Amazon FSx for Windows File ServerをTerraformで実装してみた 1 ~自己管理型ADサーバー構築編~
はじめに
こんにちは、amaebiです。
今までマネジメントコンソールからFSxを構築する際に、セキュリティグループの間違いや認証情報の誤入力などで失敗することが多々ありました。
その度に、マネジメントコンソールでポチポチしなくちゃいけないし、FSxの構築までに数十分もかかるしで手間と時間が…
そこで、この手順を可能な限り自動化したい!と思い、Amazon FSx for Windows File ServerをTerraformで実装してみることにしました。
今回は構築手順を細かな箇所までまとめましたので、本ブログ(1章と2章)をご覧いただけますと誰でも構築することが可能です!
尚、Amazon FSx for Windows File Serverを実装するにあたって、数多くの手順を踏まなくてはならないため、2部構成でお送りいたします。
本ブログでは、ADサーバー構築までを取り上げます。Amazon FSx for Windows File Serverの構築については続編をご覧ください。
完成の構成図

構成内容もシンプルなものにしました。
ADサーバーはオンプレ側を使うのか?冗長構成にするのか?など用途によって構成が変わってくるかと思います。
その都度、今回のTerraformコードをカスタマイズしていただけますと幸いです。
ADサーバー実装、構築
AWS上にADサーバー用の環境をTerraformで構築し、AWS Systems Manager Fleet Managerを利用してプライベートサブネット内のWindows Serverにログインします。
その後、Windows ServerにActive Directoryを構築していきます。

Terraform コード
実際のTerraformコードがこちらになります。
– Terraform v1.7.4
providers.tf
主にAWSと連携するための設定項目などが記述されたtfファイルです。
providers.tfは以下のコードを参照しています。

locals {
  aws_id      = "<アカウントID>"
  name_prefix = "<名前>"
  region      = "<リージョン>"
  Environment = "<環境名>"
}


terraform {
  required_version = "~> 1.7.0"
  backend "s3" {
    key            = "<S3のkey>"
    bucket         = "<バケット名>"
    region         = "<リージョン>"
  }

  required_providers {
    aws = {
      source  = "hashicorp/aws"
      version = "~> 5.0"
    }
  }
}
vpc.tf
主にAmazon VPCに関する設定項目(サブネット、ルートテーブルなど)が記述されたtfファイルです。
#--------------------------------------
# VPC
#--------------------------------------

resource "aws_vpc" "vpc" {
  cidr_block           = "10.0.0.0/16"
  instance_tenancy     = "default"
  enable_dns_support   = true
  enable_dns_hostnames = true

  tags = {
    Name = "${local.name_prefix}-vpc"
  }
}

#--------------------------------------
# Subnet
#--------------------------------------

resource "aws_subnet" "private_subnet_1a" {
  vpc_id            = aws_vpc.vpc.id
  availability_zone = "${local.region}a"

  map_public_ip_on_launch = true
  cidr_block              = cidrsubnet(aws_vpc.vpc.cidr_block, 8, 0)

  tags = {
    Name = "${local.name_prefix}-private-subnet-1a"
  }
}

#--------------------------------------
# Route table
#--------------------------------------

resource "aws_route_table" "private_rt_1a" {
  vpc_id = aws_vpc.vpc.id

  tags = {
    Name = "${local.name_prefix}-rt-private-1a"
  }
}

resource "aws_route_table_association" "private_rt_1a" {
  route_table_id = aws_route_table.private_rt_1a.id
  subnet_id      = aws_subnet.private_subnet_1a.id
}

#--------------------------------------
# VPC Endpoint
#--------------------------------------

resource "aws_vpc_endpoint" "ssm" {
  vpc_id              = aws_vpc.vpc.id
  service_name        = "com.amazonaws.${local.region}.ssm"
  vpc_endpoint_type   = "Interface"
  security_group_ids  = [aws_security_group.vpc_endpoint_sg.id]
  subnet_ids          = [aws_subnet.private_subnet_1a.id]
  private_dns_enabled = true

  tags = {
    Name = "${local.name_prefix}-ssm-endpoint"
  }
}

resource "aws_vpc_endpoint" "ssmmessages" {
  vpc_id              = aws_vpc.vpc.id
  service_name        = "com.amazonaws.${local.region}.ssmmessages"
  vpc_endpoint_type   = "Interface"
  security_group_ids  = [aws_security_group.vpc_endpoint_sg.id]
  subnet_ids          = [aws_subnet.private_subnet_1a.id]
  private_dns_enabled = true

  tags = {
    Name = "${local.name_prefix}-ssmmessages-endpoint"
  }
}

resource "aws_vpc_endpoint" "ec2messages" {
  vpc_id              = aws_vpc.vpc.id
  service_name        = "com.amazonaws.${local.region}.ec2messages"
  vpc_endpoint_type   = "Interface"
  security_group_ids  = [aws_security_group.vpc_endpoint_sg.id]
  subnet_ids          = [aws_subnet.private_subnet_1a.id]
  private_dns_enabled = true

  tags = {
    Name = "${local.name_prefix}-ec2messages-endpoint"
  }
}
sg.tf
主に全セキュリティグループの設定項目が記述されたtfファイルです。
参考:セルフマネージド Microsoft Active Directory の使用
#--------------------------------------
# Security Group : VPC Endpoint
#--------------------------------------

resource "aws_security_group" "vpc_endpoint_sg" {
  name = "${local.name_prefix}-endpoint-sg"
  vpc_id = aws_vpc.vpc.id

  ingress {
    from_port   = 443
    to_port     = 443
    protocol    = "tcp"
    cidr_blocks = [aws_vpc.vpc.cidr_block]
  }

  ingress {
    from_port   = 80
    to_port     = 80
    protocol    = "tcp"
    cidr_blocks = [aws_vpc.vpc.cidr_block]
  }

  egress {
    from_port   = 0
    to_port     = 0
    protocol    = "-1"
    cidr_blocks = ["0.0.0.0/0"]
  }

  tags = {
    Name = "${local.name_prefix}-endpoint-sg"
  }
}
#--------------------------------------
# Security Group : EC2 (Windows Server)
#--------------------------------------

resource "aws_security_group" "windows_ec2_sg" {
  name   = "${local.name_prefix}-windows-ec2-sg"
  vpc_id = aws_vpc.vpc.id

  ingress {
    from_port   = 53
    to_port     = 53
    protocol    = "tcp"
    cidr_blocks = [aws_vpc.vpc.cidr_block]
  }

  ingress {
    from_port   = 53
    to_port     = 53
    protocol    = "udp"
    cidr_blocks = [aws_vpc.vpc.cidr_block]
  }

  ingress {
    from_port   = 88
    to_port     = 88
    protocol    = "tcp"
    cidr_blocks = [aws_vpc.vpc.cidr_block]
  }

  ingress {
    from_port   = 88
    to_port     = 88
    protocol    = "udp"
    cidr_blocks = [aws_vpc.vpc.cidr_block]
  }

  ingress {
    from_port   = 389
    to_port     = 389
    protocol    = "tcp"
    cidr_blocks = [aws_vpc.vpc.cidr_block]
  }

  ingress {
    from_port   = 389
    to_port     = 389
    protocol    = "udp"
    cidr_blocks = [aws_vpc.vpc.cidr_block]
  }

  ingress {
    from_port   = 445
    to_port     = 445
    protocol    = "tcp"
    cidr_blocks = [aws_vpc.vpc.cidr_block]
  }

  ingress {
    from_port   = 445
    to_port     = 445
    protocol    = "udp"
    cidr_blocks = [aws_vpc.vpc.cidr_block]
  }

  ingress {
    from_port   = 464
    to_port     = 464
    protocol    = "tcp"
    cidr_blocks = [aws_vpc.vpc.cidr_block]
  }

  ingress {
    from_port   = 464
    to_port     = 464
    protocol    = "udp"
    cidr_blocks = [aws_vpc.vpc.cidr_block]
  }

  ingress {
    from_port   = 135
    to_port     = 135
    protocol    = "tcp"
    cidr_blocks = [aws_vpc.vpc.cidr_block]
  }

  ingress {
    from_port   = 636
    to_port     = 636
    protocol    = "tcp"
    cidr_blocks = [aws_vpc.vpc.cidr_block]
  }

  ingress {
    from_port   = 49152
    to_port     = 65535
    protocol    = "tcp"
    cidr_blocks = [aws_vpc.vpc.cidr_block]
  }

  ingress {
    from_port   = 3268
    to_port     = 3269
    protocol    = "tcp"
    cidr_blocks = [aws_vpc.vpc.cidr_block]
  }

  ingress {
    from_port   = 9389
    to_port     = 9389
    protocol    = "tcp"
    cidr_blocks = [aws_vpc.vpc.cidr_block]
  }

  ingress {
    from_port   = 123
    to_port     = 123
    protocol    = "udp"
    cidr_blocks = [aws_vpc.vpc.cidr_block]
  }

  ingress {
    from_port   = 138
    to_port     = 138
    protocol    = "udp"
    cidr_blocks = [aws_vpc.vpc.cidr_block]
  }

  ingress {
    from_port   = 443
    to_port     = 443
    protocol    = "tcp"
    cidr_blocks = [aws_vpc.vpc.cidr_block]
  }

  ingress {
    from_port   = 80
    to_port     = 80
    protocol    = "tcp"
    cidr_blocks = [aws_vpc.vpc.cidr_block]
  }

  egress {
    from_port   = 0
    to_port     = 0
    protocol    = "-1"
    cidr_blocks = ["0.0.0.0/0"]
  }

  tags = {
    Name = "${local.name_prefix}-windows-ec2-sg"
  }
}

#--------------------------------------
# Security Group : FSx for Windows File Server
#--------------------------------------

resource "aws_security_group" "fsx_windows_sg" {
  name   = "${local.name_prefix}-fsx-windows-sg"
  vpc_id = aws_vpc.vpc.id

  ingress {
    from_port       = 445
    to_port         = 445
    protocol        = "tcp"
    security_groups = [aws_security_group.windows_ec2_sg.id]
  }

  ingress {
    from_port       = 5985
    to_port         = 5985
    protocol        = "tcp"
    security_groups = [aws_security_group.windows_ec2_sg.id]
  }

  egress {
    from_port   = 0
    to_port     = 0
    protocol    = "-1"
    cidr_blocks = ["0.0.0.0/0"]
  }

  tags = {
    Name = "${local.name_prefix}-fsx-windows-sg"
  }
}
ad_ec2.tf
主にActive Directoryを実装するためのAmazon EC2に関する設定項目とAWS Systems Managerを利用するための設定項目が記述されたtfファイルです。
※AWS内にあるキーペアを使用するため、事前に作成しておいてください。キーペア名はaws_key_pair.key_pair.key_name内に記述してください。
#--------------------------------------
# IAM Role
#--------------------------------------

resource "aws_iam_instance_profile" "ssm_profile" {
  name = aws_iam_role.ssm_role.name
  role = aws_iam_role.ssm_role.name
}

resource "aws_iam_role" "ssm_role" {
  name               = "${local.name_prefix}-ssm-role"
  assume_role_policy = data.aws_iam_policy_document.assume_role.json
}

data "aws_iam_policy_document" "assume_role" {
  statement {
    actions = ["sts:AssumeRole"]

    principals {
      type        = "Service"
      identifiers = ["ec2.amazonaws.com"]
    }
  }
}

resource "aws_iam_role_policy_attachment" "ssm_managed_instance_core" {
  role       = aws_iam_role.ssm_role.name
  policy_arn = "arn:aws:iam::aws:policy/AmazonSSMManagedInstanceCore"
}

#--------------------------------------
# AMI : Windows Server 2022 Base
#--------------------------------------

data "aws_ami" "windows_server_2022" {
  most_recent = true
  owners      = ["amazon"]

  filter {
    name   = "name"
    values = ["Windows_Server-2022-English-Full-Base*"]
  }
}

#--------------------------------------
# key_pair
#--------------------------------------

data "aws_key_pair" "key_pair" {
  key_name           = "[所有しているキーペア名]"
  include_public_key = true
}

#--------------------------------------
# EC2 (AD Server)
#--------------------------------------

resource "aws_instance" "ad_ec2" {
  ami           = data.aws_ami.windows_server_2022.id
  instance_type = "t3.medium"
  subnet_id     = aws_subnet.private_subnet_1a.id

  vpc_security_group_ids      = [aws_security_group.windows_ec2_sg.id]
  associate_public_ip_address = false

  iam_instance_profile = aws_iam_instance_profile.ssm_profile.name

  key_name = data.aws_key_pair.key_pair.key_name

  root_block_device {
    volume_size           = 30
    volume_type           = "gp3"
    iops                  = 3000
    throughput            = 125
    delete_on_termination = true

    tags = {
      Name = "${local.name_prefix}-ad-ebs"
    }
  }

  tags = {
    Name = "${local.name_prefix}-ad-server"
  }
}
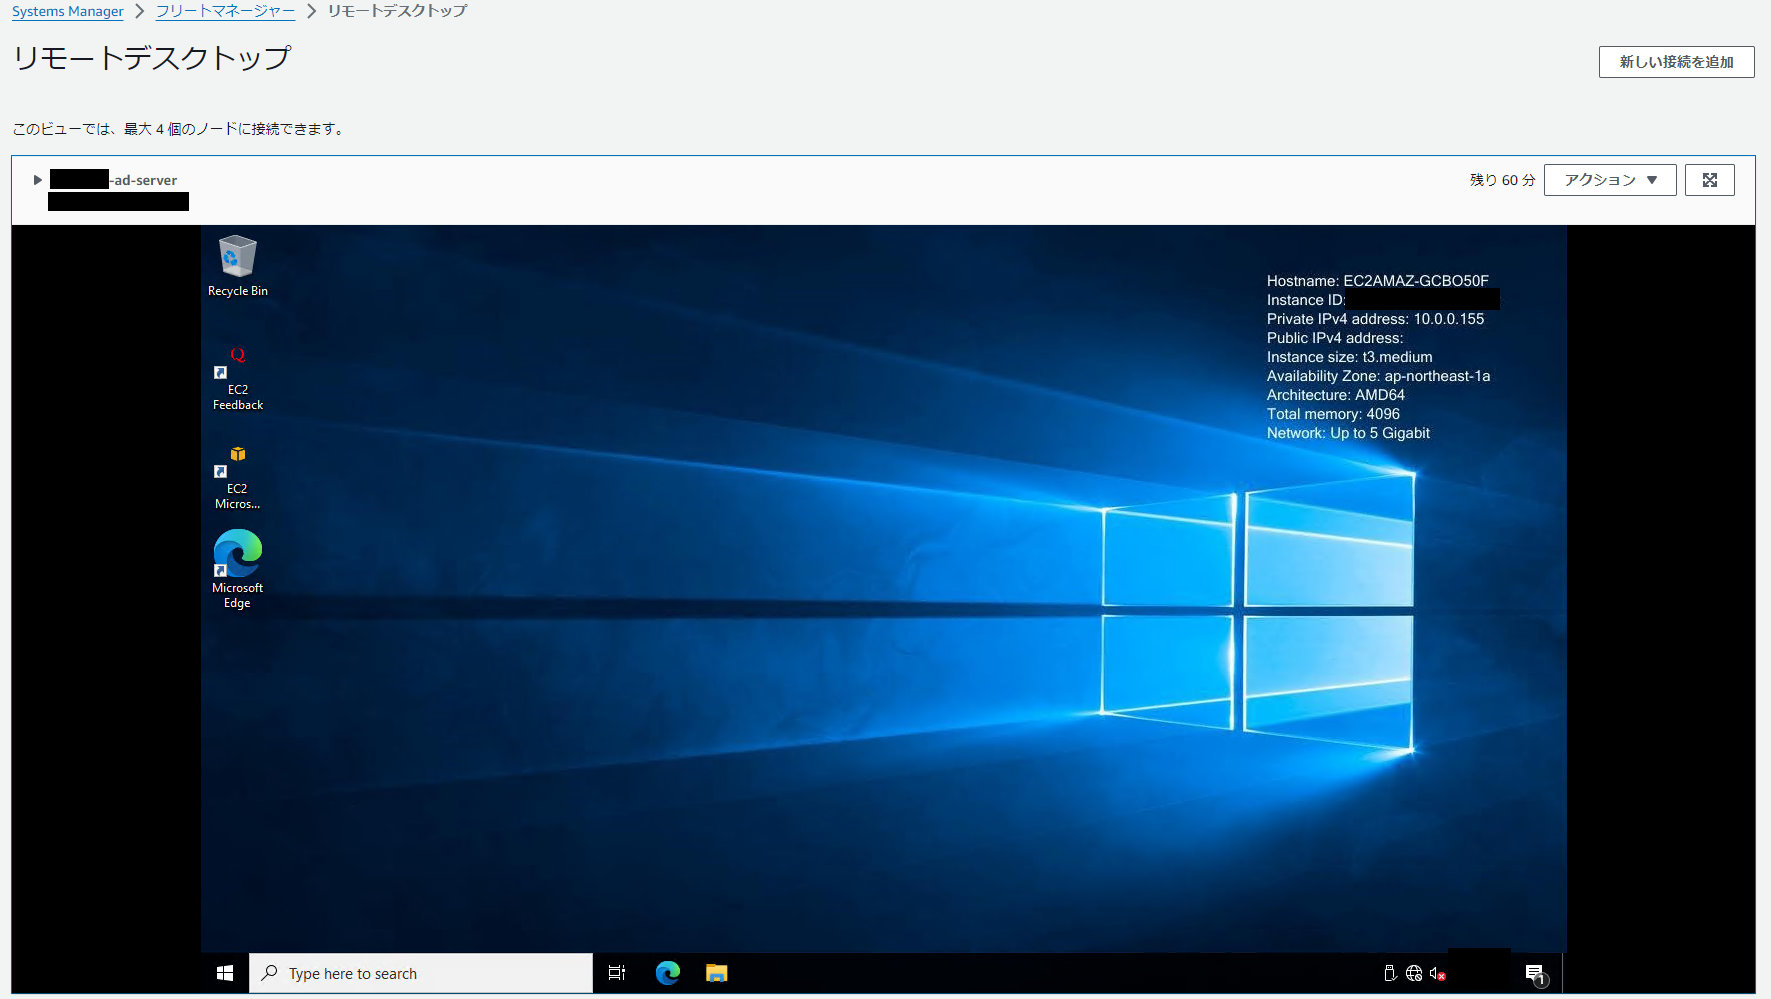
ADサーバーにログイン
先述のTerraformコードを利用して作成したADサーバーにAWS Systems Manager Fleet Managerを利用してログインしていきます。
参考:Remote Desktop を使用して Windows Server マネージドインスタンスに接続する #リモートデスクトップを使用してマネージドノードへ接続する
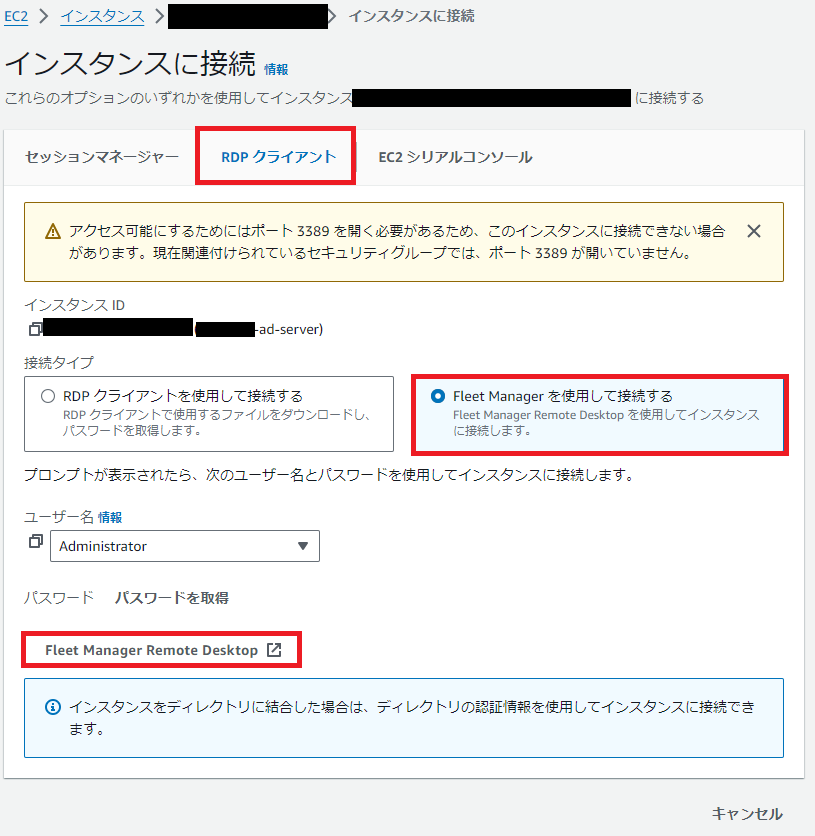
マネジメントコンソール > EC2 > インスタンス から対象のEC2インスタンスを選択し、上記の接続をクリックします。

“RDP クライアント”タブから、「Fleet Managerをを使用して接続する」を選択します。
その後、Fleet Manager Remote Desktop をクリックし、AWS Systems Manager Fleet Managerのコンソール画面に遷移します。
キーペアを使用して、ログインしていきます。
管理者名”Administrator”、キーペア”Terraformで指定したキーペアの秘密鍵”を指定します。
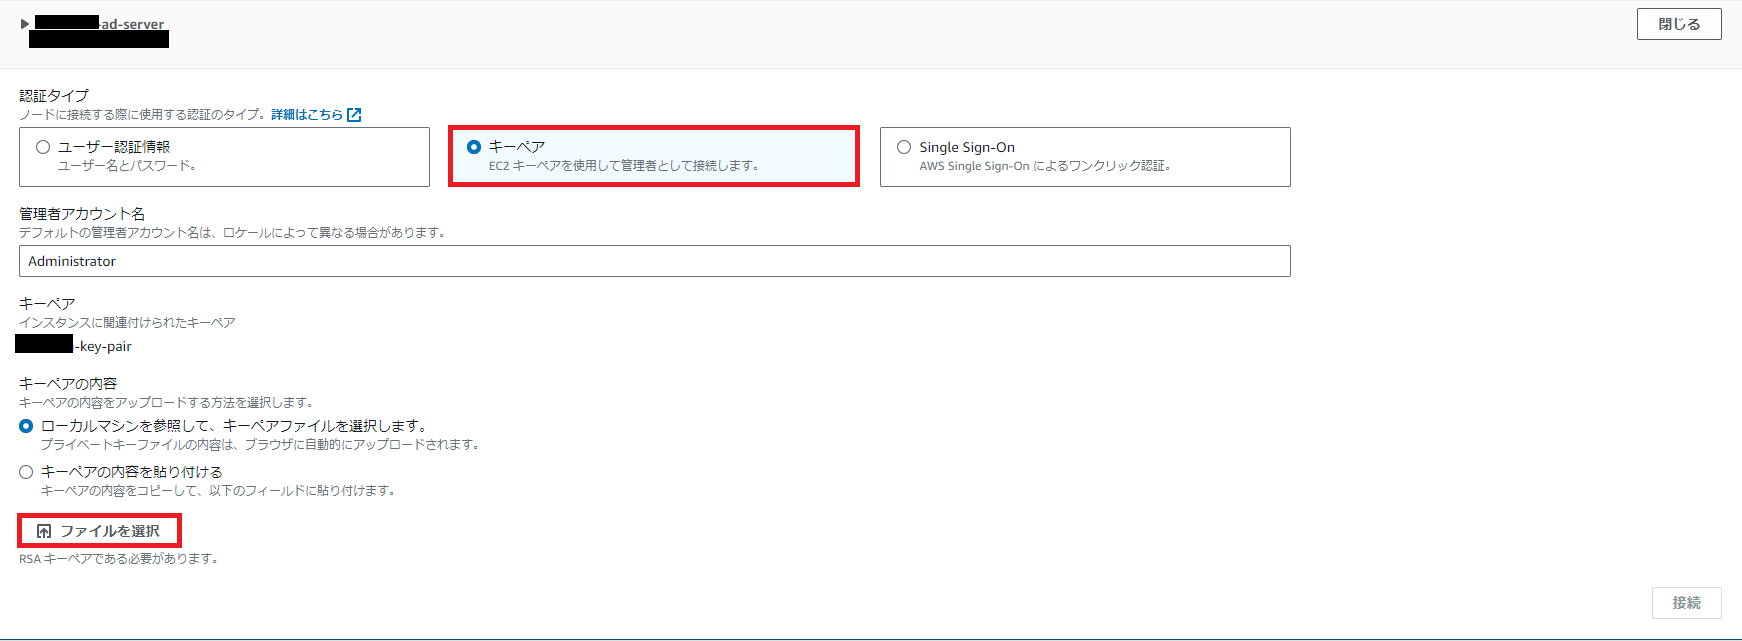
秘密鍵を指定した後、接続をクリックしてログインします。

無事ADサーバーにログインすることができました。
Active Directoryインストール
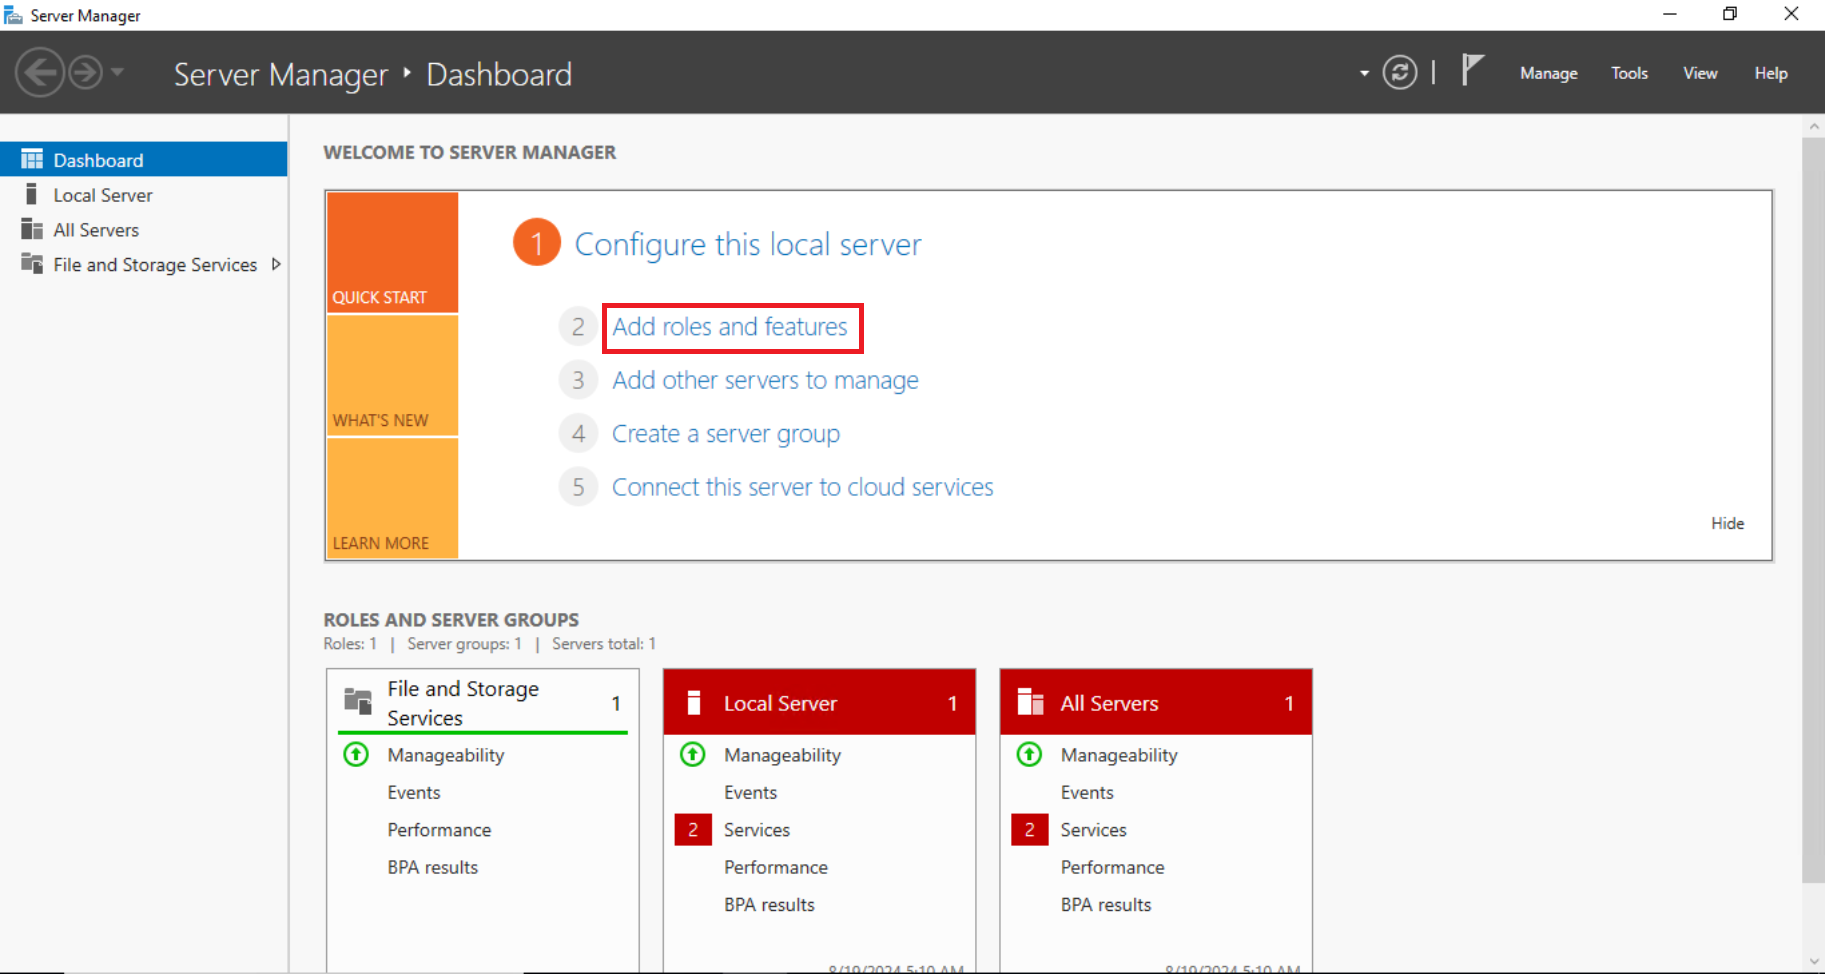
対象インスタンスにログイン後、Server Managerを立ち上げます。
Add roles and features(役割と機能の追加)をクリックします。
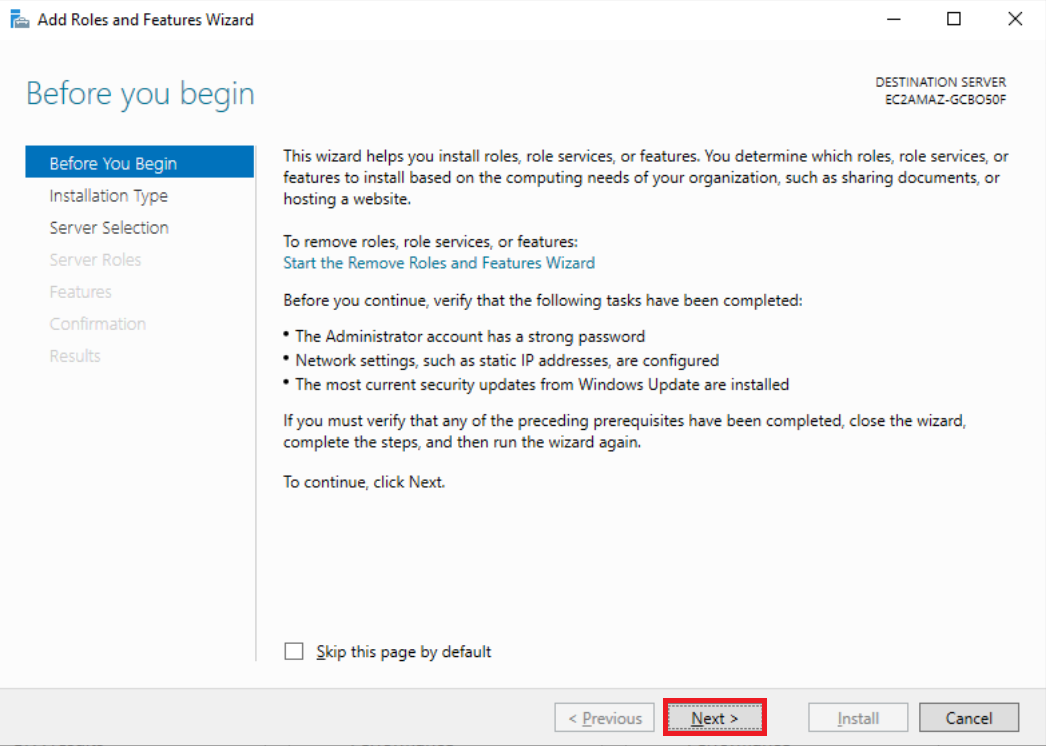
何もせずそのままNextをクリックします。
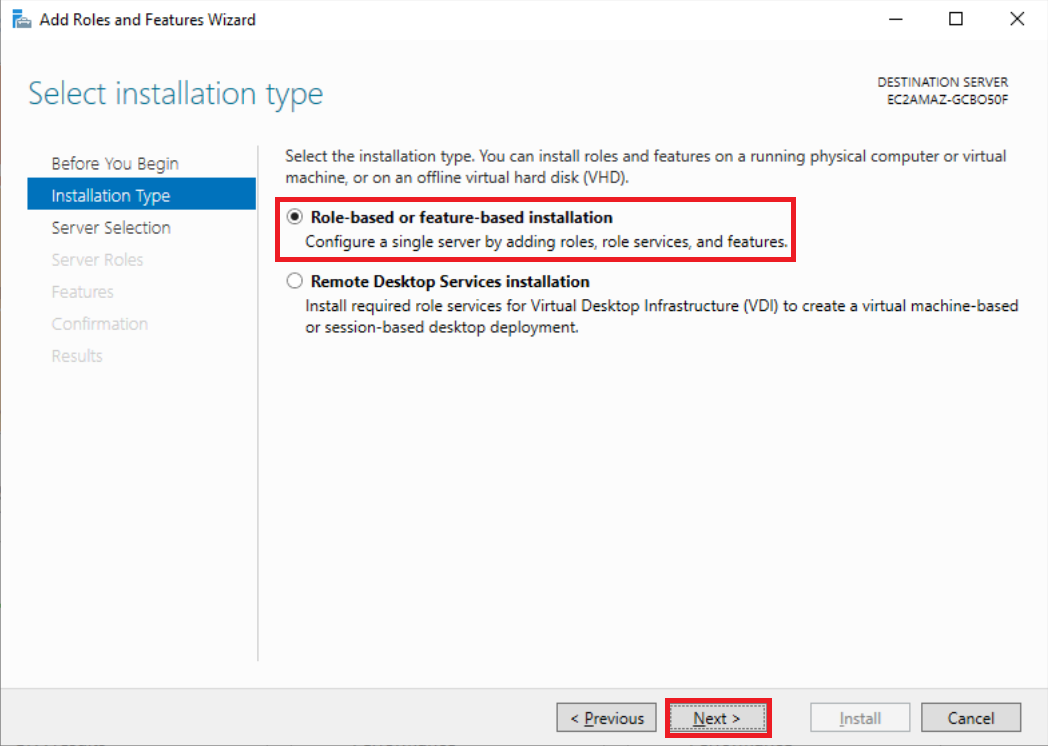
Role-based or feature-based installation(役割ベースまたは機能ベースのインストール)が選択されている状態でNextをクリックします。
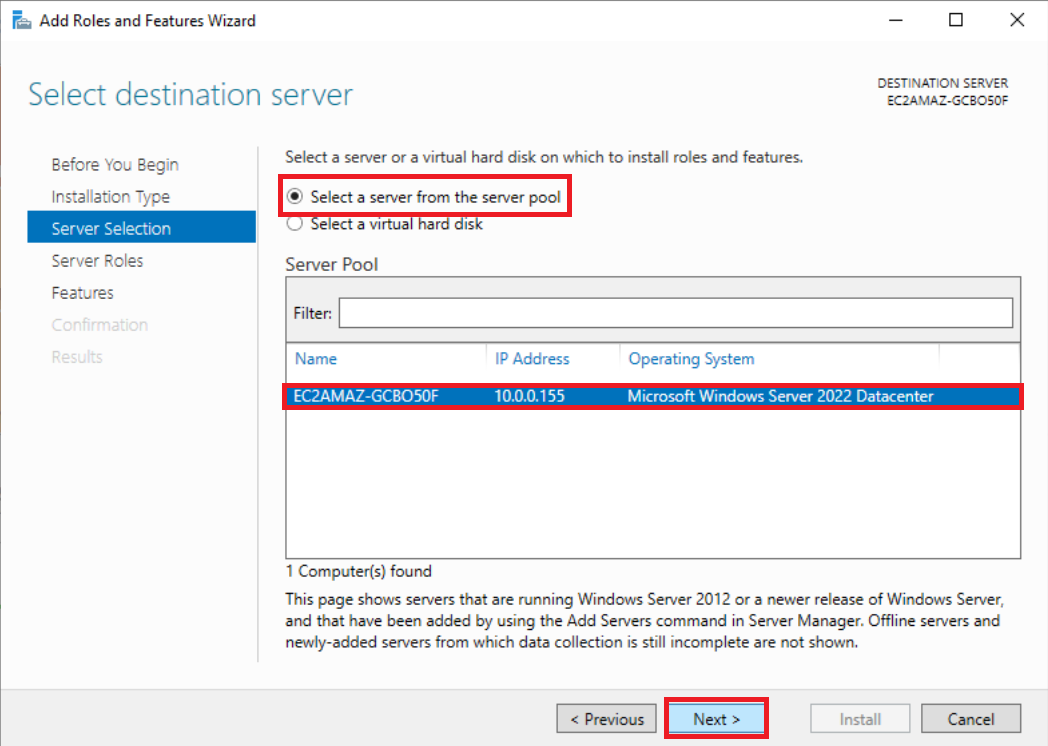
自身のサーバーが選択されていることを確認したら、Nextをクリックします。
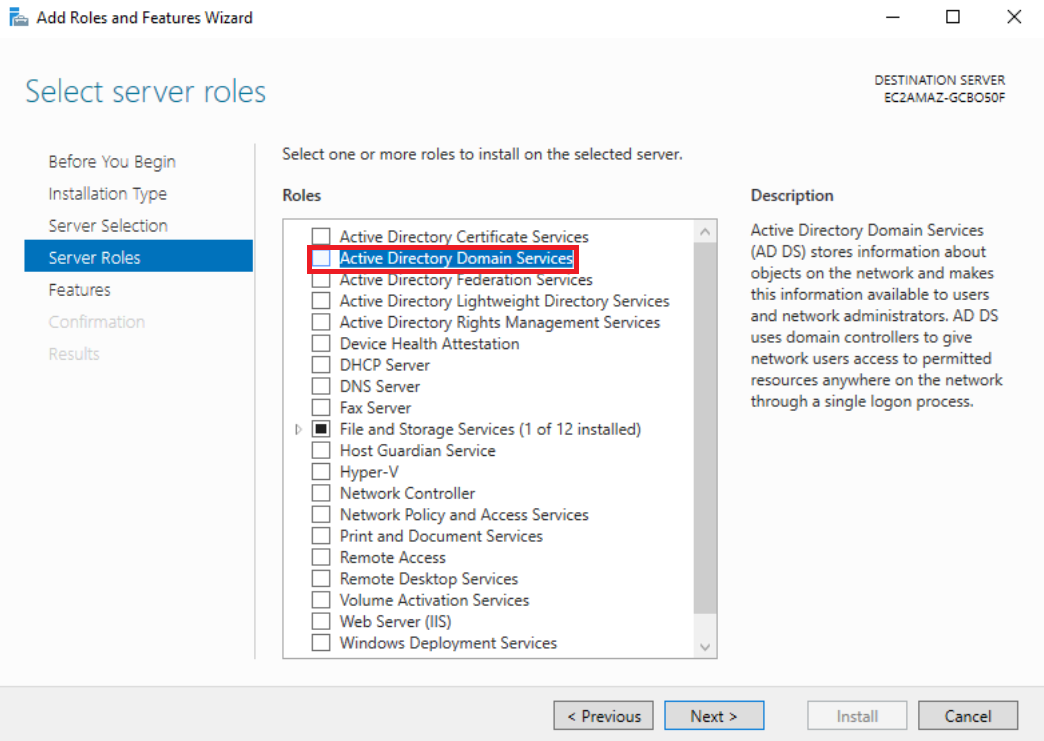
Active Directory Domain Servicesを選択後、Add Roles and Features Wizard(役割と機能の追加ウィザード)の画面に遷移します。
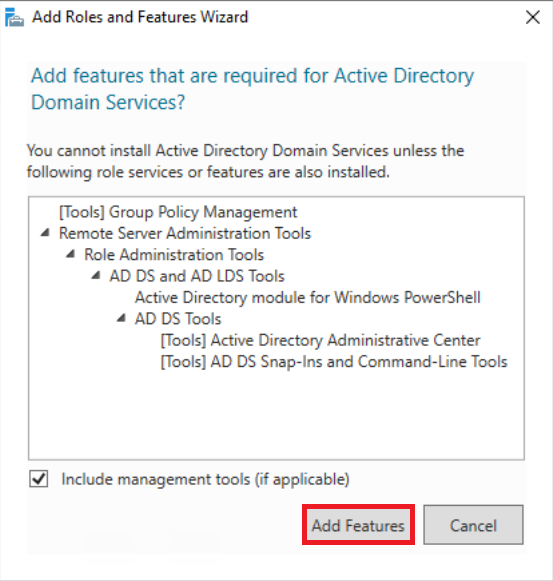
追加される機能を確認後、Add Features(機能の追加)をクリックします。
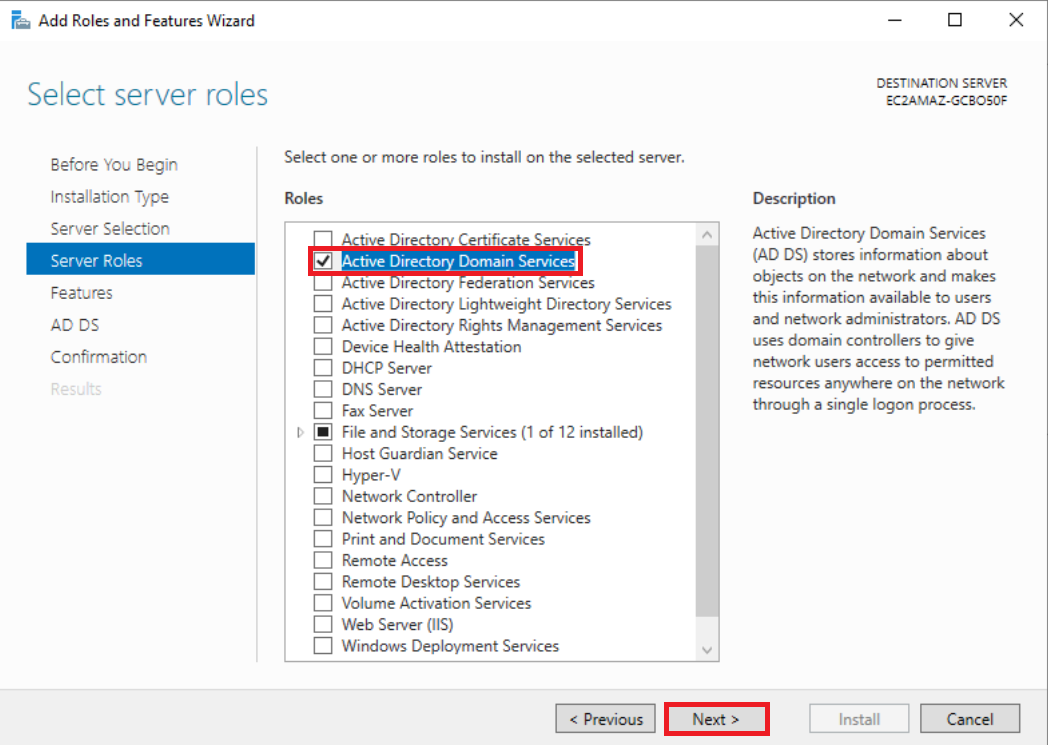
Active Directory Domain Servicesのチェックボックスにチェックされていることを確認したら、Nextをクリックします。
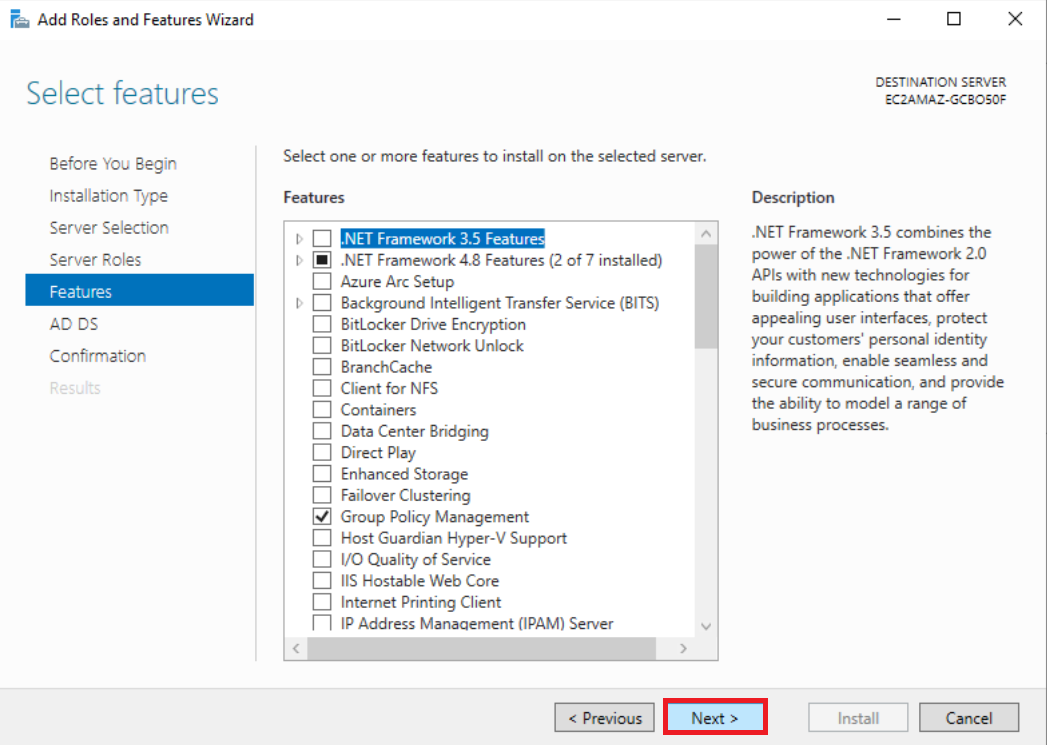
特に追加する機能はないため、そのままNextをクリックします。
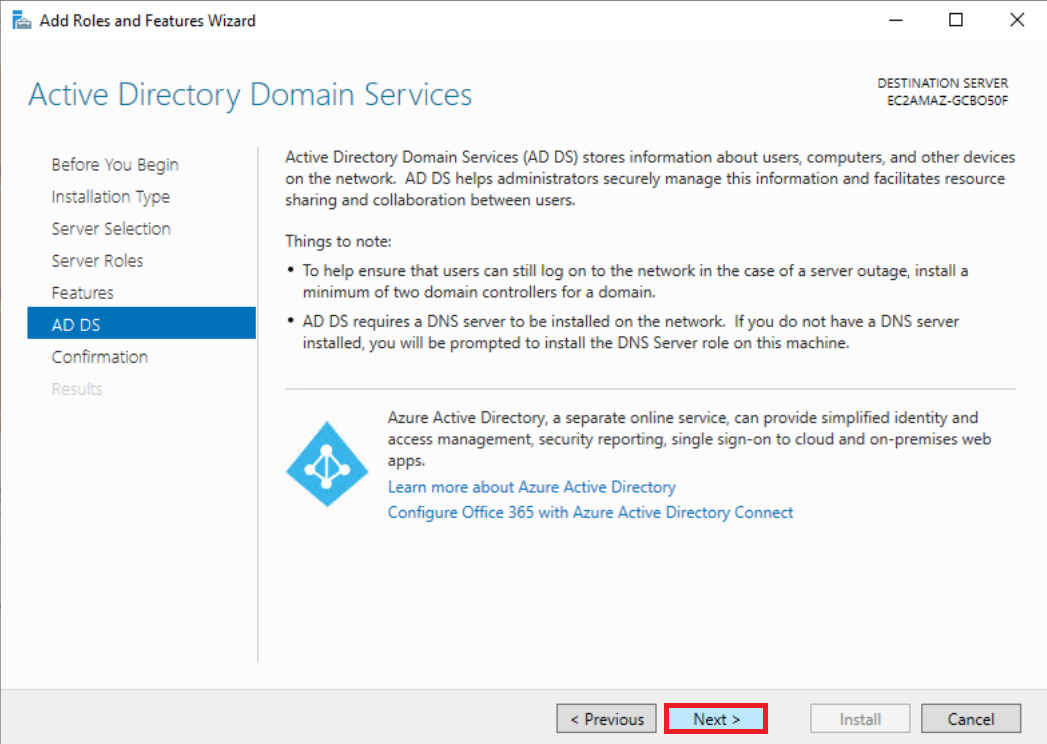
Active Directory Domain Services に関する注意事項が出来てきます。そのまま、Nextをクリックします。
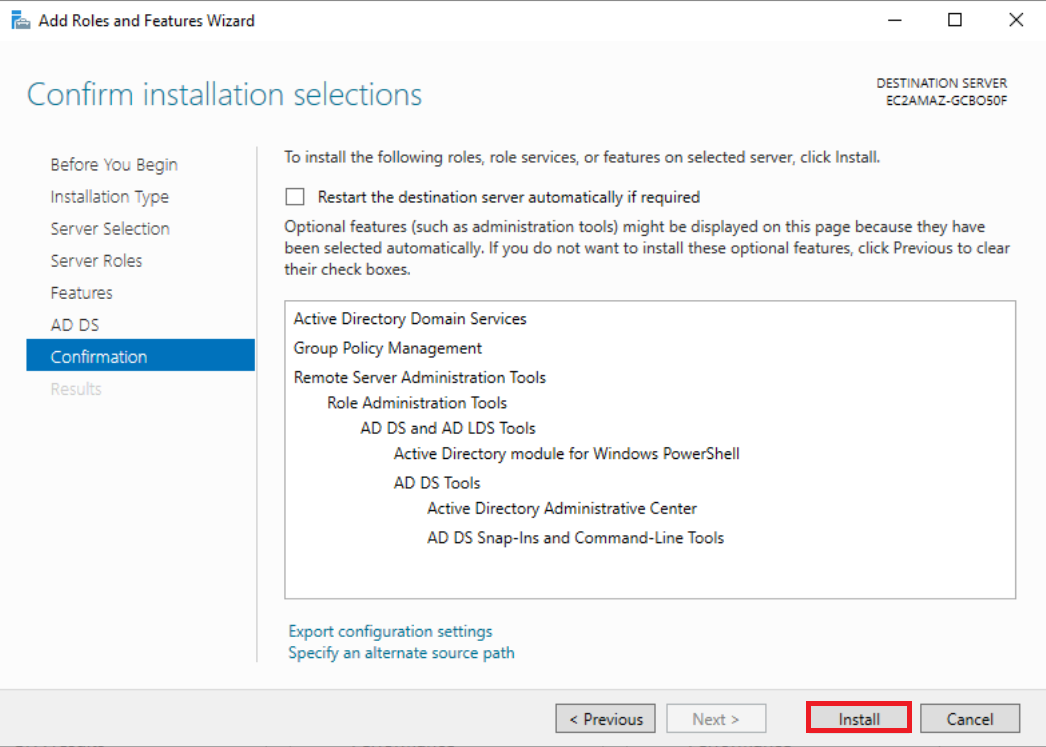
上記の設定内容を確認後、間違っていなければInstallをクリックしてインストールを行います。
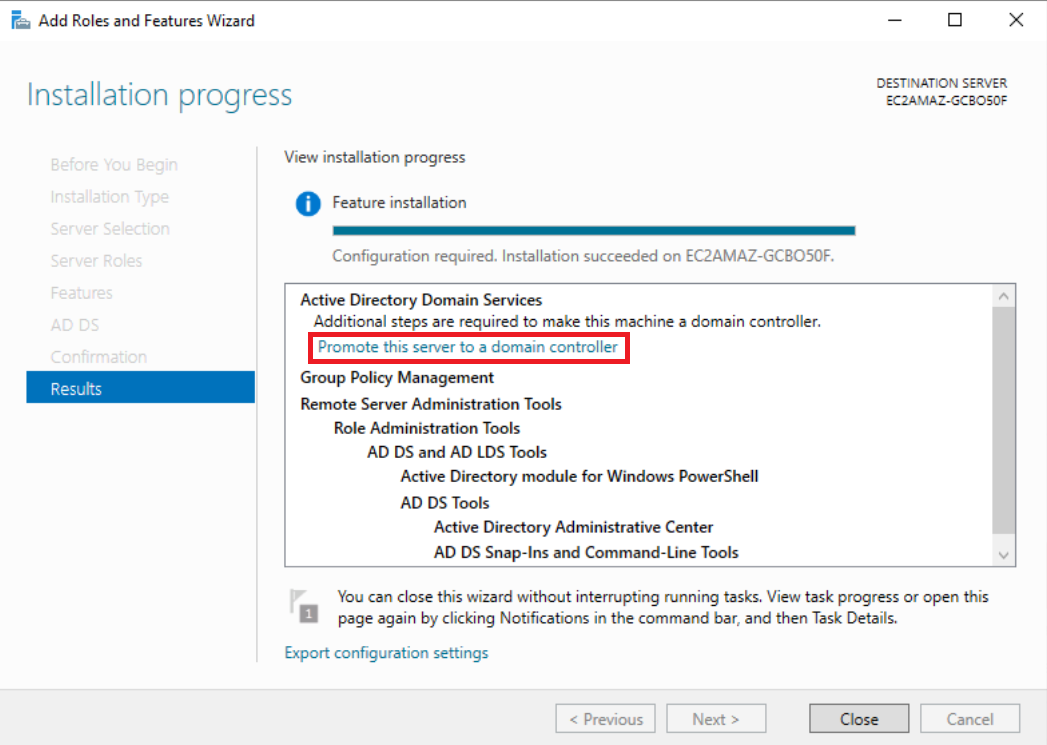
Active Directory構成
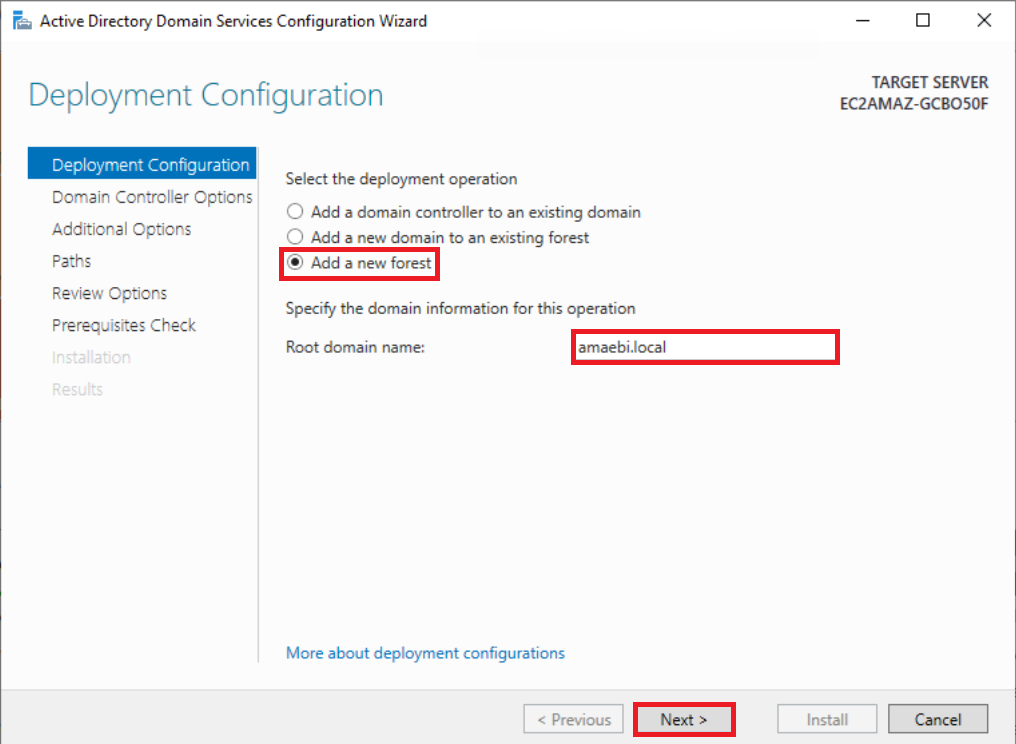
インストール完了後、Active Directoryの構成を行うため、Promote this server to a domain controller(このサーバーをドメイン コントローラーに昇格する)をクリックします。
Add a new forest(新しいフォレストを追加する)を選択し、任意のルートドメイン名を入力した後、Nextをクリックします。(ルートドメイン名は必ずメモ書きしておきます。)
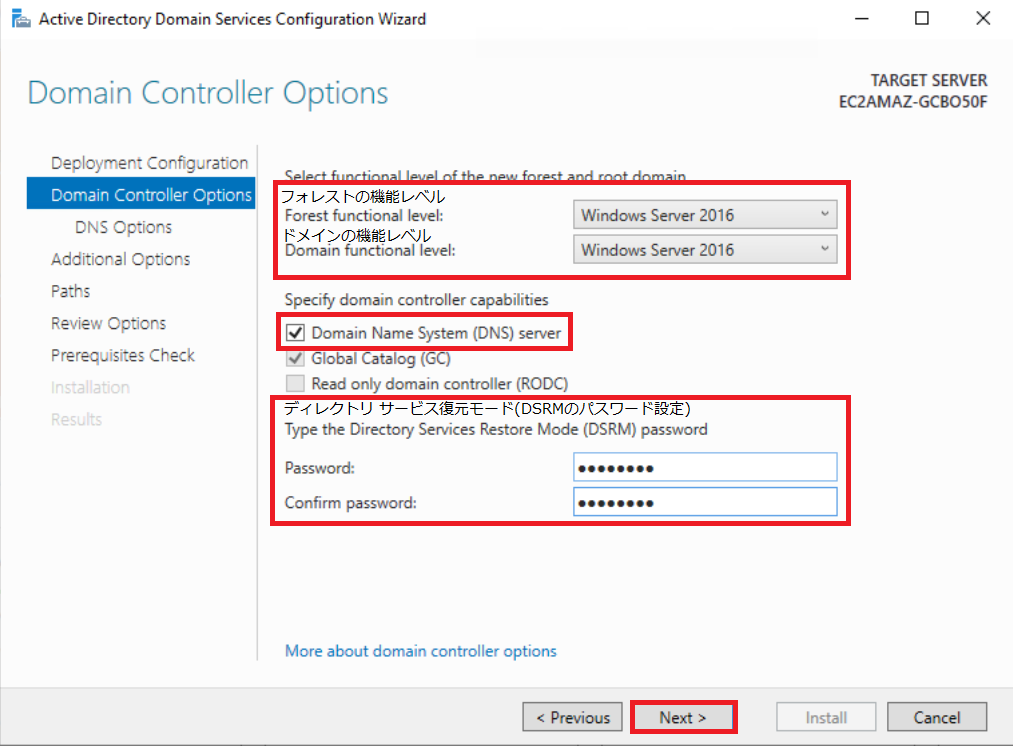
ドメインコントローラーオプションは以下のように設定します。
その後、ディレクトリサービス復元モード(DSRM)用のパスワードを入力して、Nextをクリックします。(DSRM用のパスワードも必ずメモ書きしておきます。)
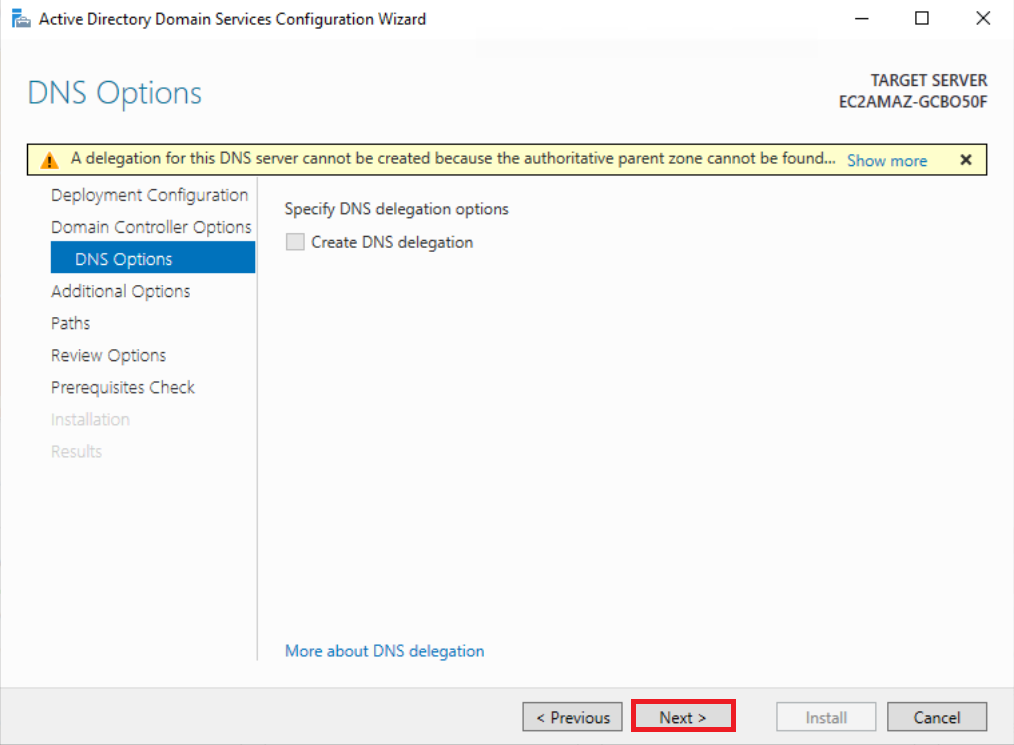
DNSサービスをインストールしていないため、設定する項目はありません。
何も設定せずにNextをクリックします。
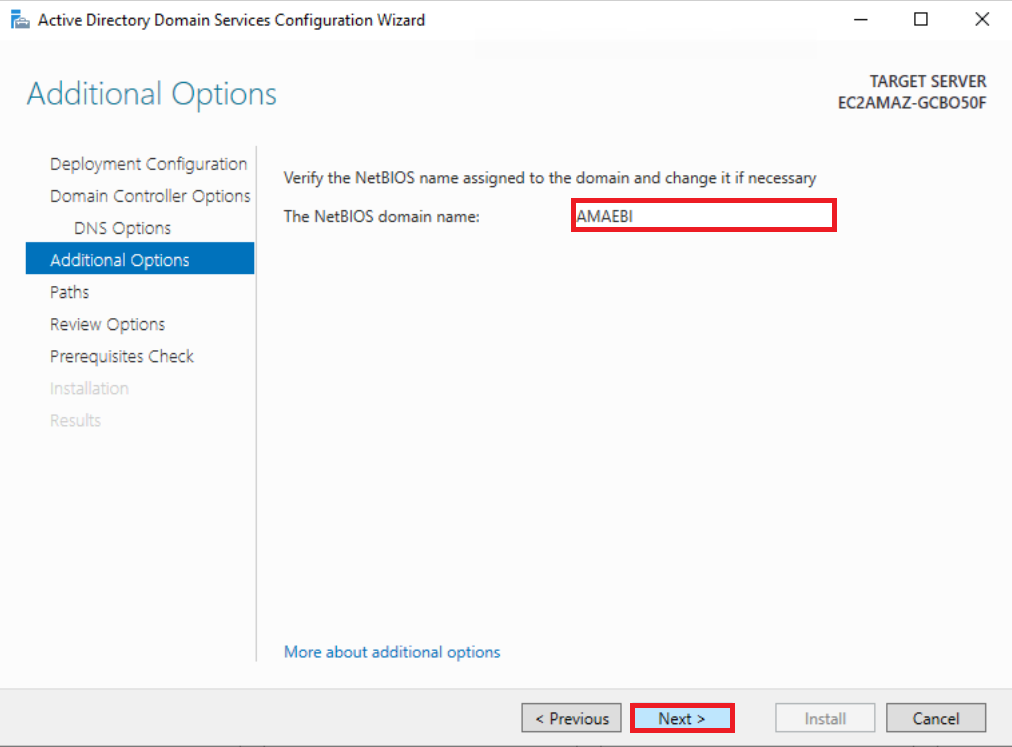
任意で入力した又は自動的に入力されたNetBIOS名を必ずメモ書きし、Nextをクリックします。
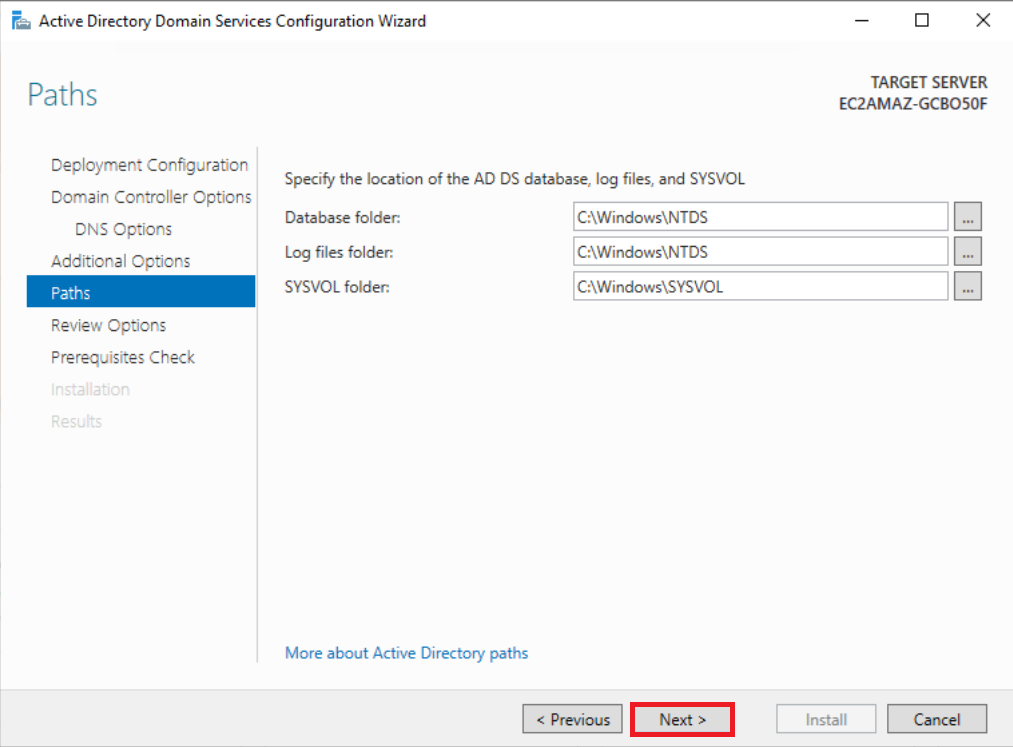
デフォルトのパスのままNextをクリックします。
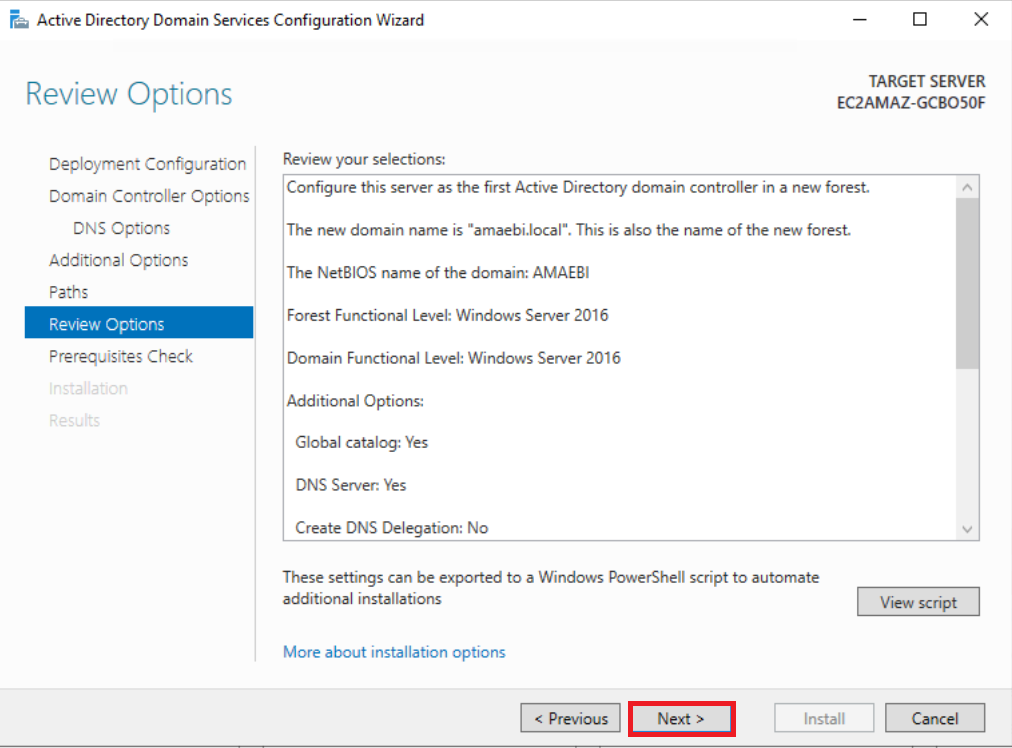
設定したオプションを確認後、Nextをクリックします。
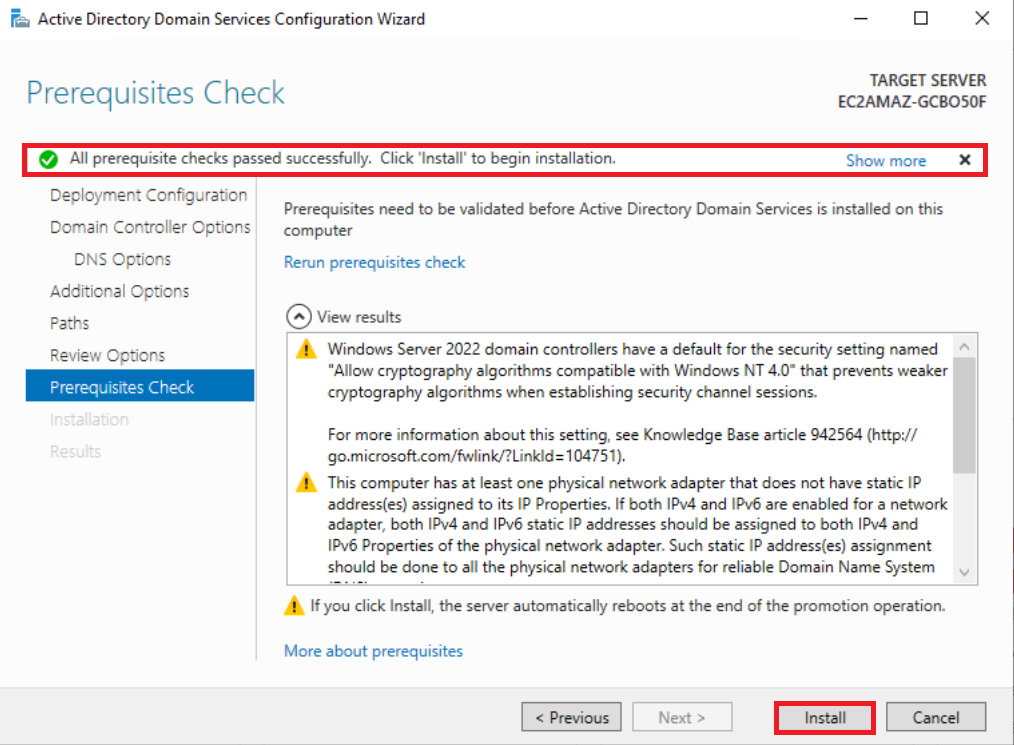
全ての前提条件にクリアしたことを確認したら、Installをクリックします。
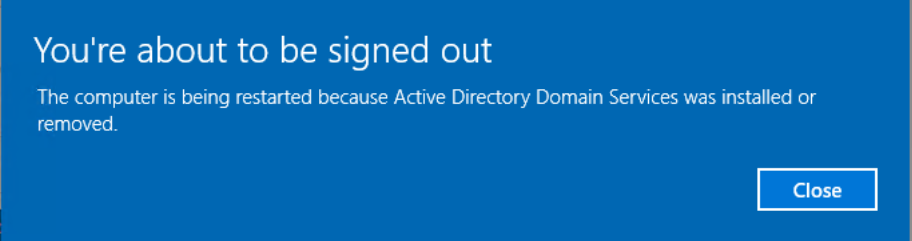
インストールが完了後、自動的に再起動が走ります。
再起動後、再びFleet Managerを使用してADサーバーにログインします。
登録したドメイン名からADサーバーのIPアドレスが確認できるかコマンドプロンプトを使用してテストします。
C:\Users\Administrator>nslookup amaebi.local
Server:  localhost
Address:  ::1

Name:    amaebi.local
Address:  10.0.0.155


C:\Users\Administrator>
無事確認できました。
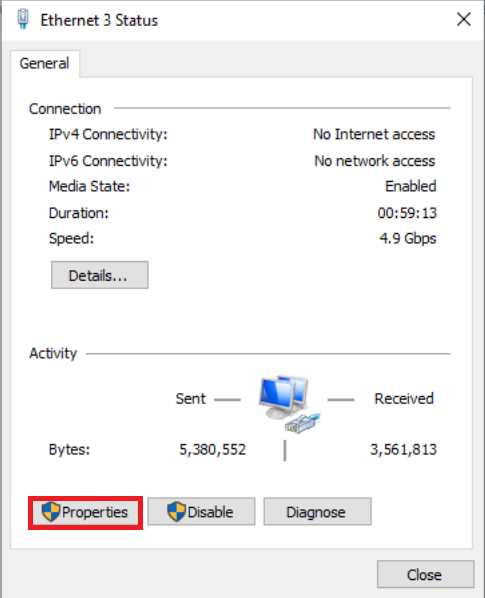
もし、IPアドレスが確認できない場合は、タスクバーの検索ボックスからncpa.cplと検索し、実行します。
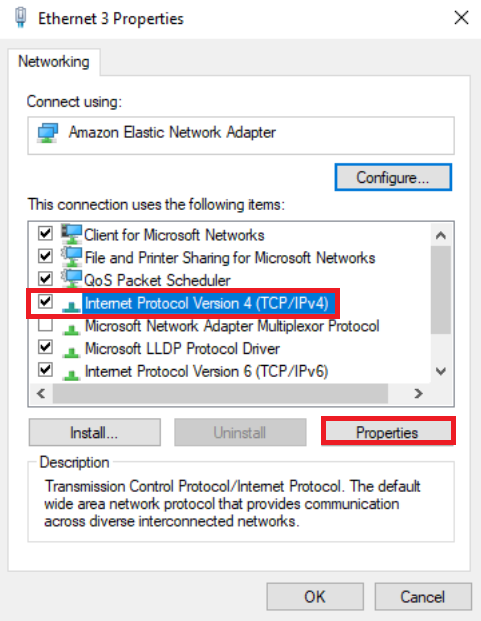
該当のネットワークアダプターからプロパティを開き、Internet Protocol Version 4(TPC/IPv4)を選択し、プロパティをクリックします。
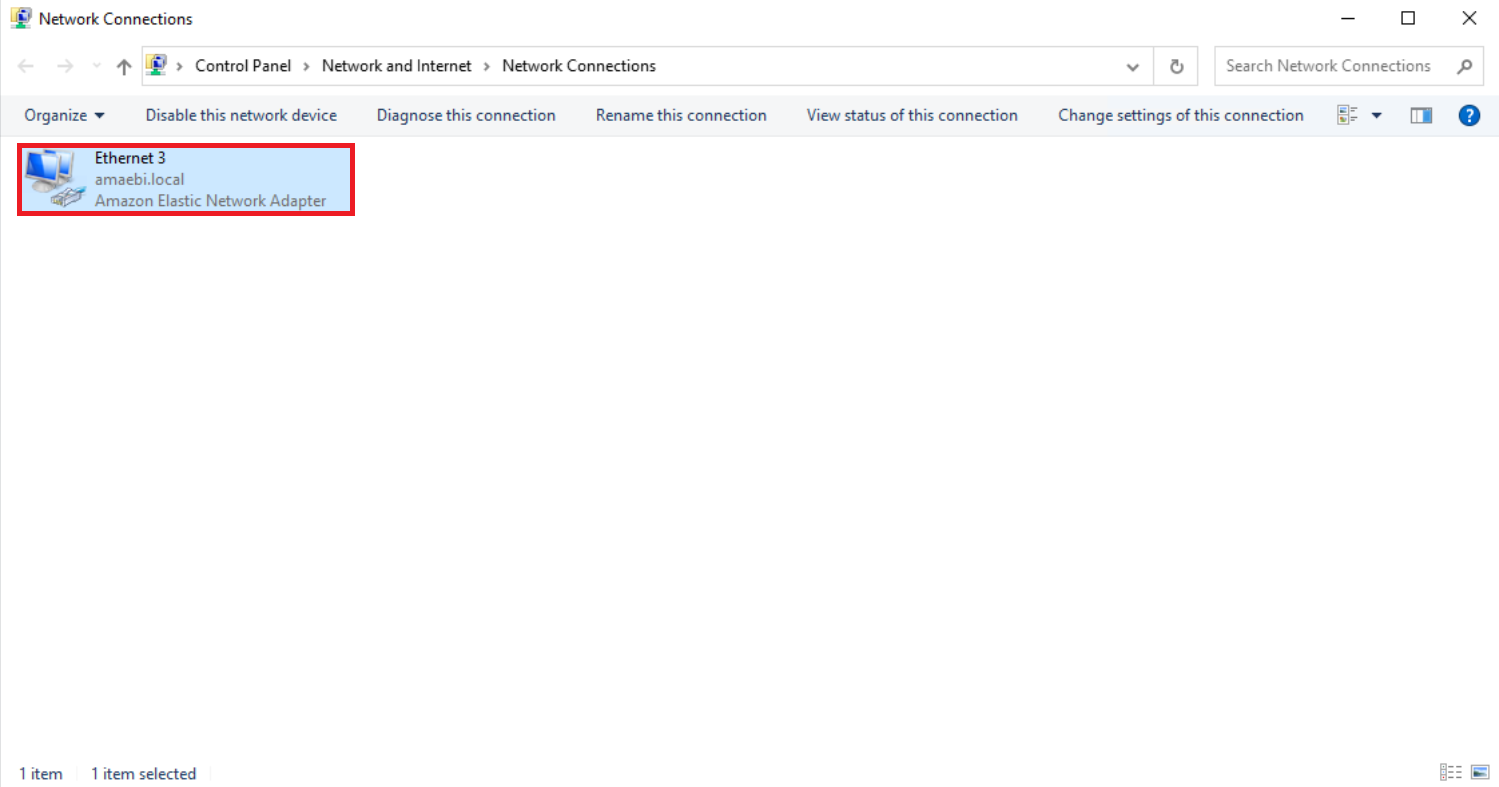
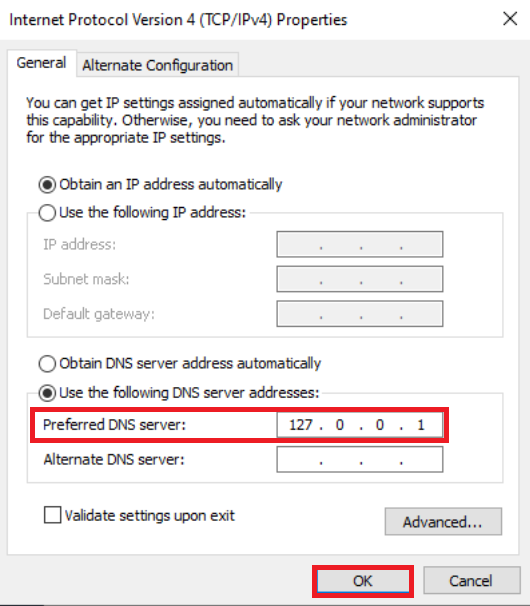
優先DNSサーバー内にループバックアドレス又は自身のプライベートIPv4アドレスを設定し、OKを押します。
以上でActive Directory構成は完了です。
おわりに
今回は自己管理型ADサーバーの構築までを行いました。
次回のブログでは、いよいよAmazon FSx for Windows File Serverの構築、動作テストを行っていきますので、良ければこちらも見ていただけますと幸いです。

amaebiと申します。クラウドエンジニアとしてまだまだ未熟ですが、これから精進していきたいです。


Recommends
こちらもおすすめ
-
AWS CodePipelineでTerraformパイプラインを実装する
2024.3.28
Special Topics
注目記事はこちら

データ分析入門
これから始めるBigQuery基礎知識
2024.02.28

AWSの料金が 10 %割引になる!
『AWSの請求代行リセールサービス』
2024.07.16