「AWS Hands-on for Beginners Network 編#3」を参考にクライアント VPN を Terraform で実装してみた
2022.2.8

Topics
はじめに
はじめまして。CloudLead チームの Cold-Airflow です。
タイトルにあるように、 AWS が公開している AWS Hands-on for Beginners の「Network 編#3 クライアント VPN をつかって、リモート接続環境を構築しよう」を Terraform を使ってデプロイしてみた内容となっております。
AWS Hands-on for Beginners とは?
AWS が様々なアーキテクチャーの構成を動画で解説してくれているので、それにそって実際に手を動かしながら AWS サービスについて学べるコンテンツです。
実際に手を動かして学ぶ!AWS Hands-on for Beginners のご紹介 | Amazon Web Services ブログ
今回使用するクライアント VPN のハンズオン以外にも AWS の基礎からサーバレスや IaC などと盛りだくさんのコンテンツです。
ほかのハンズオンにご興味がある方は下記のリンクからご覧ください。
ハンズオン資料 | AWS クラウドサービス活用資料集
今回は数あるコンテンツの中からクライアント VPN を使ったハンズオンをもとに構築を行いたいと思います。
リモート環境からソフトウェア VPN 接続を使って、VPC 内へのリソースへアクセスする方法を学ぶことが可能です。
AWS Hands-on for Beginners Network 編#3 クライアント VPN をつかって、リモート接続環境を構築しよう | AWS Webinar
クライアント VPN や AWS についてあまり知らない方は先に上記ハンズオンの動画を見たあとで本記事をご覧いただくほうがより理解をしやすいと思います。
ある程度クライアント VPN や AWS について理解しているので手を動かして構築をしたいという方は下記の workshop studio を御覧ください。
AWS Client VPN Basic workshop (Japanese)
本記事のゴールと前提条件
ゴール
- リモート環境から、ソフトウェア VPN 接続を使って、VPC 内へのリソースへアクセスする⽅法を学ぶ
前提条件
Terraform のバージョンは下記のとおりです。
C:\Users\ClientVPN>terraform --version
Terraform v1.0.5
on windows_amd64
+ provider registry.terraform.io/hashicorp/aws v3.74.0
注意点
説明しないこと
- Terraform のインストール手順
- 作成する AWS リソースの説明
ハンズオンとの差分
本記事の実装についてですが、ハンズオンの構成図と一部差異があります。
- サブネット構成
- CloudWatch の監視未実装
ハンズオンではクライアント VPN 用のサブネットを作成しておりましたが、専用のサブネット作成は行わないです。
監視も同様に不要なため実装しておりません。
Terraform 構築
作成するリソースは下記のとおりです。
- EC2
- VPC
- VPN クライアントエンドポイント
ハンズオンと同じ順番で作成します。
コードは関係するところを抜粋して説明しています。
全体をご覧になりたい方はコード全体に飛んでください。
AWS Client VPN の全体像
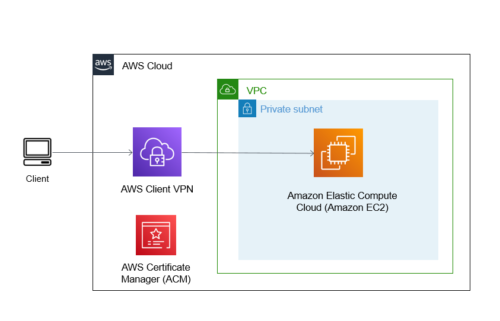
- 利用者は、VPN 接続アプリケーションをインストールしたデバイスを利用して、自宅や出先/社内からクライアント VPN エンドポイントに接続します。
- エンドポイントへの接続の際に、証明書を利用した相互認証を使用します。
VPC と EC2 の作成
クライアント VPN エンドポイントはあとで作成します。
まずは、EC2 と VPC を作成します。
VPC 構築
サブネットを一つ持った VPC を作成します。
resource "aws_vpc" "vpc" {
  cidr_block           = "10.0.0.0/16"
  enable_dns_hostnames = true
}
resource "aws_subnet" "subnet1" {
  vpc_id            = aws_vpc.vpc.id
  cidr_block        = "10.0.1.0/24"
  availability_zone = var.az1
}
EC2 構築
疎通確認(ICMP)をするのでセキュリティグループでそれを許可してます。
EC2 はお好きな AMI をご選択ください。
resource "aws_instance" "test" {
  ami                    = data.aws_ami.amazon_linux.id
  instance_type          = "t3.micro"
  vpc_security_group_ids = [aws_security_group.ping.id]
  subnet_id              = aws_subnet.subnet1.id
  lifecycle {
    ignore_changes = [
      "ami"
    ]
  }
}


resource "aws_security_group" "ping" {
  name        = "ping"
  description = "client vpn ping"
  vpc_id      = aws_vpc.vpc.id
}

resource "aws_security_group_rule" "allow_ping" {
  type              = "ingress"
  from_port         = -1
  to_port           = -1
  protocol          = "icmp"
  cidr_blocks       = ["10.0.1.0/24"]
  security_group_id = aws_security_group.ping.id
}

resource "aws_security_group_rule" "egress" {
  type              = "egress"
  from_port         = 0
  to_port           = 0
  protocol          = "-1"
  cidr_blocks       = ["0.0.0.0/0"]
  security_group_id = aws_security_group.ping.id
}
VPC と EC2 を apply
先に VPC と EC2 を作成するので apply します。
実行結果を一部だけ抜粋してます。
C:\Users\ClientVPN>terraform apply

Terraform used the selected providers to generate the following execution plan. Resource actions
are indicated with the following symbols:
  + create

Terraform will perform the following actions:

  # aws_instance.test will be created
  + resource "aws_instance" "test" {
      + ami                                  = "ami-01893222c83843146"
      + arn                                  = (known after apply)
      + associate_public_ip_address          = (known after apply)
      + availability_zone                    = (known after apply)
      + cpu_core_count                       = (known after apply)
      + cpu_threads_per_core                 = (known after apply)
      + disable_api_termination              = (known after apply)
      + ebs_optimized                        = (known after apply)
      + get_password_data                    = false
      + host_id                              = (known after apply)
      + id
aws_vpc.vpc: Creating...
aws_vpc.vpc: Still creating... [10s elapsed]
aws_vpc.vpc: Still creating... [20s elapsed]
aws_vpc.vpc: Creation complete after 21s [id=vpc-0725f7df5dc24b5d6]
aws_subnet.subnet1: Creating...
aws_security_group.ping: Creating...
aws_subnet.subnet1: Creation complete after 3s [id=subnet-0126cee2d781db425]
aws_security_group.ping: Creation complete after 9s [id=sg-0fcc570034b1f95b8]
aws_security_group_rule.allow_ping: Creating...
aws_security_group_rule.egress: Creating...
aws_instance.test: Creating...
aws_security_group_rule.egress: Creation complete after 3s [id=sgrule-569939722]
aws_security_group_rule.allow_ping: Creation complete after 6s [id=sgrule-1164125875]
aws_instance.test: Still creating... [10s elapsed]
aws_instance.test: Still creating... [20s elapsed]
aws_instance.test: Creation complete after 21s [id=i-009e68c6b5fdf4a9e]

Apply complete! Resources: 6 added, 0 changed, 0 destroyed.
作成が完了しましたので、次は証明書の作成に移ります。
証明書の作成
今回は、相互認証 (証明書ベース)を用いて設定を行います。
そのため、AWS CloudShell を利用して証明書を発行後 ACM に証明書をインポートまでを行います。
↓ 下記手順を参考
Authentication – AWS クライアント VPN
注意点:はじめにsudo yum install -y opensslしないとモジュールがなくて失敗します。
実行後、下記ファイルをダウンロードする。(もしくは内容コピー)
- ~/custom_folder/client1.domain.tld.key
- ~/custom_folder/client1.domain.tld.crt
入力コマンド一覧
sudo yum install -y openssl
git clone https://github.com/OpenVPN/easy-rsa.git
cd easy-rsa/easyrsa3
./easyrsa init-pki
./easyrsa build-ca nopass
./easyrsa build-server-full server nopass
./easyrsa build-client-full client1.domain.tld nopass
mkdir ~/custom_folder/
cp pki/ca.crt ~/custom_folder/
cp pki/issued/server.crt ~/custom_folder/
cp pki/private/server.key ~/custom_folder/
cp pki/issued/client1.domain.tld.crt ~/custom_folder
cp pki/private/client1.domain.tld.key ~/custom_folder/
cd ~/custom_folder/
aws acm import-certificate --certificate fileb://server.crt --private-key fileb://server.key --certificate-chain fileb://ca.crt
aws acm import-certificate --certificate fileb://client1.domain.tld.crt --private-key fileb://client1.domain.tld.key --certificate-chain fileb://ca.crt
クライアント VPN エンドポイントの作成
ACM にインポートした サーバとクライアントの ARN をコピーしておきます。
Terraform の クライアント VPN のポイント
- client_cidr_block でクライアントの CIDR を VPC と重複しないようにする
- 今回は
100.64.0.0/22を指定
- 今回は
- 証明書 ARN 指定する際に、逆にしないようにする
- サーバ:server_certificate_arn
- クライアント:root_certificate_chain_arn
- split_tunnel を有効にする(詳細は下記をご覧ください)
- aws_ec2_client_vpn_route の destination_cidr_block で通信対象の CIDR を追加する
- 関連付けした VPC はデフォルトでつけられるのでいらないです。(定義すると AWS 側が作成するのとで二重に作成することになるためエラーになります)
- Terraform と AWS のパラメータ対応
- aws_ec2_client_vpn_network_association:関連付け(コンソール画面)
- aws_ec2_client_vpn_authorization_rule:認証(コンソール画面)
- aws_ec2_client_vpn_route:ルートテーブル(コンソール画面)
ACM の ARN の値は変数に設定しています。
resource "aws_ec2_client_vpn_endpoint" "example" {
  description            = "terraform-clientvpn-example"
  server_certificate_arn = var.acm_arn-server
  client_cidr_block      = "100.64.0.0/22"
  split_tunnel           = true
  authentication_options {
    type                       = "certificate-authentication"
    root_certificate_chain_arn = var.acm_arn-client
  }

  connection_log_options {
    enabled = false
  }
}

resource "aws_ec2_client_vpn_network_association" "example" {
  client_vpn_endpoint_id = aws_ec2_client_vpn_endpoint.example.id
  subnet_id              = aws_subnet.subnet1.id
  security_groups        = [aws_security_group.ping.id]
}

resource "aws_ec2_client_vpn_authorization_rule" "vpc1_rule" {
  client_vpn_endpoint_id = aws_ec2_client_vpn_endpoint.example.id
  target_network_cidr    = aws_vpc.vpc.cidr_block
  authorize_all_groups   = true
}
準備ができたので apply します。
クライアント VPN エンドポイントはそこそこ時間がかかります。
aws_ec2_client_vpn_authorization_rule.vpc1_rule: Still creating... [8m1s elapsed]
aws_ec2_client_vpn_authorization_rule.vpc1_rule: Still creating... [8m11s elapsed]
aws_ec2_client_vpn_network_association.example: Still creating... [8m11s elapsed]
aws_ec2_client_vpn_network_association.example: Still creating... [8m21s elapsed]
aws_ec2_client_vpn_authorization_rule.vpc1_rule: Still creating... [8m21s elapsed]
aws_ec2_client_vpn_authorization_rule.vpc1_rule: Still creating... [8m31s elapsed]
aws_ec2_client_vpn_network_association.example: Still creating... [8m31s elapsed]
aws_ec2_client_vpn_network_association.example: Still creating... [8m41s elapsed]
aws_ec2_client_vpn_authorization_rule.vpc1_rule: Still creating... [8m41s elapsed]
aws_ec2_client_vpn_authorization_rule.vpc1_rule: Creation complete after 8m48s [id=cvpn-endpoint-046f5968344df6b52,10.0.0.0/16]
aws_ec2_client_vpn_network_association.example: Still creating... [8m51s elapsed]
aws_ec2_client_vpn_network_association.example: Creation complete after 8m52s [id=cvpn-assoc-0b3a1b2e1f347d50f]
aws_ec2_client_vpn_route.vpc: Creating...
VPN 接続
ここまですると、AWS サイドの設定は終わりです。
あとは、VPN クライアントアプリケーションをセットアップ、設定ファイルの編集するだけです。
VPN クライアントアプリケーションセットアップ
対応している OS のバージョンをインストールするだけです。
AWS Client VPN Download | Amazon Web Services
↓ 詳細は下記をご覧ください。
AWS Client VPN for Windows – AWS クライアント VPN
AWS クライアント VPN – ユーザーガイド
設定ファイルの編集
AWS Client VPN Basic workshop (Japanese)
クライアント VPN エンドポイントのコンソール画面に行って、ファイルをダウンロードします。
開いて末尾に下記ファイル内容を追加するかパスを通すかの 2 つを行います。
- client1.domain.tld.key
- client1.domain.tld.crt
今回はファイル内容を追加します。
VPN エンドポイントの作成 の最後でダウンロードした、
downloaded-client-config.ovpn ファイルを編集して、<cert></cert>, <key></key> の設定を末尾に追加します。
<cert></cert> の部分
client1.domain.tld.crt ファイルを任意のエディタやビューアーで参照し、
-----BEGIN CERTIFICATE----- から -----END CERTIFICATE----- までをコピーして、貼り付けます。
<key></key> の部分
client1.domain.tld.key ファイルを任意のエディタやビューアーで参照し、
-----BEGIN PRIVATE KEY----- から -----END PRIVATE KEY----- までをコピーして、貼り付けます。
<cert>
-----BEGIN CERTIFICATE-----
MIIDVjCCAj6gAwIBAgIRANCKzFQMReHHibib8hvEI78wDQYJKoZIhvcNAQELBQAw
FjEUMBIGA1UEAwwLRWFzeS1SU0EgQ0EwHhcNMjEwNTE0MDIxOTQyWhcNMjMwODE3
MDIxOTQyWjAdMRswGQYDVQQDDBJjbGllbnQxLmRvbWFpbi50bGQwggEiMA0GCSqG
~ 省略 ~
-----END CERTIFICATE-----
</cert>

<key>
-----BEGIN PRIVATE KEY-----
MIIEvQIBADANBgkqhkiG9w0BAQEFAASCBKcwggSjAgEAAoIBAQCqbZ3LPi+Wr0pB
uC43CoIzrgaggwVnTMgmjeFGPW2M+UJrJHfH0MuNCvAehUlToIyl6qlgbCwoaGD7
PgpSCIzgSjC1qRQ5S/dZV8XoApn4PPjIwDXSX+9i43gNhxDiIsSac7ayYqCgD/jn
~ 省略 ~
-----END PRIVATE KEY-----
</key>
接続
インストールしておいた、AWS Client VPN の接続クライアントを起動します。
ファイル → プロファイルを管理 → プロファイルを追加
表示名は適当で大丈夫です。
VPN 設定ファイルは先程編集した downloaded-client-config.ovpn ファイルを指定し、プロファイルを追加をクリックします。
その後先程作成したプロファイルを選択して接続ボタンをクリックします。
接続済みになれば成功です。
EC2 のコンソール画面で立ち上げた EC2 のプライベート IP をコピーします。
それに対してローカルから PING で疎通確認を行います。
C:\Users\ClientVPN>ping 10.0.1.212

Pinging 10.0.1.212 with 32 bytes of data:
Reply from 10.0.1.212: bytes=32 time=164ms TTL=254
Reply from 10.0.1.212: bytes=32 time=172ms TTL=254
Reply from 10.0.1.212: bytes=32 time=164ms TTL=254
Reply from 10.0.1.212: bytes=32 time=164ms TTL=254

Ping statistics for 10.0.1.212:
    Packets: Sent = 4, Received = 4, Lost = 0 (0% loss),
Approximate round trip times in milli-seconds:
    Minimum = 164ms, Maximum = 172ms, Average = 166ms
ただしく通信が行えることを確認しました。
まとめ
AWS Hands-on for Beginners はすごく便利でわかりやすかったです。
Terraform でコード化するときも設定項目が少ないので記述しやすかったです。
他にもシリーズがあるので初めて構築する際にはかなり使えると思います。
コード全体
main.tf
terraform {
  required_providers {
    aws = {
      source  = "hashicorp/aws"
      version = "~> 3.0"
    }
  }
}
provider "aws" {
  region  = "us-east-1"
  profile = "default"
  default_tags {
    tags = {
      "Name" = var.tag_name
    }
  }
}


resource "aws_vpc" "vpc" {
  cidr_block           = "10.0.0.0/16"
  enable_dns_hostnames = true
}
resource "aws_subnet" "subnet1" {
  vpc_id            = aws_vpc.vpc.id
  cidr_block        = "10.0.1.0/24"
  availability_zone = var.az1
}

data "aws_ami" "amazon_linux" {
  most_recent = true
  owners      = ["amazon"]

  filter {
    name   = "architecture"
    values = ["x86_64"]
  }

  filter {
    name   = "root-device-type"
    values = ["ebs"]
  }

  filter {
    name   = "name"
    values = ["amzn2-ami-hvm-*"]
  }

  filter {
    name   = "virtualization-type"
    values = ["hvm"]
  }

  filter {
    name   = "block-device-mapping.volume-type"
    values = ["gp2"]
  }
}

resource "aws_instance" "test" {
  ami                    = data.aws_ami.amazon_linux.id
  instance_type          = "t3.micro"
  vpc_security_group_ids = [aws_security_group.ping.id]
  subnet_id              = aws_subnet.subnet1.id
  lifecycle {
    ignore_changes = [
      "ami"
    ]
  }
}

resource "aws_security_group" "ping" {
  name        = "ping"
  description = "client vpn ping"
  vpc_id      = aws_vpc.vpc.id
}

resource "aws_security_group_rule" "allow_ping" {
  type              = "ingress"
  from_port         = -1
  to_port           = -1
  protocol          = "icmp"
  cidr_blocks       = ["10.0.1.0/24"]
  security_group_id = aws_security_group.ping.id
}

resource "aws_security_group_rule" "egress" {
  type              = "egress"
  from_port         = 0
  to_port           = 0
  protocol          = "-1"
  cidr_blocks       = ["0.0.0.0/0"]
  security_group_id = aws_security_group.ping.id
}

resource "aws_ec2_client_vpn_endpoint" "example" {
  description            = "terraform-clientvpn-example"
  server_certificate_arn = var.acm_arn-server
  client_cidr_block      = "100.64.0.0/22"
  split_tunnel           = true
  authentication_options {
    type                       = "certificate-authentication"
    root_certificate_chain_arn = var.acm_arn-client
  }

  connection_log_options {
    enabled = false
  }
}

resource "aws_ec2_client_vpn_network_association" "example" {
  client_vpn_endpoint_id = aws_ec2_client_vpn_endpoint.example.id
  subnet_id              = aws_subnet.subnet1.id
  security_groups        = [aws_security_group.ping.id]
}

resource "aws_ec2_client_vpn_authorization_rule" "vpc1_rule" {
  client_vpn_endpoint_id = aws_ec2_client_vpn_endpoint.example.id
  target_network_cidr    = aws_vpc.vpc.cidr_block
  authorize_all_groups   = true
}
variables.tf
variable "tag_name" {
  type        = string
  default     = "ClientVPNHansOn"
  description = "Resource Tag Name"
}

variable "az1" {
  default = "us-east-1a"
}
variable "az2" {
  default = "us-east-1b"
}
variable "acm_arn-server" {
}
variable "acm_arn-client" {
}
おまけ
クライアント VPN エンドポイントの説明で下記の説明を行いました。
aws_ec2_client_vpn_route の destination_cidr_block で通信対象の CIDR を追加する
aws_ec2_client_vpn_network_associationで関連付けした VPC はデフォルトでつけられるのでいらないです。(定義すると AWS 側が作成するのとで二重に作成することになるためエラーになります)
main.tf に下記コードを作成して実行するとエラーが表示されます。
resource "aws_ec2_client_vpn_route" "vpc" {
  client_vpn_endpoint_id = aws_ec2_client_vpn_endpoint.example.id
  destination_cidr_block = aws_vpc.vpc.cidr_block
  target_vpc_subnet_id   = aws_ec2_client_vpn_network_association.example.subnet_id
}
エラー内容。
╷
│ Error: error creating client VPN route "cvpn-endpoint-046f5968344df6b52,subnet-0126cee2d781db425,10.0.0.0/16": InvalidClientVpnDuplicateRoute: Route already exists
│       status code: 400, request id: eaaf8dce-c5f4-4368-99f2-cb29803fa88c
│
│   with aws_ec2_client_vpn_route.vpc,
│   on main.tf line 122, in resource "aws_ec2_client_vpn_route" "vpc":
│  122: resource "aws_ec2_client_vpn_route" "vpc" {
│
╵
参考資料
Authentication – AWS クライアント VPN
VPC へのアクセス – AWS クライアント VPN
AWS Client VPN Basic workshop (Japanese)
AWS Hands-on for Beginners Network 編#3 クライアント VPN をつかって、リモート接続環境を構築しよう | AWS Webinar

2021年新卒入社。インフラエンジニアです。RDBが三度の飯より好きです。 主にデータベースやAWSのサーバレスについて書く予定です。あと寒いのは苦手です。


Recommends
こちらもおすすめ
-

Terraform import ブロックの実活用
2023.12.16
-

AWSサービスをTerraformでコード化する:AWS Chatbot編
2024.3.11


Special Topics
注目記事はこちら

データ分析入門
これから始めるBigQuery基礎知識
2024.02.28

AWSの料金が 10 %割引になる!
『AWSの請求代行リセールサービス』
2024.07.16