AWS Client VPNでアクセスする Amazon FSx 環境の構築
こんにちは、skです。今回は「AWS Managed Microsoft AD」、「Amazon FSx」、「AWS Client VPN」を利用してAWS環境にあるファイルサーバに、セキュアに接続し、利用できる環境を構築してみたいと思います。やってみる!を目標とした記事になります。
準備
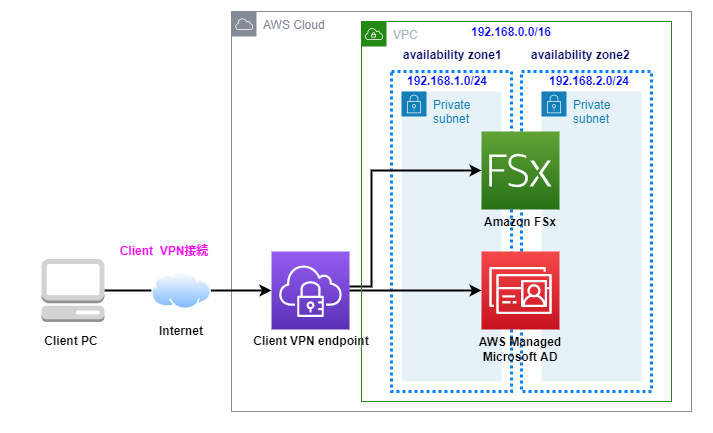
VPC、subnet、セキュリティグループを用意します。
- VPC
- 192.168.0.0/16
- subnet (サブネットを2つ用意)
- 192.168.1.0/24
- 192.168.2.0/24
- セキュリティグループ (インバウンドで 192.168.0.0/16 の範囲を許可)
- TCP/UDP 53 – DNS
- TCP/UDP 88 – Kerberos 認証
- UDP 123 – NTP
- TCP 135 – RPC
- TCP/UDP 389 – LDAP
- TCP/UDP 445 – SMB
- TCP/UDP 464 – Kerberos 認証
- TCP 636 – LDAPS (TLS/SSL 経由の LDAP)
- TCP 3268-3269 – グローバルカタログ
- TCP/UDP 49152-65535 – RPC 用のエフェメラルポート
「AWS Managed Microsoft AD」を利用しますので関連するサービスのポートを許可します。
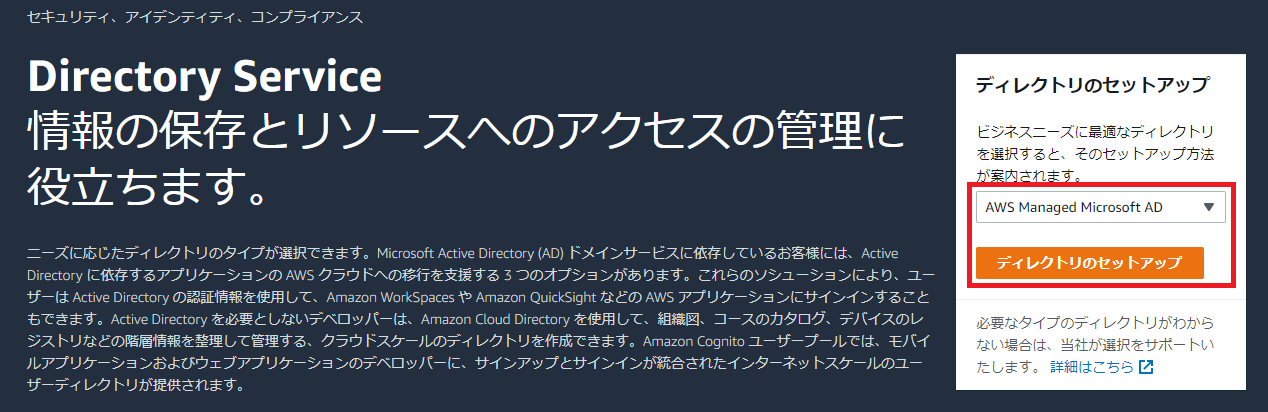
AWS Managed Microsoft AD を準備する
AD 環境の構築
Active Directory 認証を利用する為、 Microsoft AD の環境を準備します。後で AWS VPN client で接続するときや、ファイルサーバにアクセスするときのユーザ認証で使用します。
各項目を選択、入力していきます。
1. ディレクトリタイプを選択
AWS Managed Microsoft AD を選択します。
2. ディレクトリ情報を入力
下記項目を順次選択、入力します。
- 利用規模に応じてエディションを選択
- ディレクトリの DNS 名に完全修飾ドメイン名を設定 (※try-ad.example.local としました)
- Admin パスワードを入力
3. VPC とサブネットを選択
準備したVPCとサブネットを選択します。
これで AWS Managed Microsoft AD が構築できました。
ファイルサーバの構築

それでは、各項目を入力していきましょう。
1. ファイルシステムのタイプを選択
Amazon FSx for Windows ファイルサーバを選択します。
2. ファイルシステムの詳細を指定
- ファイルシステム名
- デプロイタイプ (マルチAZ)
- ストレージタイプ
- ストレージ容量
-
ネットワークセキュリティの設定
- 準備したVPC
- サブネット2つ(推奨サブネット、スタンバイサブネット)
- セキュリティグループ
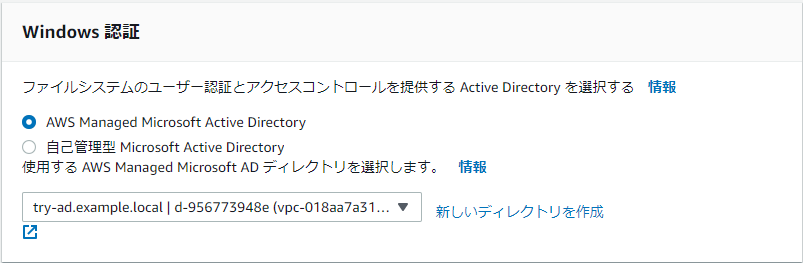
- Windows認証
- AWS Managed Microsoft Active Directory を選択
- 作成したADディレクトリを選択 (※try-ad.example.local)
- バックアップとメンテナンス
デフォルトで有効になっていますので適宜設定します。
これで Amazon FSx が構築できました。
クライアントVPN環境の構築
AWS環境にVPN接続するための為の設定を行っていきます。
1. サーバとクライアントの証明書の作成
まずはサーバとクライアントの証明書を作成します。手順は、下記リンクのAWSのドキュメントで紹介されています。
以下は実際に実行した内容です。
# git clone https://github.com/OpenVPN/easy-rsa.git
Cloning into 'easy-rsa'...
remote: Enumerating objects: 3617, done.
remote: Counting objects: 100% (56/56), done.
remote: Compressing objects: 100% (40/40), done.
remote: Total 3617 (delta 24), reused 46 (delta 16), pack-reused 3561
Receiving objects: 100% (3617/3617), 25.00 MiB | 11.18 MiB/s, done.
Resolving deltas: 100% (1702/1702), done.
#
# cd easy-rsa/easyrsa3
#
# ./easyrsa init-pki

Notice
------
'init-pki' complete; you may now create a CA or requests.

Your newly created PKI dir is:
* /tmp/tmp/easy-rsa/easyrsa3/pki

* IMPORTANT: Easy-RSA 'vars' file has now been moved to your PKI above.

#
# ./easyrsa build-ca nopass
* Using Easy-RSA configuration from: /tmp/tmp/easy-rsa/easyrsa3/pki/vars
* Using SSL: openssl OpenSSL 1.0.1e-fips 11 Feb 2013
.................+++
.........................+++
You are about to be asked to enter information that will be incorporated
into your certificate request.
What you are about to enter is what is called a Distinguished Name or a DN.
There are quite a few fields but you can leave some blank
For some fields there will be a default value,
If you enter '.', the field will be left blank.
-----
Common Name (eg: your user, host, or server name) [Easy-RSA CA]:TestCA

Notice
------
CA creation complete and you may now import and sign cert requests.
Your new CA certificate file for publishing is at:
/tmp/tmp/easy-rsa/easyrsa3/pki/ca.crt

#
# ./easyrsa build-server-full server nopass
* Using Easy-RSA configuration from: /tmp/tmp/easy-rsa/easyrsa3/pki/vars
* Using SSL: openssl OpenSSL 1.0.1e-fips 11 Feb 2013
Generating a 2048 bit RSA private key
......................................+++
.................................................+++
writing new private key to '/tmp/tmp/easy-rsa/easyrsa3/pki/d91eb6ab/temp.df79494e'
-----

Notice
------
Keypair and certificate request completed. Your files are:
req: /tmp/tmp/easy-rsa/easyrsa3/pki/reqs/server.req
key: /tmp/tmp/easy-rsa/easyrsa3/pki/private/server.key

Using configuration from /tmp/tmp/easy-rsa/easyrsa3/pki/d91eb6ab/temp.03ad91ac
Check that the request matches the signature
Signature ok
The Subject's Distinguished Name is as follows
commonName            :PRINTABLE:'server'
Certificate is to be certified until Sep 18 03:07:41 2024 GMT (825 days)

Write out database with 1 new entries
Data Base Updated

Notice
------
Certificate created at: /tmp/tmp/easy-rsa/easyrsa3/pki/issued/server.crt

#
# ./easyrsa build-client-full client1.domain.tld nopass
* Using Easy-RSA configuration from: /tmp/tmp/easy-rsa/easyrsa3/pki/vars
* Using SSL: openssl OpenSSL 1.0.1e-fips 11 Feb 2013
Generating a 2048 bit RSA private key
........................+++
..............+++
writing new private key to '/tmp/tmp/easy-rsa/easyrsa3/pki/c381ce1b/temp.e3775d58'
-----

Notice
------
Keypair and certificate request completed. Your files are:
req: /tmp/tmp/easy-rsa/easyrsa3/pki/reqs/client1.domain.tld.req
key: /tmp/tmp/easy-rsa/easyrsa3/pki/private/client1.domain.tld.key

Using configuration from /tmp/tmp/easy-rsa/easyrsa3/pki/c381ce1b/temp.19ef12d2
Check that the request matches the signature
Signature ok
The Subject's Distinguished Name is as follows
commonName            :PRINTABLE:'client1.domain.tld'
Certificate is to be certified until Sep 18 03:07:55 2024 GMT (825 days)

Write out database with 1 new entries
Data Base Updated

Notice
------
Certificate created at: /tmp/tmp/easy-rsa/easyrsa3/pki/issued/client1.domain.tld.crt

#
# mkdir ~/custom_folder/
# cp pki/ca.crt ~/custom_folder/
# cp pki/issued/server.crt ~/custom_folder/
# cp pki/private/server.key ~/custom_folder/
# cp pki/issued/client1.domain.tld.crt ~/custom_folder
# cp pki/private/client1.domain.tld.key ~/custom_folder/
# cd ~/custom_folder/
#
# ls -la
total 36
drwxr-xr-x   2 root root 4096 Jun 16 12:10 .
dr-xr-x---. 39 root root 4096 Jun 16 12:09 ..
-rw-------   1 root root 1151 Jun 16 12:09 ca.crt
-rw-------   1 root root 4438 Jun 16 12:09 client1.domain.tld.crt
-rw-------   1 root root 1704 Jun 16 12:10 client1.domain.tld.key
-rw-------   1 root root 4525 Jun 16 12:09 server.crt
-rw-------   1 root root 1704 Jun 16 12:09 server.key
#
以下ファイルが生成されますので使用していきます。
| ファイル名 | 説明 |
|---|---|
| server.crt | サーバ証明書 |
| server.key | サーバ証明書の鍵 |
| ca.crt | サーバ証明書チェーン |
| client1.domain.tld.crt | クライアント証明書 |
| client1.domain.tld.key | クライアント証明書の鍵 |
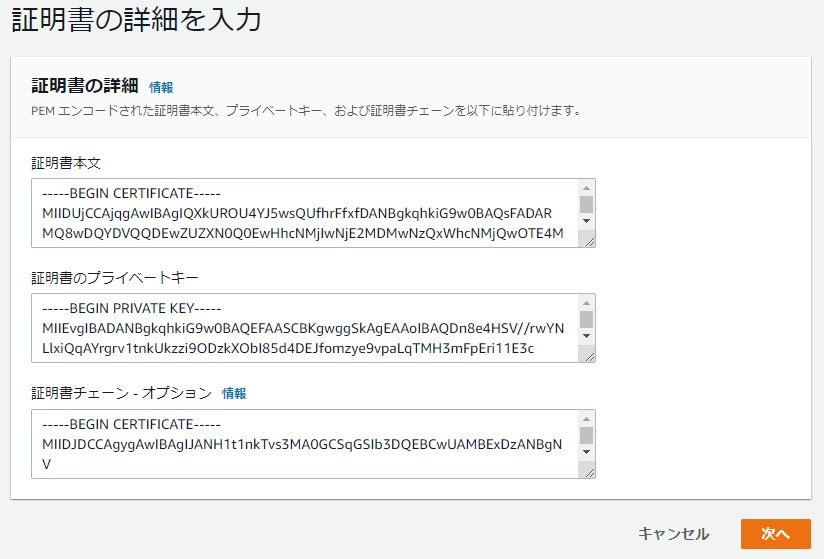
2. ACM(AWS Certificate Manager)でインポート
ACMで作成したサーバ証明書をインポートしていきます。
- server.crt
- server.key
- ca.crt
3. クライアントVPNエンドポイントの作成
クライアントVPNエンドポイントを作成します。各項目を設定していきます。
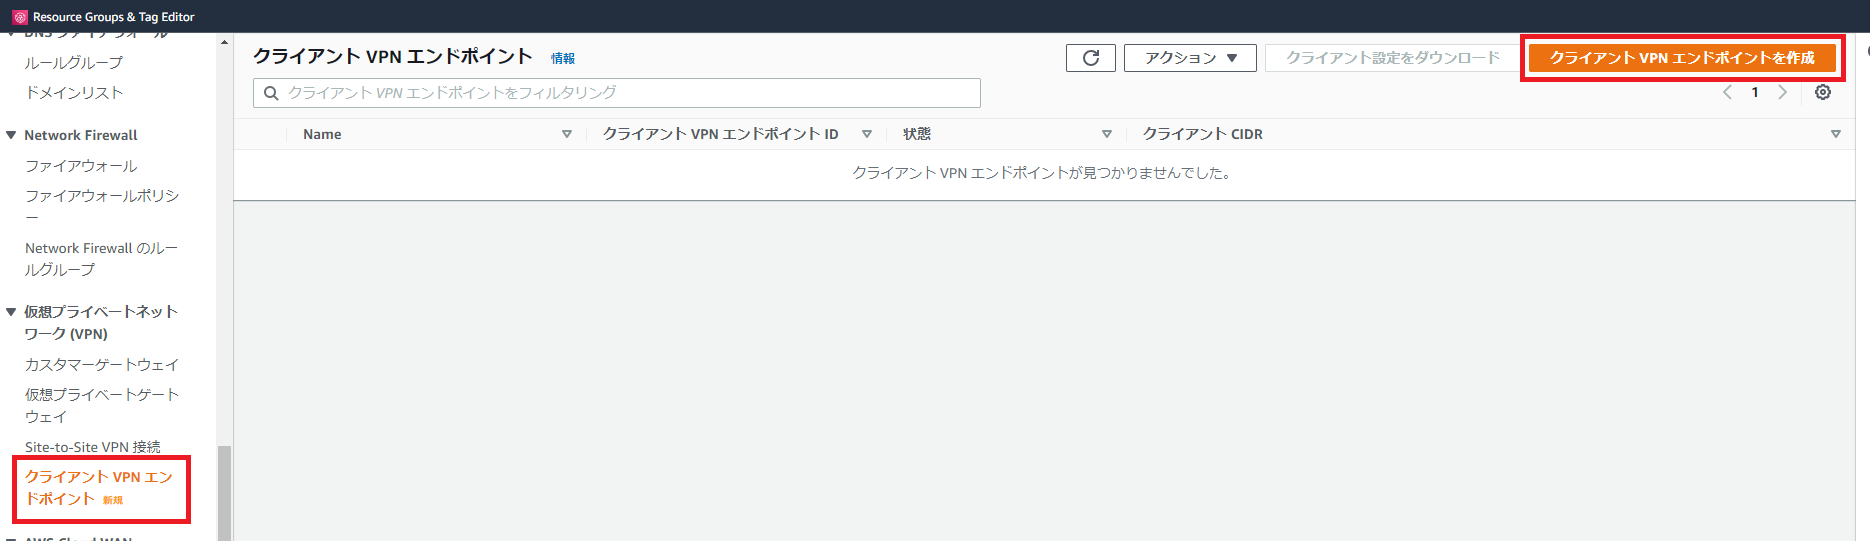
- 名前タグの入力
- クライアント IPv4 の範囲指定 (例 : 10.0.0.0/22)
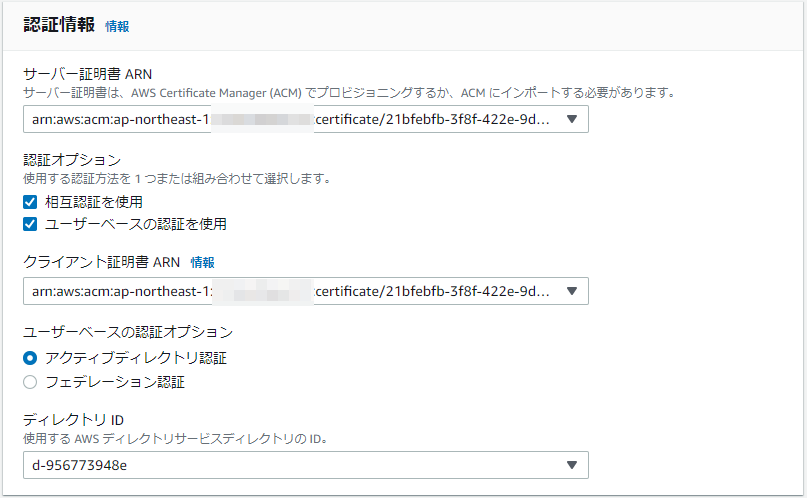
- サーバ証明書 ARN
- ACMにインポートした証明書を選択
- 認証オプション
- 相互認証を使用にチェック
- ユーザーベースの認証を使用にチェック
- クライアント証明書 ARN
- ACMにインポートした証明書を選択
- ユーザーベースの認証オプション
- アクティブディレクトリ認証にチェック
- 作成したディレクトリIDを選択
- アクティブディレクトリ認証にチェック
- その他のパラメータ
- DNSサーバーを有効化し、AWS Managed Microsoft AD サーバのDNSを設定
- スプリットトンネルを有効化
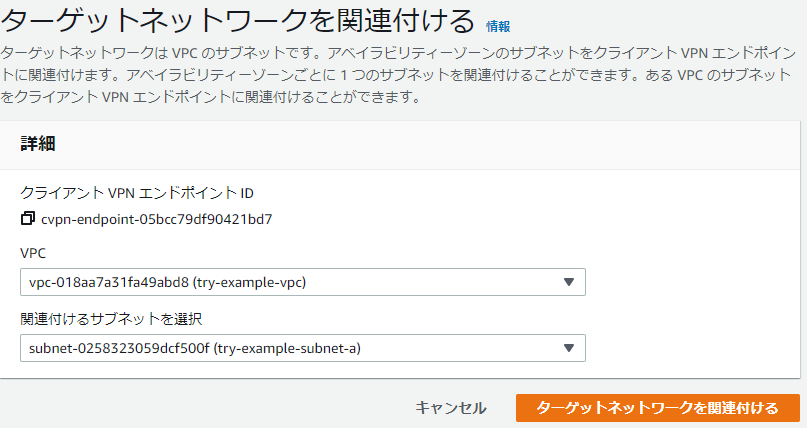
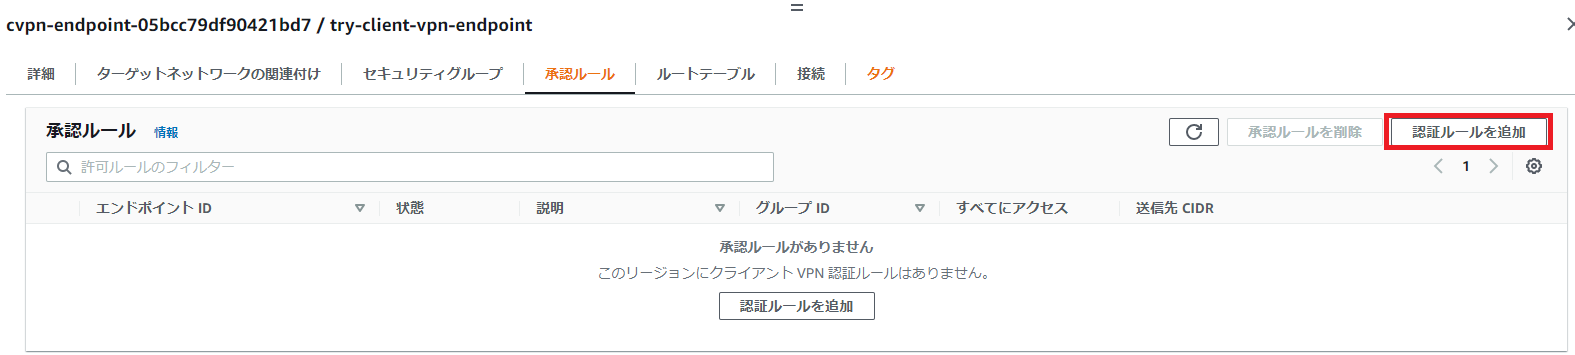
クライアントVPNエンドポイントの作成後に、エンドポイントを選択して「ターゲットネットワークの関連付け」、「承認ルール」の設定を行います。
- ターゲットネットワークの関連付け
- ADのVPCを設定
- 承認ルール
- アクセスを有効にする送信先のネットワークを指定
- アクセス権をすべてのユーザーに許可するにチェック
- クライアント設定をダウンロード
作成したVPNエンドポイントを選択後、クライアント設定をダウンロードし downloaded-client-config.ovpn を取得します。
VPN接続
- AWS VPN Client をダウンロード、インストールの実施
AWS Client VPN download - 設定ファイル(downloaded-client-config.ovpn)の編集
▼ 追記例

<cert>
-----BEGIN CERTIFICATE-----
(※client1.domain.tld.crt ファイルを参照して貼り付け)
-----END CERTIFICATE-----
</cert>

<key>
-----BEGIN PRIVATE KEY-----
(※client1.domain.tld.key ファイルを参照して貼り付け)
-----END PRIVATE KEY-----
</key>
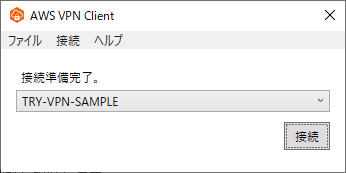
AWS VPN Client で設定ファイルのインポートが終わりましたら VPN 接続をおこないます。
認証は、AWS Managed Microsoft AD で設定したadmin ユーザになります。
ファイルサーバへ接続
VPN接続が確認できましたらファイルシステムをアタッチしてみましょう。
アタッチコマンドの情報は、Amazon FSx で作成したファイルシステムを選択し「アタッチ」ボタンで確認できます。
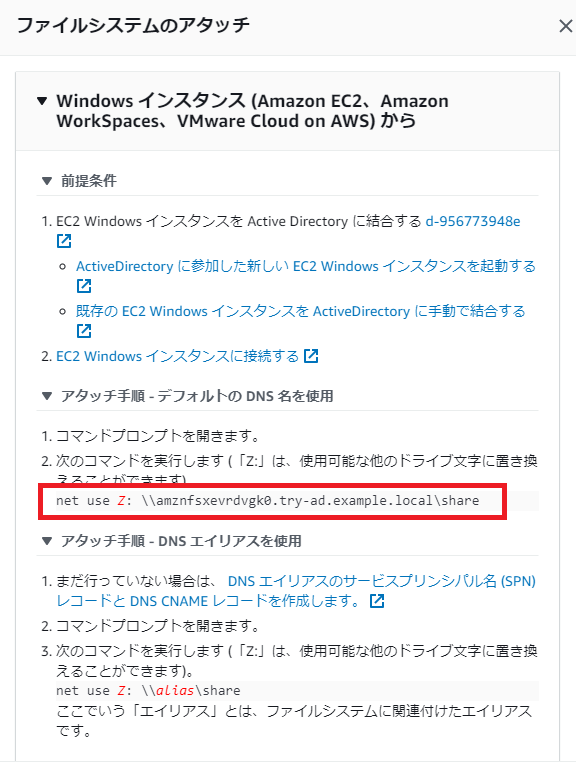
アタッチコマンドを実行後、ユーザとパスワードを入力します。
今回の場合、ユーザ名は「try-ad.example.local\admin」になります。
ユーザ名: <ドメイン>\<ユーザ名>
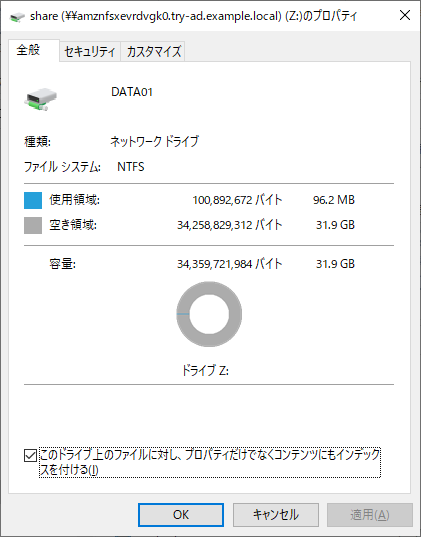
VPN Client 経由で AWSにあるファイルサーバをマウントすることができました。
ファイルをアップロードできることを確認して終了です。
まとめ
今回は、VPN 経由で AWSにあるファイルサーバをマウントするところまでを実践しました。ユーザアカウントを追加していけば、複数人でマウントし共有ファイルサーバとしてリモートネットワークでも使えそうです。
テックブログ新着情報のほか、AWSやGoogle Cloudに関するお役立ち情報を配信中!
Follow @twitter
こんにちは。マイグレーションチームメンバーの sk です。自分のペースでAWSを勉強中です。学んだことなどを紹介できればと思います。
Recommends
こちらもおすすめ
Special Topics
注目記事はこちら

データ分析入門
これから始めるBigQuery基礎知識
2024.02.28

AWSの料金が 10 %割引になる!
『AWSの請求代行リセールサービス』
2024.07.16