【AWS Certificate Manager for Nitro Enclaves】Amazon EC2でACMを利用する
はじめに
こんにちは。最近、出社するために早起きしているwakaです。
この記事はNHN テコラスAdvent Calendar 2023の12日目の記事です。
テックブログを書く機会を頂けましたので、以前から気になっていたEC2単体でACMを利用できるACM for Nitro Enclavesを動かしてみようと思います。
動作検証環境
- AWS Cloud9
- Terraform 1.6.5
- Amazon Linux 2
- Amazon Route 53(もしくはお使いのDNSサーバー)
- AWS Certificate Manager
- Amazon EC2
- Amazon Linux 2023
- Apache
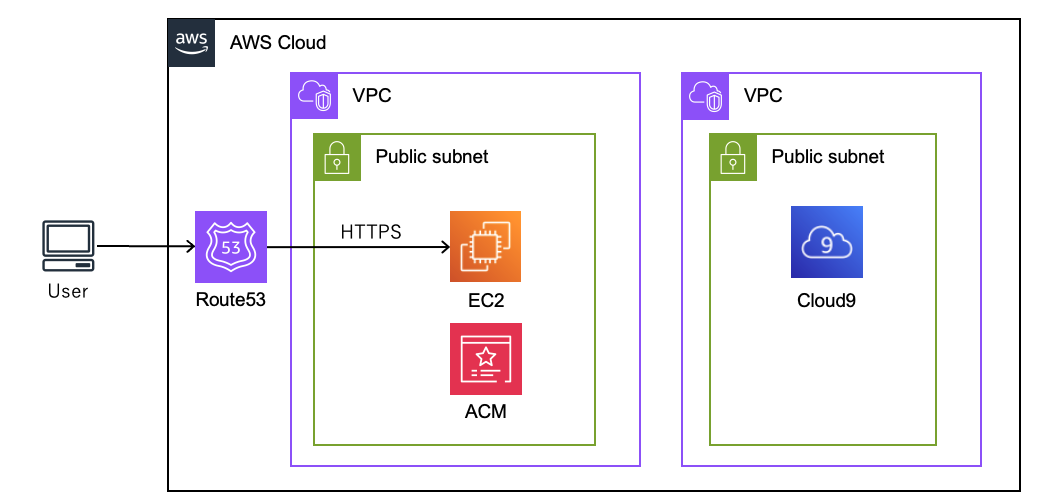
想定構成図
今回は同一アカウント内にTerraformの実行環境としてCloud9を作成し、そこからapplyを行って動作確認を行います。
実行手順
AWSから設定方法として、ステップ7まで公開されておりますが、ステップ6までをTerraformのファイルにまとめましたので、以下のファイルの必要箇所を変更してapplyを行います。
main.tf
基本的にlocals内の変数のみ変更すればapplyが通るかと思います。
locals {
  aws_id      = XXXXXXXXXXXX
  name_prefix = "Techblog"
  region      = "ap-northeast-1"
  acm_arn     = "arn:aws:acm:ap-northeast-1:XXXXXXXXXXXX:certificate/xxxxxxx-xxxx-xxxx-xxxx-xxxxxxxxxxxx"
}

provider "aws" {
  region = local.region
}

# EC2インスタンスの作成
module "ec2" {
  source  = "terraform-aws-modules/ec2-instance/aws"
  version = "5.5.0"

  name                        = "${local.name_prefix}-ec2"
  ami                         = "ami-012261b9035f8f938"  # Amazon Linux 2023
  instance_type               = "m6a.xlarge"
  availability_zone           = element(module.vpc.azs, 0)
  subnet_id                   = element(module.vpc.public_subnets, 0)
  iam_instance_profile        = module.nitro_role.iam_instance_profile_id
  vpc_security_group_ids      = [aws_security_group.sg_web.id]
  associate_public_ip_address = true
  cpu_credits                 = "standard"
  disable_api_termination     = false
  enclave_options_enabled     = true

  root_block_device = [
    {
      encrypted   = true
      volume_type = "gp3"
      volume_size = 10
      throughput  = 125
    }
  ]

  user_data          = file("install.sh")
  ignore_ami_changes = false

}

# VPCの作成
module "vpc" {
  source  = "terraform-aws-modules/vpc/aws"
  version = "5.2.0"

  name = "${local.name_prefix}-vpc"
  cidr = "10.0.0.0/16"

  azs            = ["${local.region}a", "${local.region}c"]
  public_subnets = ["10.0.0.0/24", "10.0.1.0/24"]
}

# EC2,ACMと紐付けるIAMロールの作成
module "nitro_role" {
  source  = "terraform-aws-modules/iam/aws//modules/iam-assumable-role"
  version = "5.32.0"

  create_role             = true
  create_instance_profile = true
  role_requires_mfa       = false

  trusted_role_services = ["ec2.amazonaws.com"]
  role_name             = "${local.name_prefix}NitroEnclavesRole"

  custom_role_policy_arns = [
    "arn:aws:iam::aws:policy/AmazonSSMManagedInstanceCore",
    aws_iam_policy.nitro_enclaves_policy.arn
  ]
}

resource "aws_iam_policy" "nitro_enclaves_policy" {
  name   = "${local.name_prefix}NitroEnclavesPolicy"
  policy = data.aws_iam_policy_document.nitro_enclaves_policy_document.json
}

data "aws_iam_policy_document" "nitro_enclaves_policy_document" {
  statement {
    sid    = "NitroEnclaves"
    effect = "Allow"
    actions = [
      "ec2:AssociateEnclaveCertificateIamRole",
      "ec2:GetAssociatedEnclaveCertificateIamRoles",
      "ec2:DisassociateEnclaveCertificateIamRole"
    ]

    resources = [
      "arn:aws:acm:${local.region}:${local.aws_id}:certificate/*",
      "arn:aws:iam::${local.aws_id}:role/*"
    ]
  }
}

# ステップ4でのACMとIAMロールの紐づけ
resource "awscc_ec2_enclave_certificate_iam_role_association" "acm_enclave_certificate" {
  certificate_arn = local.acm_arn
  role_arn        = module.nitro_role.iam_role_arn
}

# ステップ5のACMとIAMの紐付け時に必要なロールのアタッチ
resource "aws_iam_role_policy_attachment" "nitro_enclaves_kms_policy_attach" {
  role       = module.nitro_role.iam_role_name
  policy_arn = aws_iam_policy.nitro_enclaves_kms_policy.arn
}

resource "aws_iam_policy" "nitro_enclaves_kms_policy" {
  name   = "${local.name_prefix}NitroEnclavesKMSPolicy"
  policy = data.aws_iam_policy_document.nitro_enclaves_kms_policy_document.json
}

data "aws_iam_policy_document" "nitro_enclaves_kms_policy_document" {
  statement {
    effect = "Allow"
    actions = [
      "s3:GetObject"
    ]

    resources = [
      "arn:aws:s3:::${awscc_ec2_enclave_certificate_iam_role_association.acm_enclave_certificate.certificate_s3_bucket_name}/*"
    ]
  }

  statement {
    sid    = "VisualEditor0"
    effect = "Allow"
    actions = [
      "kms:Decrypt"
    ]

    resources = ["arn:aws:kms:${local.region}:*:key/${awscc_ec2_enclave_certificate_iam_role_association.acm_enclave_certificate.encryption_kms_key_id}"]
  }

  statement {
    effect = "Allow"
    actions = [
      "iam:GetRole"
    ]

    resources = ["arn:aws:iam::${local.aws_id}:role/${module.nitro_role.iam_role_name}"]
  }
}

resource "aws_security_group" "sg_web" {
  name   = "${local.name_prefix}-sg-web"
  vpc_id = module.vpc.vpc_id

  ingress {
    from_port   = 443
    to_port     = 443
    protocol    = "tcp"
    cidr_blocks = ["0.0.0.0/0"]
  }

  ingress {
    from_port   = 80
    to_port     = 80
    protocol    = "tcp"
    cidr_blocks = ["0.0.0.0/0"]
  }

  egress {
    from_port        = 0
    to_port          = 0
    protocol         = "-1"
    cidr_blocks      = ["0.0.0.0/0"]
    ipv6_cidr_blocks = ["::/0"]
  }
}
install.sh
#!/bin/bash
yum update -y

## Apache Setup
yum -y install httpd mod_ssl
systemctl enable httpd
systemctl start httpd

# nitro-acm Setup
yum install aws-nitro-enclaves-acm -y
1. terraformの実行
事前にCloud9上に実行環境を作成し、リソースの作成が可能なIAMロールのアタッチを行ってください。
terraform init
terraform plan
terraform apply
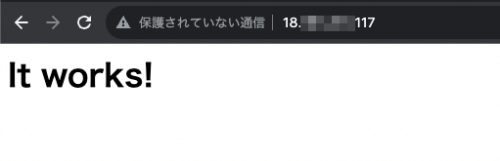
applyとEC2のステータスチェックが完了すると、パブリックIP経由でApacheの画面まで確認できるかと思います。
2. EC2内の各種設定を行います
AWS Systems Manager Session Manager経由でインスタンスに接続し、各コマンドを実行します。
(1)読み込ませるACMの設定を行う
sudo su
mv /etc/nitro_enclaves/acm-httpd.example.yaml /etc/nitro_enclaves/acm.yaml
vi /etc/nitro_enclaves/acm.yaml
/etc/nitro_enclaves/acm.yaml内の45行目付近にあるAcmブロック内のcertificate_arnに利用するACMのarnを入力し、保存します。
 35 tokens:
 36   # A label for this PKCS#11 token
 37   - label: httpd-acm-token
 38     # Configure a managed token, sourced from an ACM certificate.
 39     source:
 40       Acm:
 41         # The certificate ARN
 42         # Note: this certificate must have been associated with the
 43         #       IAM role assigned to the instance on which ACM for
 44         #       Nitro Enclaves is run.
 45         certificate_arn: ""  #ここにACMのarnを入力する
(2)VirtualHost周りの設定を行う
vi /etc/httpd/conf.d/httpd-acm.conf
<VirtualHost *:443>
ServerName www.example.com #紐付けたいドメイン名に変更する
SSLEngine on
SSLProtocol -all +TLSv1.2
SSLCertificateKeyFile "/etc/pki/tls/private/localhost.key"
SSLCertificateFile "/etc/pki/tls/certs/localhost.crt"
</VirtualHost>
構成ファイルのリネームも合わせて行います。
mv /etc/httpd/conf.d/ssl.conf /etc/httpd/conf.d/httpd-acm.conf
(3)nitro-enclaves-acmサービスを起動する
systemctl start nitro-enclaves-acm.service
以下のようにactiveとなっていればプロセスの起動に成功しています。
[root@ip-10-0-0-146 httpd]# systemctl status nitro-enclaves-acm.service
● nitro-enclaves-acm.service - Nitro Enclaves ACM Agent
     Loaded: loaded (/usr/lib/systemd/system/nitro-enclaves-acm.service; enabled; preset: disabled)
     Active: active (running) since Mon 2023-12-04 03:56:42 UTC; 16min ago
   Main PID: 27302 (p11ne-agent)
      Tasks: 5 (limit: 18708)
     Memory: 23.2M
        CPU: 3.665s
     CGroup: /system.slice/nitro-enclaves-acm.service
             ├─27302 /usr/bin/p11ne-agent
             └─27305 nitro-cli run-enclave --eif-path /usr/share/nitro_enclaves/p11ne/p11ne.eif --cpu-count 2 --memory 256

Dec 04 03:56:42 ip-10-0-0-146.ap-northeast-1.compute.internal systemd[1]: Started nitro-enclaves-acm.service - Nitro Enclaves ACM Agent.
Dec 04 03:56:43 ip-10-0-0-146.ap-northeast-1.compute.internal p11ne-agent[27302]: |INFO  | Setting up p11-kit config
Dec 04 03:56:43 ip-10-0-0-146.ap-northeast-1.compute.internal p11ne-agent[27302]: |INFO  | Restarting vsock proxy
Dec 04 03:56:46 ip-10-0-0-146.ap-northeast-1.compute.internal p11ne-agent[27302]: |INFO  | Syncing token httpd-acm-token
Dec 04 03:56:48 ip-10-0-0-146.ap-northeast-1.compute.internal p11ne-agent[27302]: |INFO  | Service: httpd | Force_Start: true | Reload: 0 | Sync: 600
Dec 04 03:56:48 ip-10-0-0-146.ap-northeast-1.compute.internal p11ne-agent[27302]: |INFO  | Reloading HTTPD configuration.
Dec 04 04:06:46 ip-10-0-0-146.ap-northeast-1.compute.internal p11ne-agent[27302]: |INFO  | Syncing token httpd-acm-token
Dec 04 04:06:47 ip-10-0-0-146.ap-northeast-1.compute.internal p11ne-agent[27302]: |INFO  | Refreshing token httpd-acm-token
Dec 04 04:06:48 ip-10-0-0-146.ap-northeast-1.compute.internal p11ne-agent[27302]: |INFO  | Service: httpd | Force_Start: true | Reload: 0 | Sync: 600
Dec 04 04:06:48 ip-10-0-0-146.ap-northeast-1.compute.internal p11ne-agent[27302]: |INFO  | Reloading HTTPD configuration.
3. IPをRoute53に紐付け動作確認を行う
nitro-enclaves-acm.serviceが問題なく起動していれば、IPをドメインと紐付けることでHTTPS経由での表示ができるようになっているかと思います。
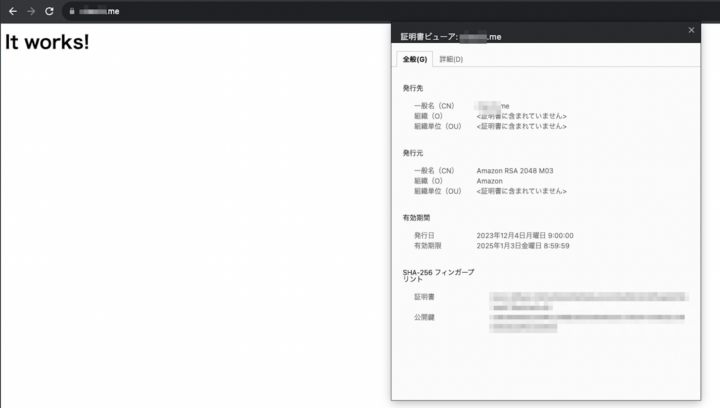
ACM側も自動更新の対象として問題なく認識されているようですね。

最後に
これまではACMを利用するためにALBを利用する場合などが多かったかと思いますが、Nitro Enclavesの規格に合ったインスタンスタイプを利用する場合、EC2内でACMを利用するパターンも選択肢の一つとして出てくるのではないでしょうか。
最後までご覧いただきありがとうございました。

2022年に中途入社した人です。好きなAWSサービスはLambdaです。
Recommends
こちらもおすすめ
-

インナーブランディングで100点をとった話
2023.12.1
-

【高精度な画像分類器作りに挑戦!】(2)ファインチューニングで高精度化
2018.4.26
-
Terraform で Amazon EC2 を複数台作成する
2022.4.7
-

画像分類の機械学習モデルを作成する(1)ゼロからCNN
2018.4.17

Special Topics
注目記事はこちら

データ分析入門
これから始めるBigQuery基礎知識
2024.02.28

AWSの料金が 10 %割引になる!
『AWSの請求代行リセールサービス』
2024.07.16