Amazon EC2インスタンスのメモリ使用率をAmazon CloudWatchでモニタリングする
はじめに
こんにちは、eunseoです!
本記事では、CloudWatch Agentを使用してEC2インスタンスのメモリ使用率をCloudWatchでモニタリングする方法について、ご紹介いたします。
概要
Amazon CloudWatchとは
Amazon CloudWatch は、Amazon Web Services (AWS) リソースと、AWS で実行されているアプリケーションをリアルタイムでモニターリングします。CloudWatch を使用してメトリクスを収集し、追跡できます。メトリクスとは、リソースやアプリケーションに関して測定できる変数です。
CloudWatch のホームページには、使用している AWS の各サービスに関するメトリクスが自動的に表示されます。さらに、カスタムダッシュボードを作成してカスタムアプリケーションのメトリクスを表示したり、選択したメトリクスのカスタムコレクションを表示したりできます。
デフォルトとしてCPU 使用率、ディスク I/O、ネットワーク使用率をモニタリングすることができます。
しかし、メモリ使用率及びSwap使用率等はデフォルトで利用できないため、直接メトリクスを取得し、CloudWatchでモニタリングする必要があります。
CloudWatch Agentとは
CloudWatch Agentとは、EC2インスタンスにインストールするだけで、サーバー上のメトリクス及びログを取得し、これをCloudWatchで見ることができます。
前提
・EC2インスタンスのAMIは「AmazonLinux2023」を使用
・「CloudWatchAgentAdminPolicy」ロールをEC2にアタッチ
手順
まず、EC2にログインします。
CloudWatch Agentインストール
CloudWatch Agentをインストールします。
$ sudo yum install amazon-cloudwatch-agent
CloudWatch Agentを起動します。
$ sudo /opt/aws/amazon-cloudwatch-agent/bin/amazon-cloudwatch-agent-config-wizard
CloudWatch Agent設定作成
選択式で各質問に回答します。
変更したい場合、選択したい数字を入れEnterキーを押します。
変更がなければEnterキーのみで操作します。
使用するOSを選択
On which OS are you planning to use the agent?
1. linux
2. windows
3. darwin
default choice: [1]:
EC2 or オンプレミス 利用するホストを選択
Trying to fetch the default region based on ec2 metadata...
I! imds retry client will retry 1 timesAre you using EC2 or On-Premises hosts?
1. EC2
2. On-Premises
default choice: [1]:
エージェントをどのユーザーで実行するか
今回は「root」を選択します。
Which user are you planning to run the agent?
1. cwagent
2. root
3. others
default choice: [1]:
2
StatsDデーモンを有効にするか
Do you want to turn on StatsD daemon?
1. yes
2. no
default choice: [1]:
StatsD デーモンのリッスンポート
Which port do you want StatsD daemon to listen to?
default choice: [8125]
StatsD デーモンの収集間隔
What is the collect interval for StatsD daemon?
1. 10s
2. 30s
3. 60s
default choice: [1]:
StatsD デーモンが収集したメトリクスの集約間隔
What is the aggregation interval for metrics collected by StatsD daemon?
1. Do not aggregate
2. 10s
3. 30s
4. 60s
default choice: [4]:
CollectD からのメトリクスをモニタリングするか
デフォルトではモニタリングをするため、この後CollectDをインストールします。
Do you want to monitor metrics from CollectD? WARNING: CollectD must be installed or the Agent will fail to start
1. yes
2. no
default choice: [1]:
ホストメトリクスをモニタリングするか
Do you want to monitor any host metrics? e.g. CPU, memory, etc.
1. yes
2. no
default choice: [1]:
コアごとの CPU メトリクスをモニタリングするか
Do you want to monitor cpu metrics per core?
1. yes
2. no
default choice: [1]:
すべてのメトリクスにEC2の情報を追加するか
Do you want to add ec2 dimensions (ImageId, InstanceId, InstanceType, AutoScalingGroupName) into all of your metrics if the info is available?
1. yes
2. no
default choice: [1]:
EC2 の情報を集約するか
Do you want to aggregate ec2 dimensions (InstanceId)?
1. yes
2. no
default choice: [1]::
高解像度でメトリクスを収集するか
Would you like to collect your metrics at high resolution (sub-minute resolution)? This enables sub-minute resolution for all metrics, but you can customize for specific metrics in the output json file.
1. 1s
2. 10s
3. 30s
4. 60s
default choice: [4]:
デフォルトのメトリクスセット
Which default metrics config do you want?
1. Basic
2. Standard
3. Advanced
4. None
default choice: [1]:
Basicでは、以下のメトリクスがモニタリングできます。
・Mem
– mem_used_percent
・Disk
– disk_used_percent
StandardBでは、以下のメトリクスがモニタリングできます。
・CPU
– cpu_usage_idle
– cpu_usage_iowait
– cpu_usage_user
– cpu_usage_system
・Disk
– disk_used_percent
– disk_inodes_free
・Diskio
– diskio_io_time
・Mem
– mem_used_percent
・Swap
– swap_used_percent
Advancedでは、以下のメトリクスがモニタリングできます。
・CPU
– cpu_usage_idle
– cpu_usage_iowait
– cpu_usage_user
– cpu_usage_system
・Disk
– disk_used_percent
– disk_inodes_free
・Diskio
– diskio_io_time
– diskio_write_bytes
– diskio_read_bytes
– diskio_writes
– diskio_reads
・Mem
– mem_used_percent
・Netstat
– netstat_tcp_established
– netstat_tcp_time_wait
・Swap
– swap_used_percent
設定情報の確認
設定情報を確認し、問題なければEnterキーを押します。
Current config as follows:
{
        "agent": {
                "metrics_collection_interval": 60,
                "run_as_user": "root"
        },
        "metrics": {
                "aggregation_dimensions": [
                        [
                                "InstanceId"
                        ]
                ],
                "append_dimensions": {
                        "AutoScalingGroupName": "${aws:AutoScalingGroupName}",
                        "ImageId": "${aws:ImageId}",
                        "InstanceId": "${aws:InstanceId}",
                        "InstanceType": "${aws:InstanceType}"
                },
                "metrics_collected": {
                        "collectd": {
                                "metrics_aggregation_interval": 60
                        },
                        "disk": {
                                "measurement": [
                                        "used_percent"
                                ],
                                "metrics_collection_interval": 60,
                                "resources": [
                                        "*"
                                ]
                        },
                        "mem": {
                                "measurement": [
                                        "mem_used_percent"
                                ],
                                "metrics_collection_interval": 60
                        },
                        "statsd": {
                                "metrics_aggregation_interval": 60,
                                "metrics_collection_interval": 10,
                                "service_address": ":8125"
                        }
                }
        }
}
Are you satisfied with the above config? Note: it can be manually customized after the wizard completes to add additional items.
1. yes
2. no
default choice: [1]:
マイグレーションのためインポートする既存のCloudWatch Log Agentの設定ファイルはあるか
Do you have any existing CloudWatch Log Agent (http://docs.aws.amazon.com/AmazonCloudWatch/latest/logs/AgentReference.html) configuration file to import for migration?
1. yes
2. no
default choice: [2]:
ログファイルを監視するか
Do you want to monitor any log files?
1. yes
2. no
default choice: [1]:
X-ray トレースを取得するか
X-rayトレースを取得するには、「AWSXRayDaemonWriteAccess」ポリシーを追加する必要があります。
今回は、「NO」にします。
Do you want the CloudWatch agent to also retrieve X-ray traces?
1. yes
2. no
default choice: [1]:
2
設定情報の確認
また設定情報を確認し、問題なければEnterキーを押します。
Existing config JSON identified and copied to:  /opt/aws/amazon-cloudwatch-agent/etc/backup-configs
Saved config file to /opt/aws/amazon-cloudwatch-agent/bin/config.json successfully.
Current config as follows:
{
        "agent": {
                "metrics_collection_interval": 60,
                "run_as_user": "root"
        },
        "metrics": {
                "aggregation_dimensions": [
                        [
                                "InstanceId"
                        ]
                ],
                "append_dimensions": {
                        "AutoScalingGroupName": "${aws:AutoScalingGroupName}",
                        "ImageId": "${aws:ImageId}",
                        "InstanceId": "${aws:InstanceId}",
                        "InstanceType": "${aws:InstanceType}"
                },
                "metrics_collected": {
                        "collectd": {
                                "metrics_aggregation_interval": 60
                        },
                        "disk": {
                                "measurement": [
                                        "used_percent"
                                ],
                                "metrics_collection_interval": 60,
                                "resources": [
                                        "*"
                                ]
                        },
                        "mem": {
                                "measurement": [
                                        "mem_used_percent"
                                ],
                                "metrics_collection_interval": 60
                        },
                        "statsd": {
                                "metrics_aggregation_interval": 60,
                                "metrics_collection_interval": 10,
                                "service_address": ":8125"
                        }
                }
        }
}
Please check the above content of the config.
The config file is also located at /opt/aws/amazon-cloudwatch-agent/bin/config.json.
Edit it manually if needed.
設定を SSM パラメータストアに保存するか
Do you want to store the config in the SSM parameter store?
1. yes
2. no
default choice: [1]:
設定を保存する際のパラメータストア名
What parameter store name do you want to use to store your config? (Use 'AmazonCloudWatch-' prefix if you use our managed AWS policy)
default choice: [AmazonCloudWatch-linux]
パラメータストアに設定を保存する際のリージョン
Trying to fetch the default region based on ec2 metadata...
I! imds retry client will retry 1 timesWhich region do you want to store the config in the parameter store?
default choice: [ap-northeast-1]
パラメータ ストアに送信する際のAWSクレデンシャル
Which AWS credential should be used to send json config to parameter store?
1.****************** (From SDK)
2. Other
default choice: [1]:
設定完了!
Successfully put config to parameter store AmazonCloudWatch-linux.
Program exits now.
Collectdインストール
amazon-linux-extrasでCollectdがインストールできないです。
$ sudo amazon-linux-extras install collectd
sudo: amazon-linux-extras: command not found
以下の公式サイトによるとAmazon Linux 2023ではamazon-linux-extrasは入っていないようです。
Q: AL2023 は AL2 のような Amazon-Linux-Extras を搭載していますか?
A: いいえ。AL2023 には extras はありません。言語ランタイムなどの高レベルのソフトウェアパッケージの場合、四半期ごとのリリースを使用して、リポジトリで提供されるデフォルトパッケージに加えて、個別の名前空間化されたパッケージとしてメジャー/マイナー更新をパッケージに追加します。 例えば、Amazon Linux 2023 のデフォルトの Python バージョンは 3.8 である可能性がありますが、Python 3.9 (python39) が利用可能になると、別の名前空間化されたパッケージとして追加されます。これらの追加パッケージは、アップストリームリリース頻度とサポートモデルに厳密に従います。また、それらのサポートポリシーは、コンプライアンスとセキュリティのユースケースのために、パッケージマネージャーによってアクセスされることがあります。デフォルトパッケージは、AL2023 の存続期間を通じてサポート対象であり続けます。
とりあえず以下のコマンドでインストールします。
$ sudo yum install collectd
collectdを起動します。
$ sudo systemctl enable collectd.service
$ sudo systemctl start collectd.service
CloudWatch Agentを開始
以下のコマンドでCloudWatch Agentを開始します。
$ sudo /opt/aws/amazon-cloudwatch-agent/bin/amazon-cloudwatch-agent-ctl -a fetch-config -m ec2 -s -c ssm:AmazonCloudWatch-linux
無事に開始されたら、以下の
Configuration validation second phase succeeded
Configuration validation succeeded
が表示されます。
****** processing amazon-cloudwatch-agent ******
I! Trying to detect region from ec2 D! [EC2] Found active network interface I! imds retry client will retry 1 timesRegion: ap-northeast-1 credsConfig: map[] Successfully fetched the config and saved in /opt/aws/amazon-cloudwatch-agent/etc/amazon-cloudwatch-agent.d/ssm_AmazonCloudWatch-linux.tmp
Start configuration validation...
2024/05/27 17:27:29 Reading json config file path: /opt/aws/amazon-cloudwatch-agent/etc/amazon-cloudwatch-agent.d/ssm_AmazonCloudWatch-linux.tmp ...
2024/05/27 17:27:29 I! Valid Json input schema.
2024/05/27 17:27:29 D! ec2tagger processor required because append_dimensions is set
2024/05/27 17:27:29 D! pipeline hostDeltaMetrics has no receivers
2024/05/27 17:27:29 Configuration validation first phase succeeded
I! Detecting run_as_user...
I! Trying to detect region from ec2
D! [EC2] Found active network interface
I! imds retry client will retry 1 times
/opt/aws/amazon-cloudwatch-agent/bin/amazon-cloudwatch-agent -schematest -config /opt/aws/amazon-cloudwatch-agent/etc/amazon-cloudwatch-agent.toml
Configuration validation second phase succeeded
Configuration validation succeeded
終了ステータス「0」が返ってくるのを確認します。
$ echo $?
0
CloudWatch Agentを起動します。
$ sudo systemctl enable amazon-cloudwatch-agent
$ sudo systemctl start amazon-cloudwatch-agent
CloudWatchでメモリ使用率を確認
CloudWatchコンソールに移動します。
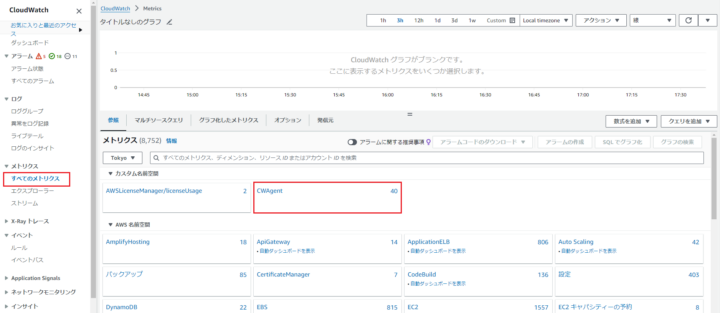
「すべてのメトリクス」を選択し、「CWAgent」を選択します。
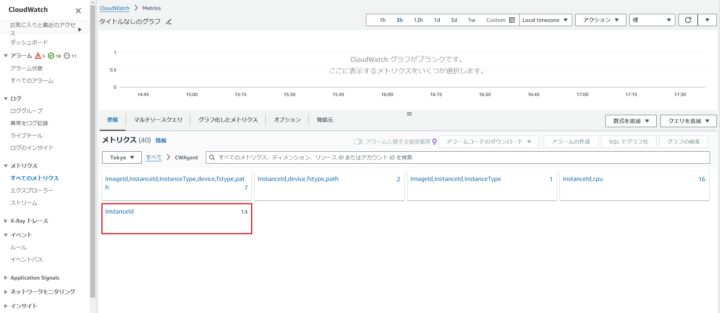
「Instanceld」を選択します。
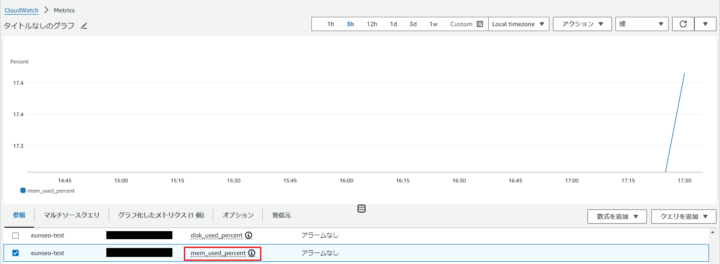
EC2インスタンスのメトリクス名の「mem_used_percent」を選択すると、メモリの使用率が確認できます。
さいごに
今回は、CloudWatch Agentを使用してEC2インスタンスのメモリ使用率をCloudWatchでモニタリングする方法について、ご紹介しました。
また、CloudWatch Agent設定ファイルをSSMパラメータストアに保存することで、メトリクス・ログを便利に追加とか編集することもできます。
最後まで読んでいただきありがとうございます!
NHN テコラスの採用情報はこちら
テックブログ新着情報のほか、AWSやGoogle Cloudに関するお役立ち情報を配信中!
Follow @twitterRecommends
こちらもおすすめ
Special Topics
注目記事はこちら

データ分析入門
これから始めるBigQuery基礎知識
2024.02.28

AWSの料金が 10 %割引になる!
『AWSの請求代行リセールサービス』
2024.07.16

