【Amazon Quick】Amazon Bedrock AgentCore のエージェントと連携してみる

はじめに
こんにちは、Paseri です。
今回は、Amazon Bedrock AgentCore と、Amazon Quick を連携させる方法をご紹介します。
今回のケースでは、コスト分析を行うエージェントを AgentCore Runtime に構築し、AgentCore Gateway を経由して Quick と連携するまでのアーキテクチャを、実際に構築しながら解説していきます。
今回は以下の手順で構築、設定作業を進めていきます。
- AgentCore Runtime へエージェントをデプロイ
- 必要なリソースの構築(CloudFormation)
- Quick と連携
アーキテクチャ
今回構築するシステムのアーキテクチャは以下の通りです。
クライアントが Cognito から認証を通して Gateway を呼び出して、Lambda 経由で Runtime が実行されます。
処理の流れ:
- ユーザーが Quick のチャットから AWS のコスト状況について質問
- AgentCore Gateway と Lambda を経由して AgentCore Runtime を実行
- コスト分析エージェントが Cost Explorer API を呼び出して、サービス別コスト集計・異常検出
- 分析結果(総コスト、トップ5サービス、異常検出)が Quick へ返却される
Quick:AWS のコスト状況について質問
    ↓
AgentCore Gateway(Cognito OAuth 認証)
    ↓
Lambda 関数:エージェントを呼び出す
    ↓
AgentCore Runtime:コスト分析エージェント実行
    ↓
AWS Cost Explorer:コスト状況を取得
エージェントのデプロイ
コードの準備
今回は、AWS Cost Explorer API を使用してコスト分析を行うエージェントを作成します。
このエージェントは、月初から現在までの AWS コストを分析し、サービス別のコスト内訳や異常なコスト増加を検出してくれます。
agent.py を作成します。
"""
AWS コスト分析エージェント
Cost Explorer API を使用してコスト傾向を分析
"""
import json
import boto3
from datetime import datetime, timedelta
from bedrock_agentcore.runtime import BedrockAgentCoreApp

app = BedrockAgentCoreApp()


class CostAnalyzer:
    """コスト分析を実行するクラス"""

    def __init__(self, region='ap-northeast-1'):
        """
        初期化

        Args:
            region: AWS リージョン
        """
        self.region = region
        # AWS Cost Explorer API を呼び出すためのクライアント作成
        self.ce_client = boto3.client('ce', region_name=region)

    def analyze(self, days=None):
        """
        コスト分析を実行

        Args:
            days: 分析期間(日数)。None の場合は月初から現在まで

        Returns:
            dict: 分析結果
        """
        end_date = datetime.now().date()

        if days is None:
            # 月初から現在まで
            start_date = end_date.replace(day=1)
        else:
            # 指定された日数分
            start_date = end_date - timedelta(days=days)

        print(f"Analyzing costs from {start_date} to {end_date}")

        # 過去30日間のコストを取得
        response = self.ce_client.get_cost_and_usage(
            TimePeriod={
                'Start': start_date.strftime('%Y-%m-%d'),
                'End': end_date.strftime('%Y-%m-%d')
            },
            Granularity='DAILY',
            Metrics=['UnblendedCost'],
            GroupBy=[
                {
                    'Type': 'DIMENSION',
                    'Key': 'SERVICE'
                }
            ]
        )

        # サービス別コストを集計
        service_costs = self._aggregate_service_costs(response)

        # 異常なコスト増加を検出
        anomalies = self._detect_cost_anomalies(response)

        # トップ5コストサービスを抽出
        top_services = sorted(
            service_costs.items(),
            key=lambda x: x[1],
            reverse=True
        )[:5]

        total_cost = sum(service_costs.values())

        return {
            'total_cost': round(total_cost, 2),
            'service_costs': service_costs,
            'top_services': dict(top_services),
            'anomalies': anomalies,
            'period': {
                'start': start_date.isoformat(),
                'end': end_date.isoformat(),
                'days': (end_date - start_date).days
            }
        }

    def _aggregate_service_costs(self, response):
        """
        サービス別コストを集計

        Args:
            response: Cost Explorer API レスポンス

        Returns:
            dict: サービス名とコストのマッピング
        """
        service_costs = {}

        for result in response['ResultsByTime']:
            for group in result.get('Groups', []):
                service = group['Keys'][0]
                cost = float(group['Metrics']['UnblendedCost']['Amount'])

                if service in service_costs:
                    service_costs[service] += cost
                else:
                    service_costs[service] = cost

        return service_costs

    def _detect_cost_anomalies(self, response):
        """
        異常なコスト増加を検出

        Args:
            response: Cost Explorer API レスポンス

        Returns:
            list: 検出された異常のリスト
        """
        anomalies = []
        daily_costs = []

        # 日次コストを抽出
        for result in response['ResultsByTime']:
            total_daily_cost = sum(
                float(group['Metrics']['UnblendedCost']['Amount'])
                for group in result.get('Groups', [])
            )
            daily_costs.append({
                'date': result['TimePeriod']['Start'],
                'cost': total_daily_cost
            })

        # 簡易的な異常検出(平均の1.5倍以上)
        if len(daily_costs) > 7:
            avg_cost = sum(d['cost'] for d in daily_costs[:-7]) / (len(daily_costs) - 7)

            for day in daily_costs[-7:]:
                if day['cost'] > avg_cost * 1.5:
                    anomalies.append({
                        'date': day['date'],
                        'cost': round(day['cost'], 2),
                        'average': round(avg_cost, 2),
                        'increase_rate': round((day['cost'] / avg_cost - 1) * 100, 1)
                    })

        return anomalies


@app.entrypoint
def invoke(payload):
    """
    エージェントのエントリーポイント

    Args:
        payload: リクエストペイロード

    Returns:
        dict: 実行結果
    """
    print(f"Starting AWS Cost Analysis Agent")
    print(f"Payload: {json.dumps(payload)}")

    try:
        # リクエストパラメータの取得
        days = payload.get('days')  # None の場合は月初から現在まで

        # コスト分析の実行
        analyzer = CostAnalyzer()
        analysis = analyzer.analyze(days=days)

        # サマリーメッセージの生成
        total_cost = analysis['total_cost']
        top_services = analysis['top_services']
        anomalies = analysis['anomalies']
        period = analysis['period']

        # 期間の表示
        if days is None:
            period_text = f"今月({period['start']}~{period['end']})"
        else:
            period_text = f"過去{period['days']}日間({period['start']}~{period['end']})"

        message = f"AWS コスト分析結果 {period_text}\n\n"
        message += f"総コスト: ${total_cost:.2f}\n\n"

        # トップ5サービス
        message += "コストが高いサービス(トップ5):\n"
        for i, (service, cost) in enumerate(top_services.items(), 1):
            percentage = (cost / total_cost * 100) if total_cost > 0 else 0
            message += f"{i}. {service}: ${cost:.2f} ({percentage:.1f}%)\n"

        # 異常検出
        if anomalies:
            message += f"\n異常なコスト増加を検出: {len(anomalies)}件\n"
            for anomaly in anomalies[:3]:
                message += f"- {anomaly['date']}: ${anomaly['cost']:.2f} "
                message += f"(平均の{anomaly['increase_rate']:.1f}%増)\n"
        else:
            message += "\n異常なコスト増加は検出されませんでした。\n"

        result = {
            "message": message,
            "analysis": analysis
        }

        print("Completed successfully")
        return result

    except Exception as e:
        import traceback
        error_detail = traceback.format_exc()
        print(f"Error occurred: {str(e)}")
        print(error_detail)

        return {
            "error": str(e),
            "message": f"エラーが発生しました: {str(e)}\n\n詳細:\n{error_detail}"
        }


if __name__ == "__main__":
    # ローカルテスト用
    app.run()
エージェントに必要なパッケージも requirements.txt に明記しておきます。
boto3
bedrock-agentcore
これで、AWS のコストを分析できるエージェントの準備が完了しました。
デフォルトでは月初から現在までのコストを分析し、days パラメータを指定すれば任意の期間を分析できます。
依存パッケージのインストール
エージェントの設定前に、依存パッケージをインストールしておきます。
pip install boto3 bedrock-agentcore bedrock-agentcore-starter-toolkit
AgentCore Runtime のデプロイ
デプロイするためのエージェント設定コマンドを実行します。
agentcore configure -e agent.py
設定時の質問には全て Enter を押してデフォルト値を使用します。
設定が完了すると、.bedrock_agentcore.yaml ファイルが作成されています。
╭───────────────────────────────────────────────────────────────── Configuration Success ──────────────────────────────────────────────────────────────────╮
│ Agent Details                                                                                                                                            │
│ Agent Name: paseri_cost_agent                                                                                                                            │
│ Deployment: container                                                                                                                                    │
│ Region: ap-northeast-1                                                                                                                                   │
│ Account: XXXXXXXXXXXX                                                                                                                                    │
│                                                                                                                                                          │
│ Configuration                                                                                                                                            │
│ Execution Role: Auto-create                                                                                                                              │
│ ECR Repository: Auto-create                                                                                                                              │
│ Network Mode: Public                                                                                                                                     │
│ ECR Repository: Auto-create                                                                                                                              │
│ Authorization: IAM (default)                                                                                                                             │
│                                                                                                                                                          │
│                                                                                                                                                          │
│ Memory: Disabled                                                                                                                                         │
│                                                                                                                                                          │
│                                                                                                                                                          │
│  Config saved to: ~/app/.bedrock_agentcore.yaml                                                                                                          │
│                                                                                                                                                          │
│ Next Steps:                                                                                                                                              │
│ agentcore deploy                                                                                                                                         │
╰──────────────────────────────────────────────────────────────────────────────────────────────────────────────────────────────────────────────────────────╯
設定が完了したら、デプロイを実行します。
agentcore launch
デプロイには数分程度かかります。
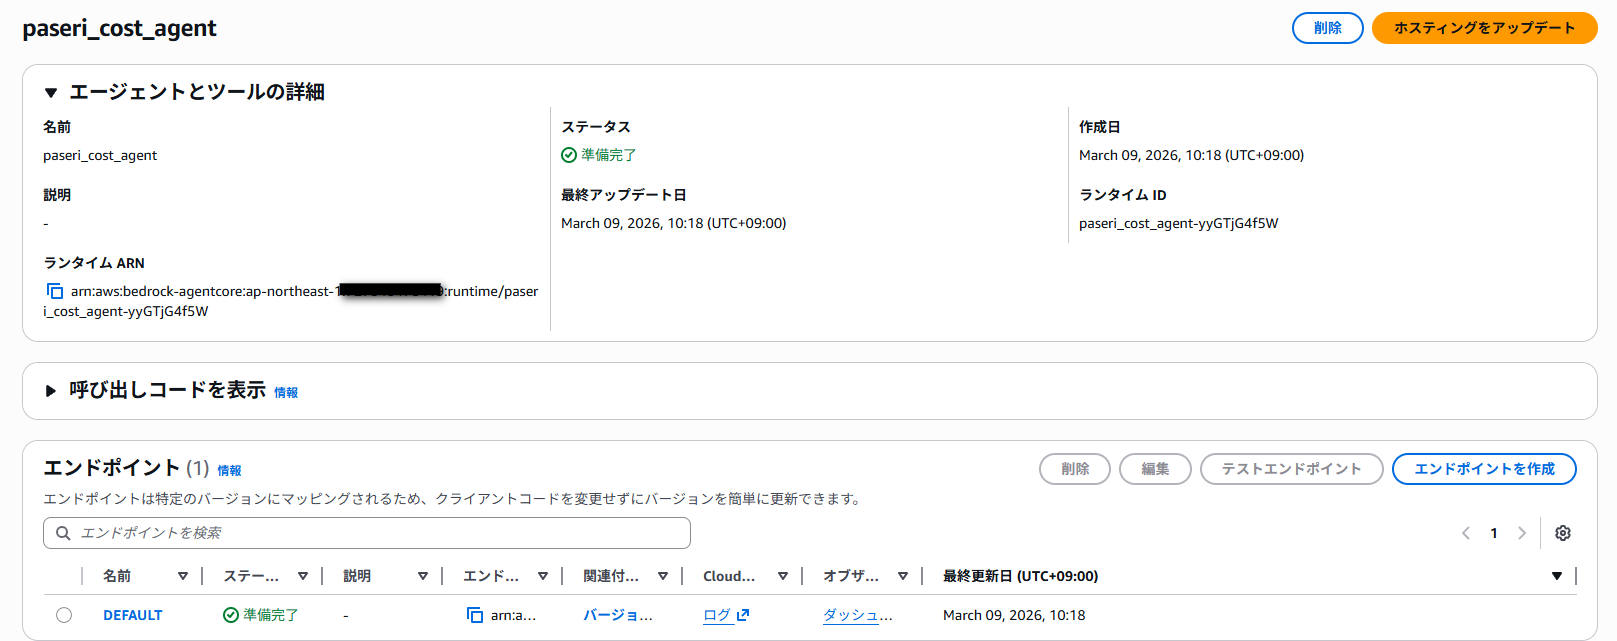
デプロイが完了したら、コンソールでもエージェントを確認することができるようになります。
後の手順で使用するので、Runtime ID を取得しておきます。
Runtime ID:paseri_cost_agent-yyGTjG4f5W
動作確認
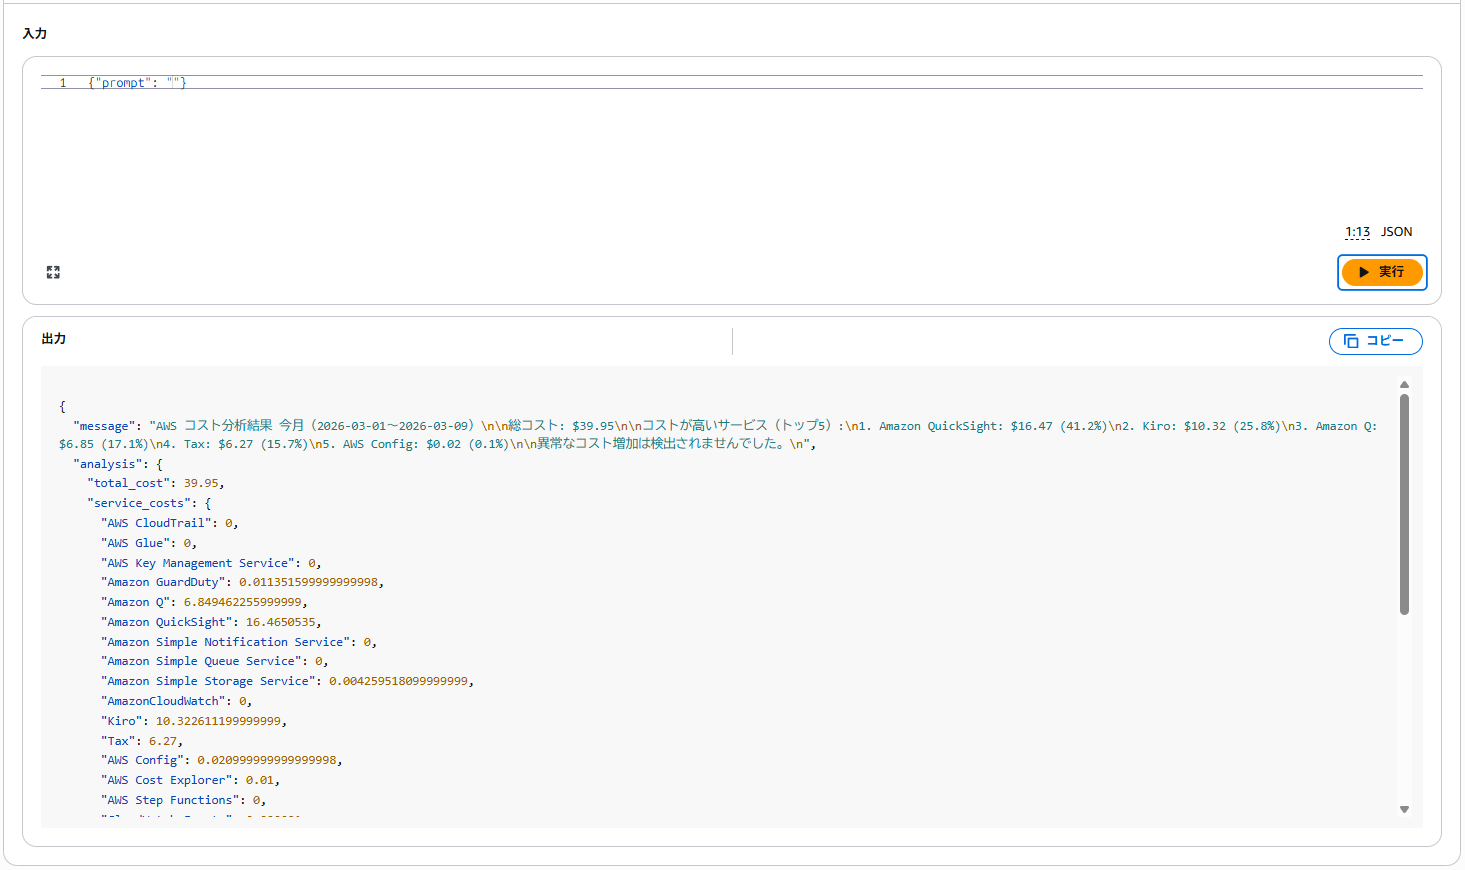
デプロイした Runtime を呼び出して動作確認しておきます。
パラメータを指定しない場合、月初から現在までのコストを分析します。
また今回のエージェントでは、特定の期間で指定することもできます。
{"days": 7}
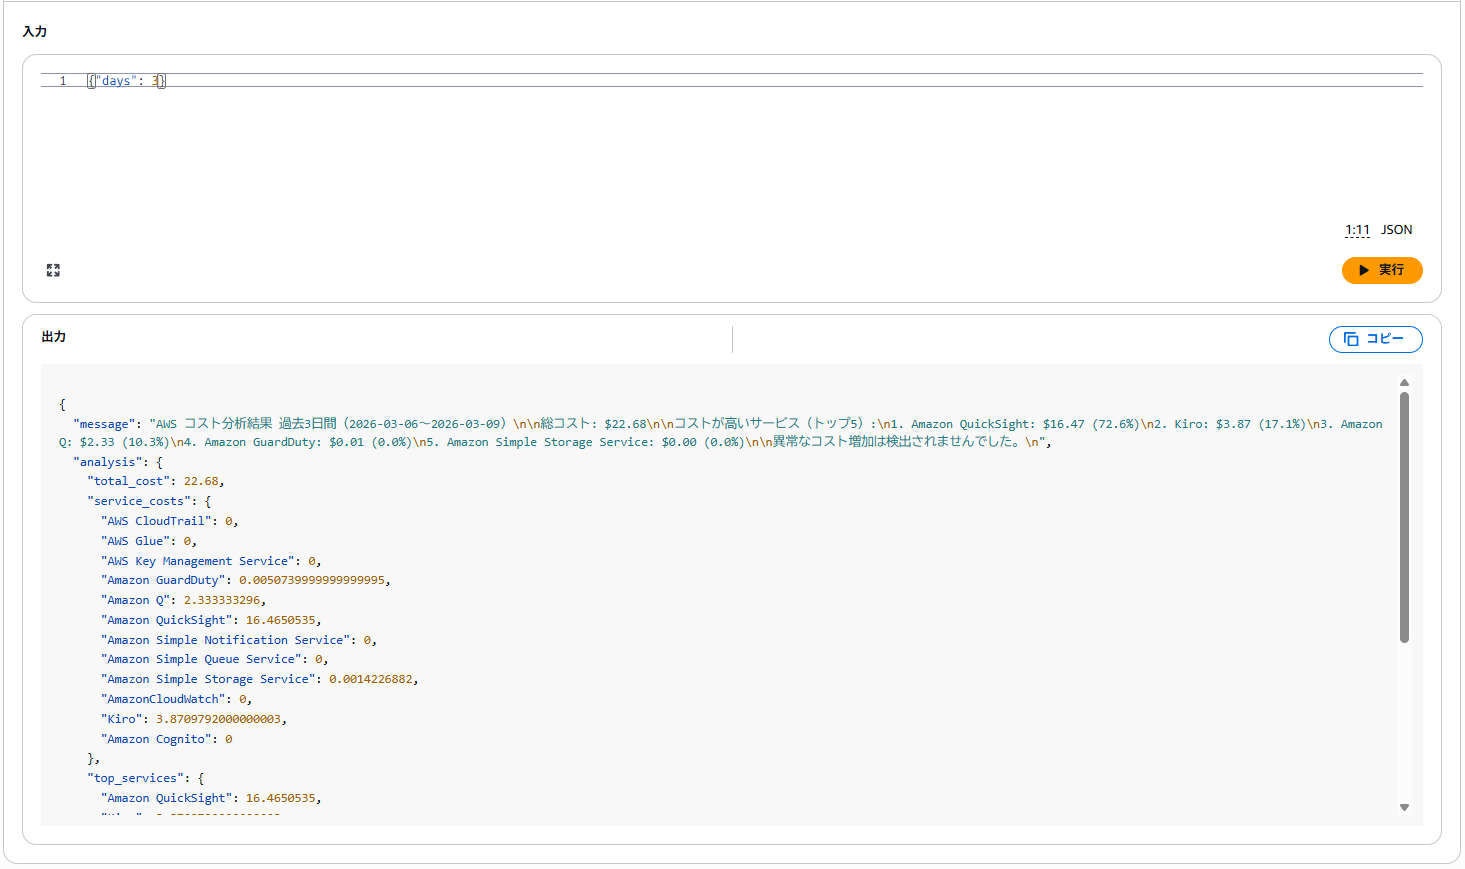
レスポンスが返ってくれば、Runtime のデプロイは成功です。
CloudFormation でリソースをデプロイ
今回は、Quick との連携に必要なリソースをすべて CloudFormation で作成します。
CloudFormation テンプレートの準備
cost-agent-gateway.yaml を作成します。(コードは本記事の最下部に添付しています。)
このテンプレートには以下のリソースが定義されています。
- Cognito ユーザープール(OAuth 認証用)
- Cognito ユーザープールドメイン
- Cognito ユーザープールクライアント
- Lambda 関数(Gateway 連携用)
- Lambda 実行ロール
- Gateway 実行ロール
- AgentCore Gateway
- Gateway Target
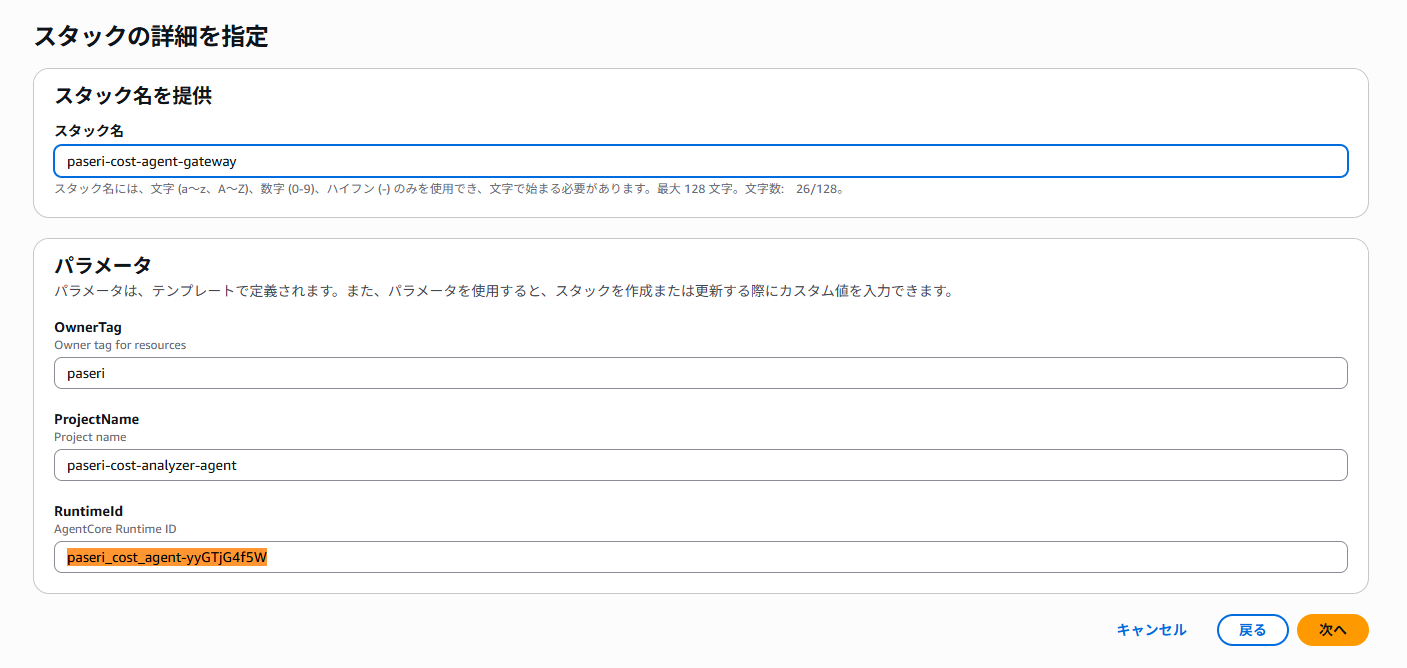
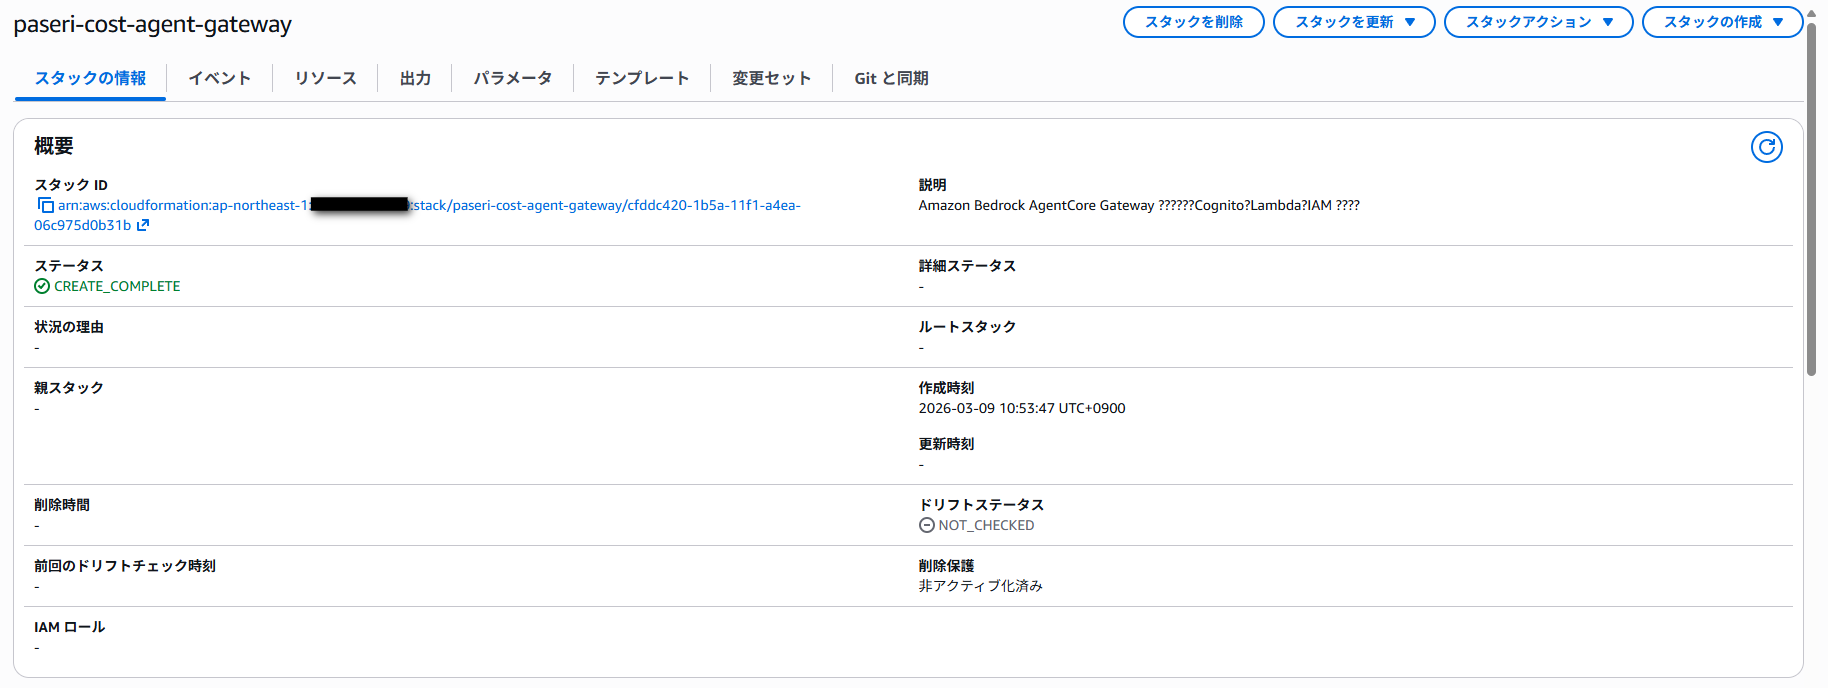
スタックの作成
それでは CloudFormation スタックを作成します。
パラメーターの項目で RuntimeId に、先ほど取得した Runtime ID を記入しておきます。
問題無く作成できれば完了です。
必要な値を取得
スタック作成完了後、必要な値を取得してメモしておきます。
aws cloudformation describe-stacks \
  --stack-name <CloudFormationStackName> \
  --region ap-northeast-1 \
  --query 'Stacks[0].Outputs' \
  --output table
Quick との連携時に必要なので、Client Secret も取得しておきます。
aws cognito-idp describe-user-pool-client \
  --user-pool-id <UserPoolId> \
  --client-id <UserPoolClientId> \
  --region ap-northeast-1 \
  --query 'UserPoolClient.ClientSecret' \
  --output text
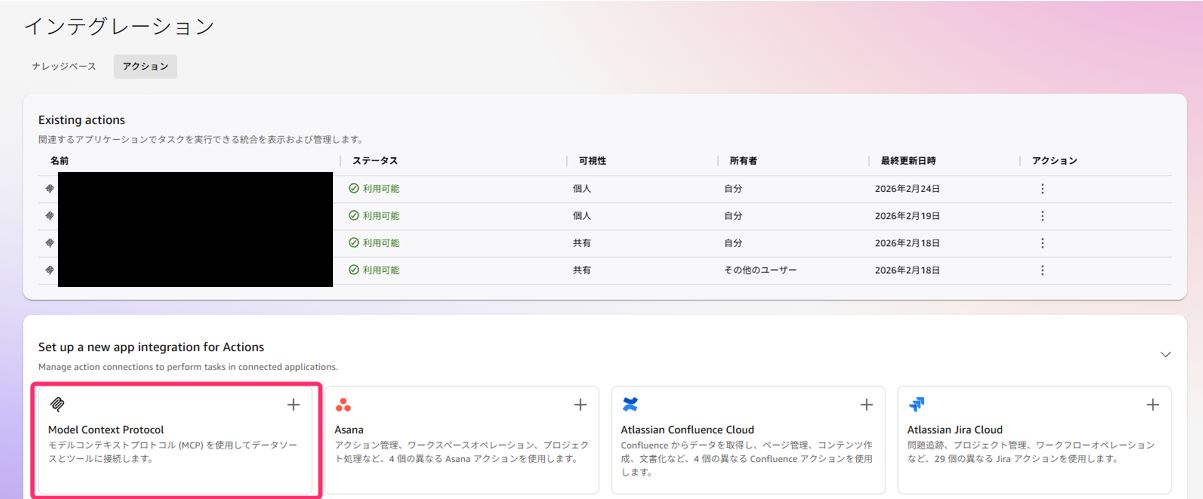
Quick と連携する
ここからは Quick 上での操作になります。
インテグレーションのアクションから「Model Context Protocol」を選択します。
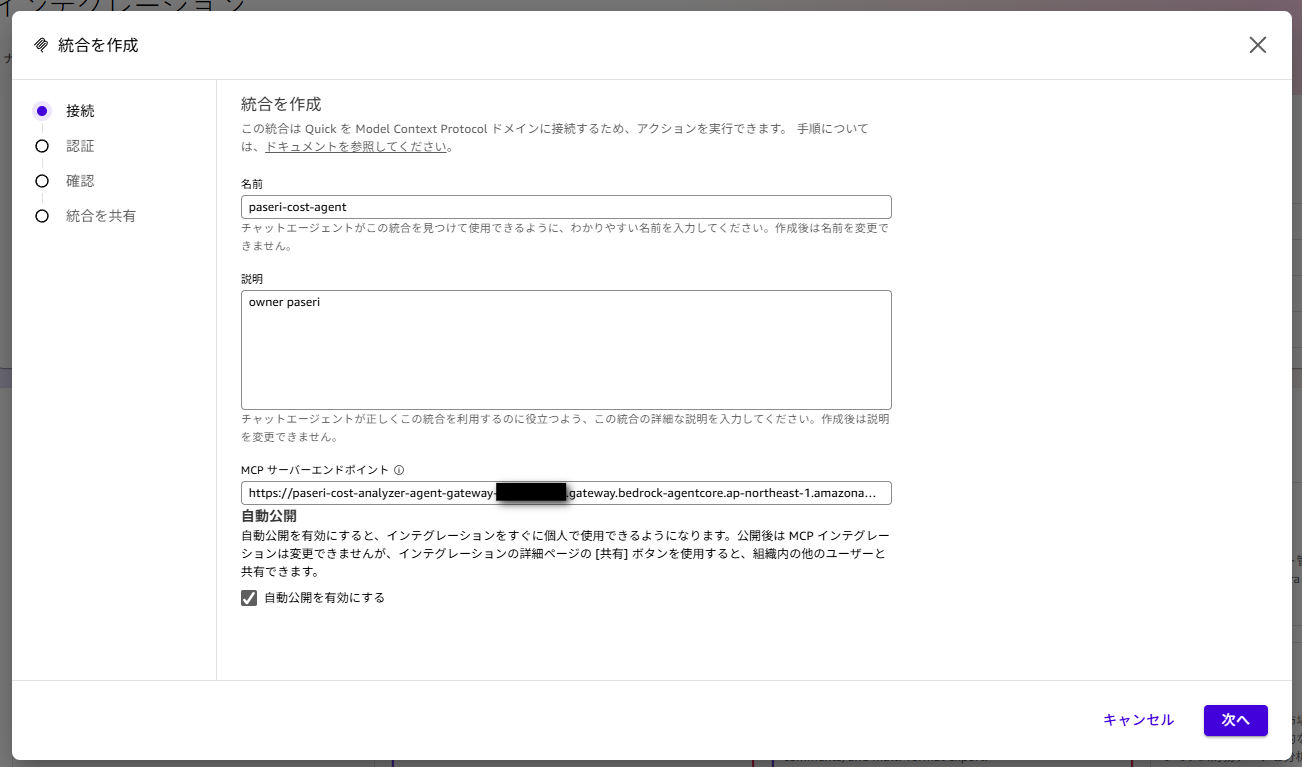
名前など必要な設定を記載します。
MCP サーバーエンドポイントには、Gateway の「AgentCore Gateway URL」の内容を記載しておきます。
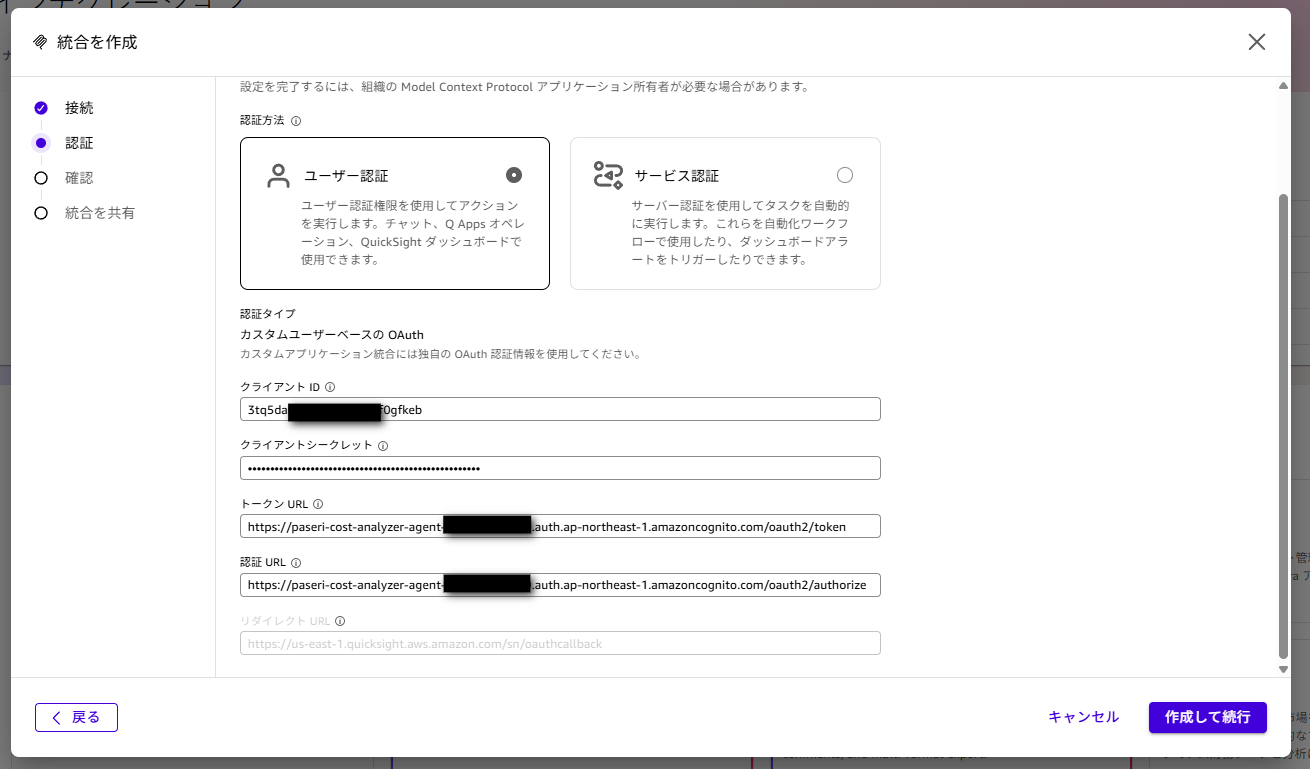
ユーザー認証部分は先ほどメモしておいた内容を記載します。
- クライアントID:Cognito User Pool Client ID の値
- クライアントシークレット:2 回目の CLI で取得した値
- トークンURL:Cognito Token Endpoint の値
- 認証URL:Cognito Authorize Endpoint の値
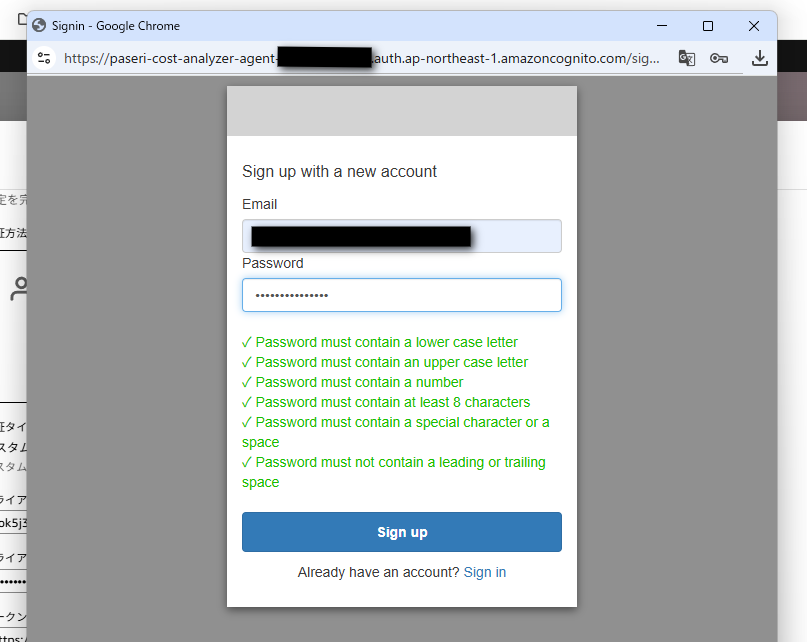
初回設定になるので、「Sign up」から進みます。

メールアドレスは、承認コードを受け取る必要があるので受信できるものを記載してください。
メールに届いた 6 桁のコードを記載して完了です。
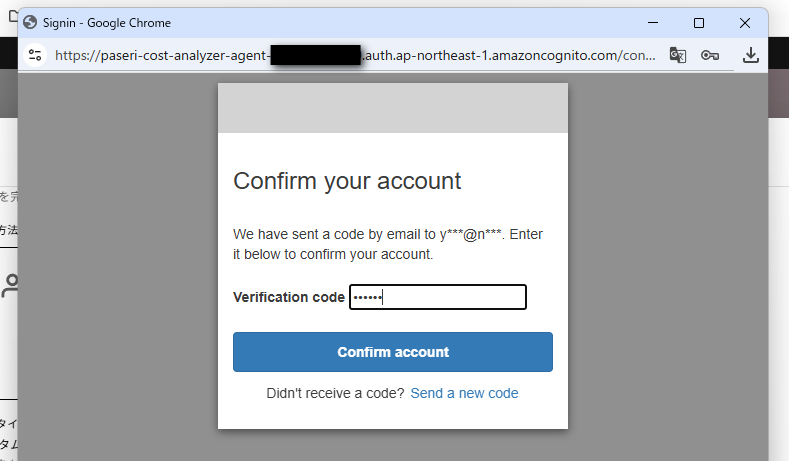
認証設定が問題無く進めば成功です。
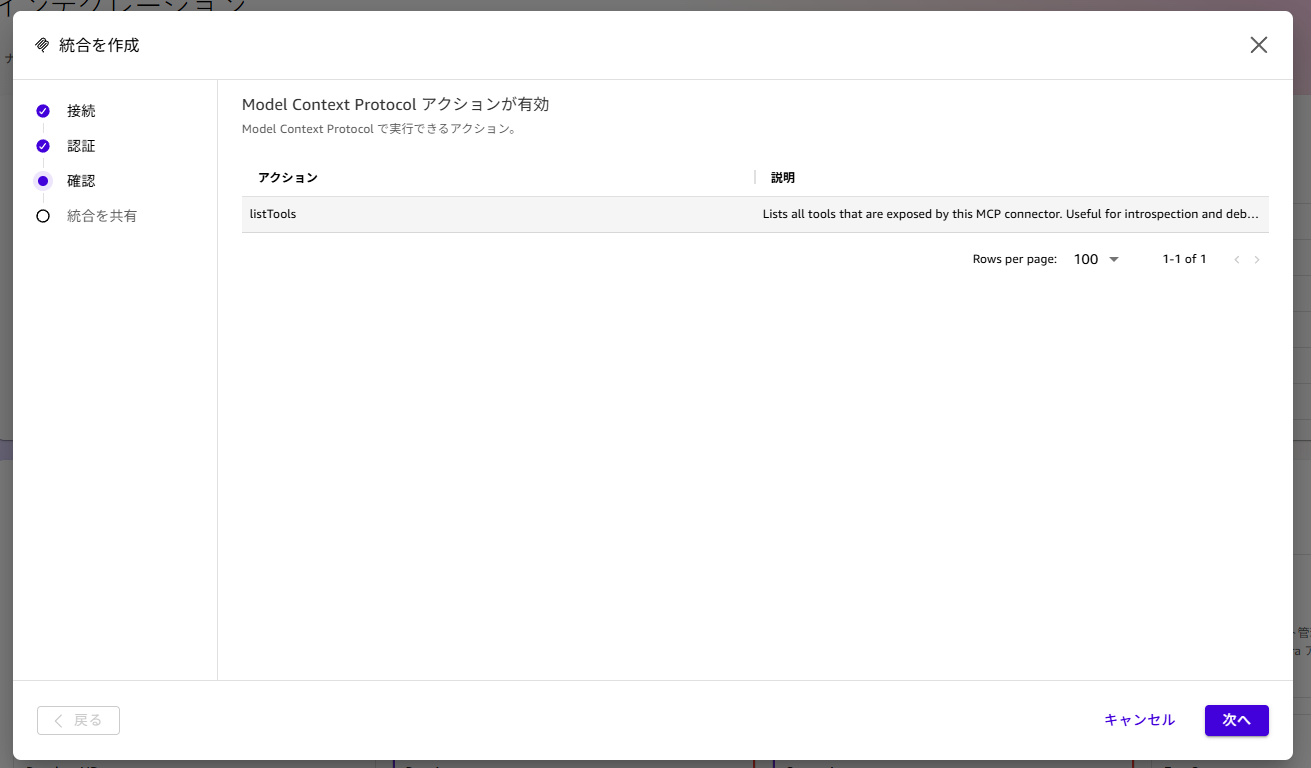
Quick 上で有効になったアクションの説明が確認されます。
作成したアクションの共有相手を設定することができます。
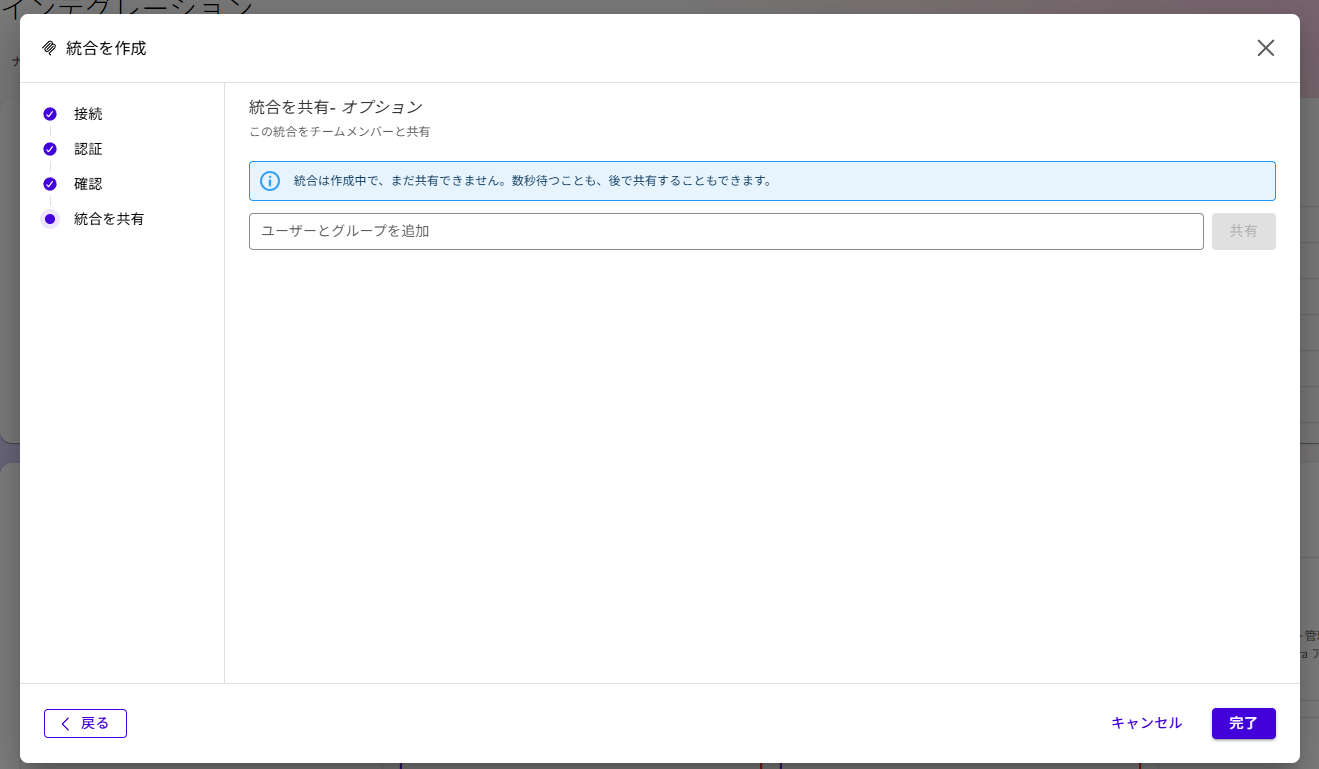
これで作成したエージェントと、Quick を連携することができました。
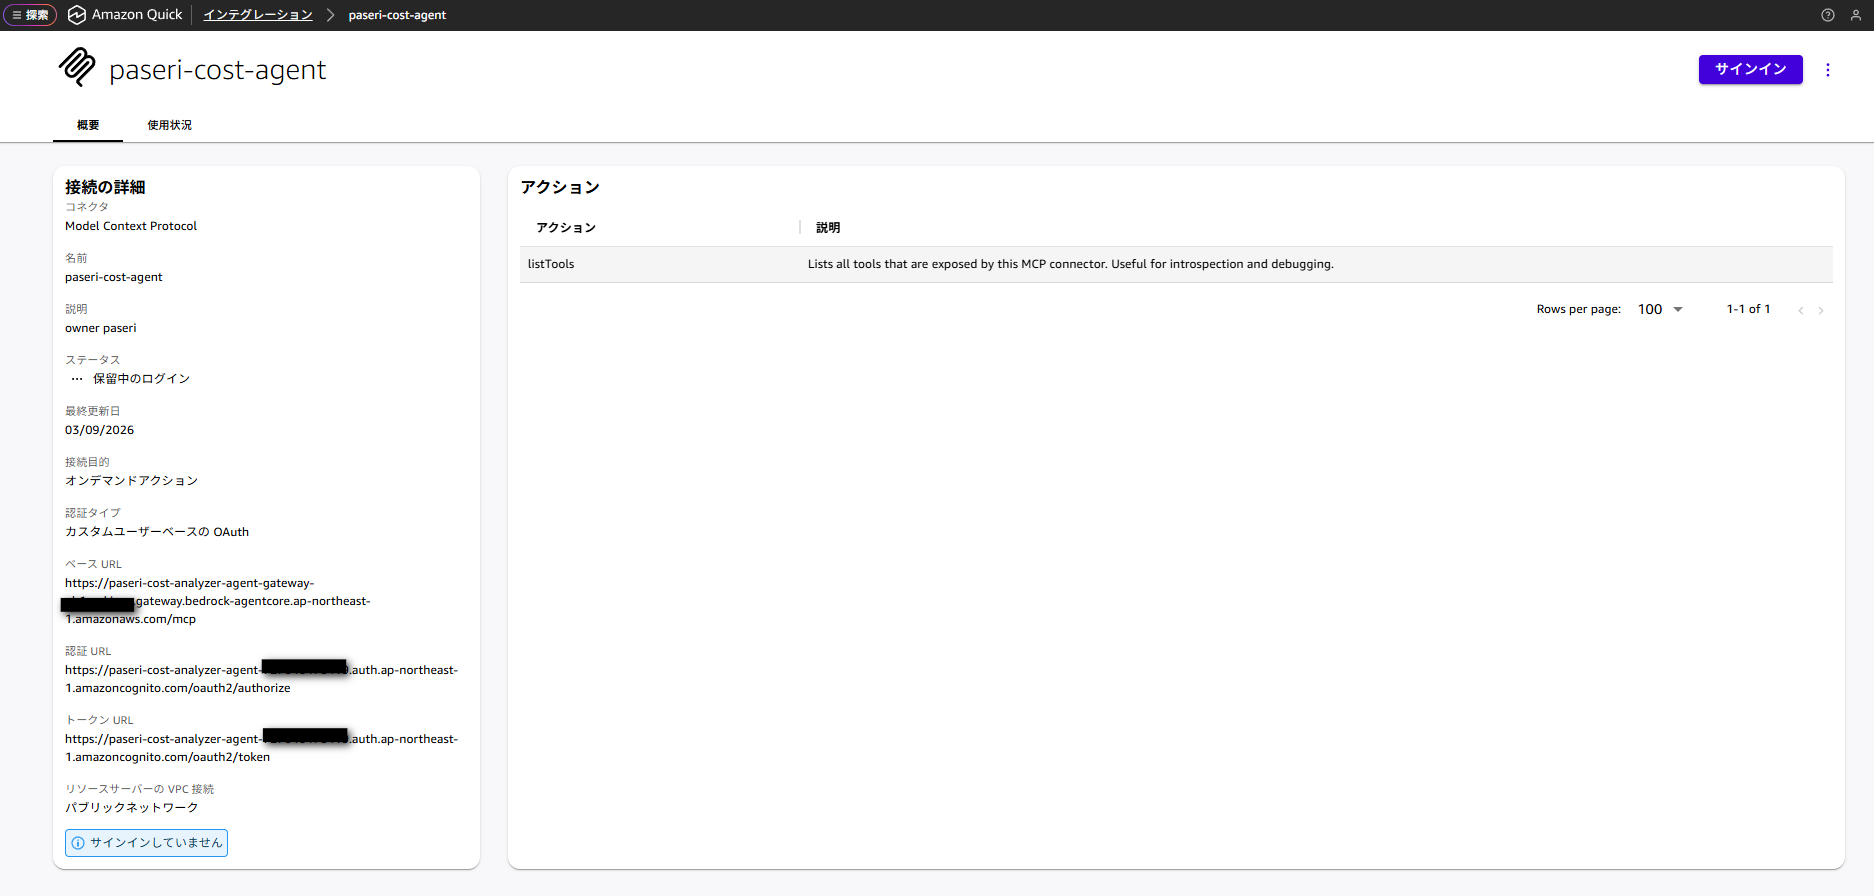
名前の部分を選択することで詳細を確認することができます。
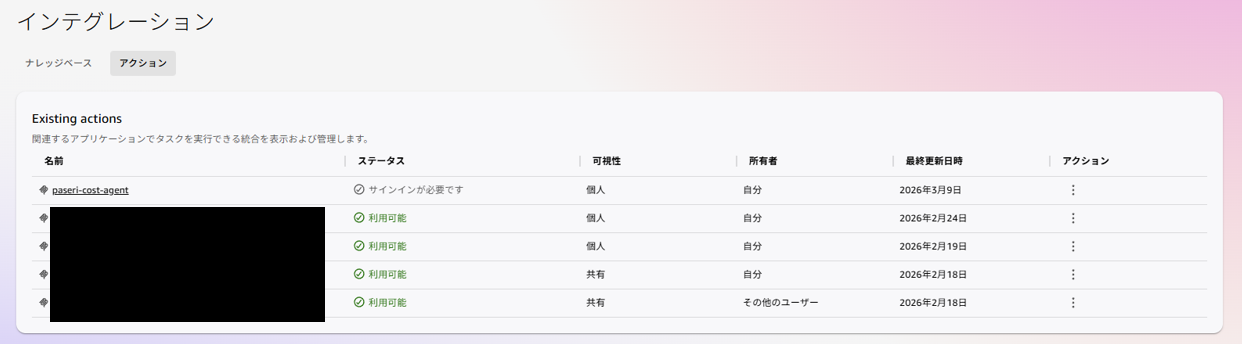
作成したエージェントを利用するには、サインインが必要です。
画面右上の「サインイン」から認証が可能です。
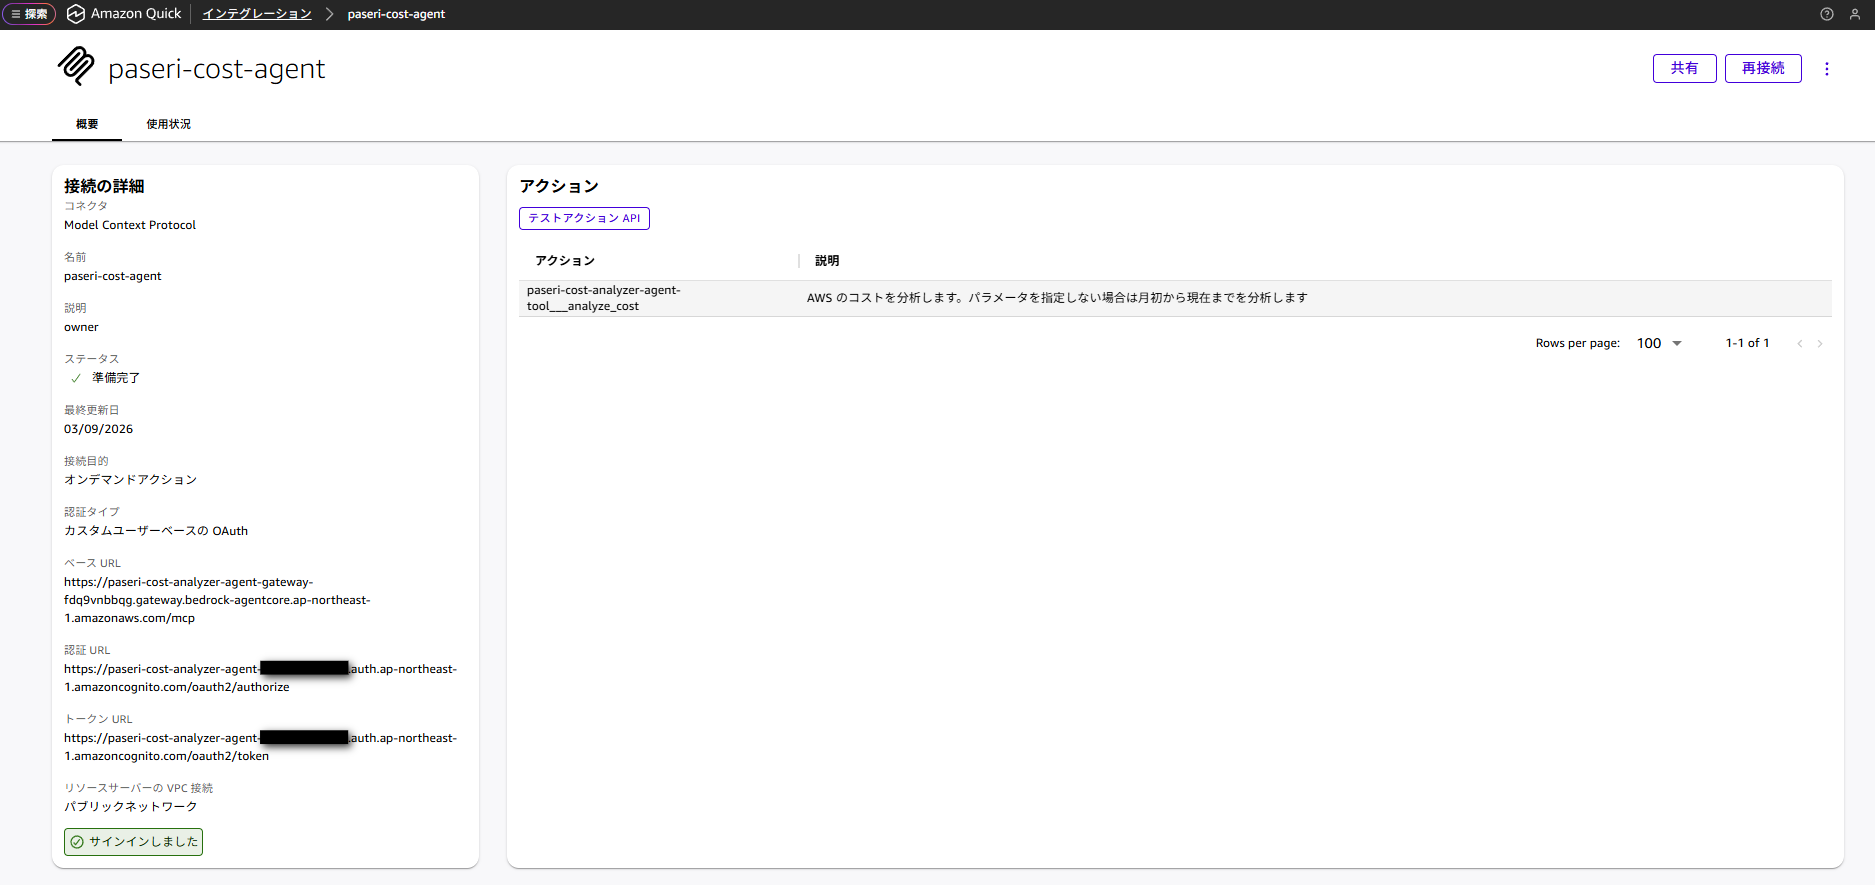
サインインができると左下に「サインインしました」と表示されるようになります。
これでエージェントが利用できる状態になりました。
実行してみる
これで一通りの設定が完了したので、実際に Quick 上から呼び出してみます。
作成したアクションの利用は、チャットから設定できます。
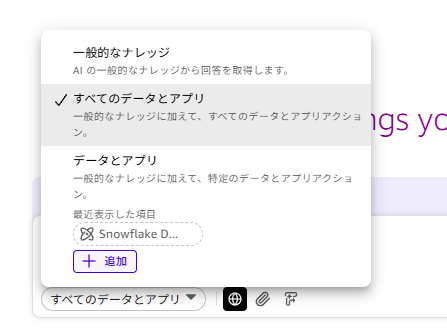
「すべてのデータとアプリ」を選択
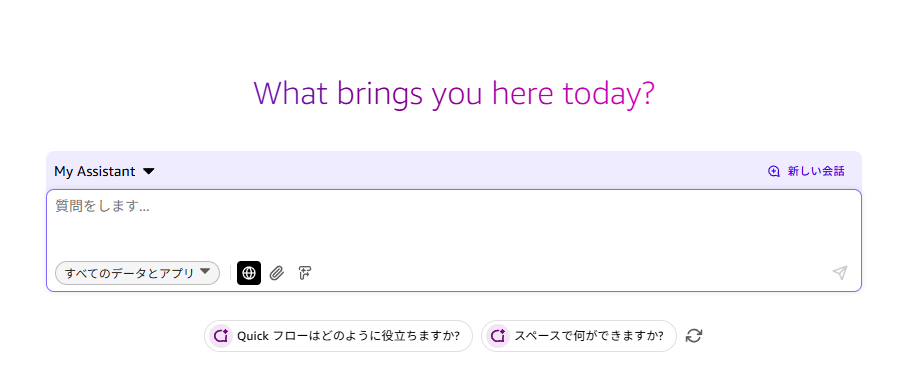
「+追加」を選択
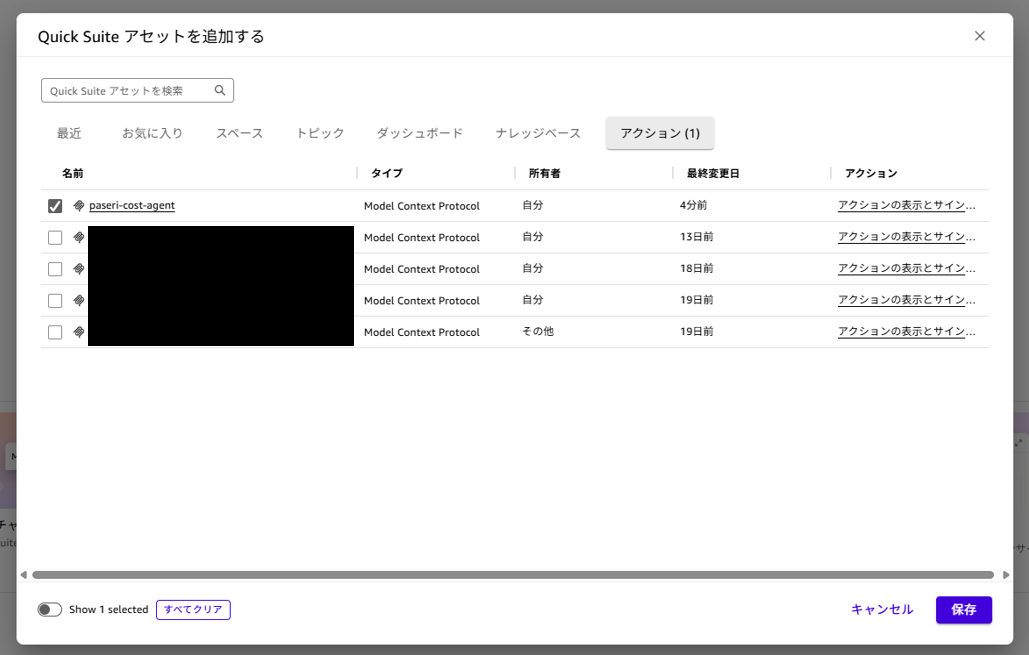
アクションタブから先ほど作成したアクションを選択することで利用できるようになります。
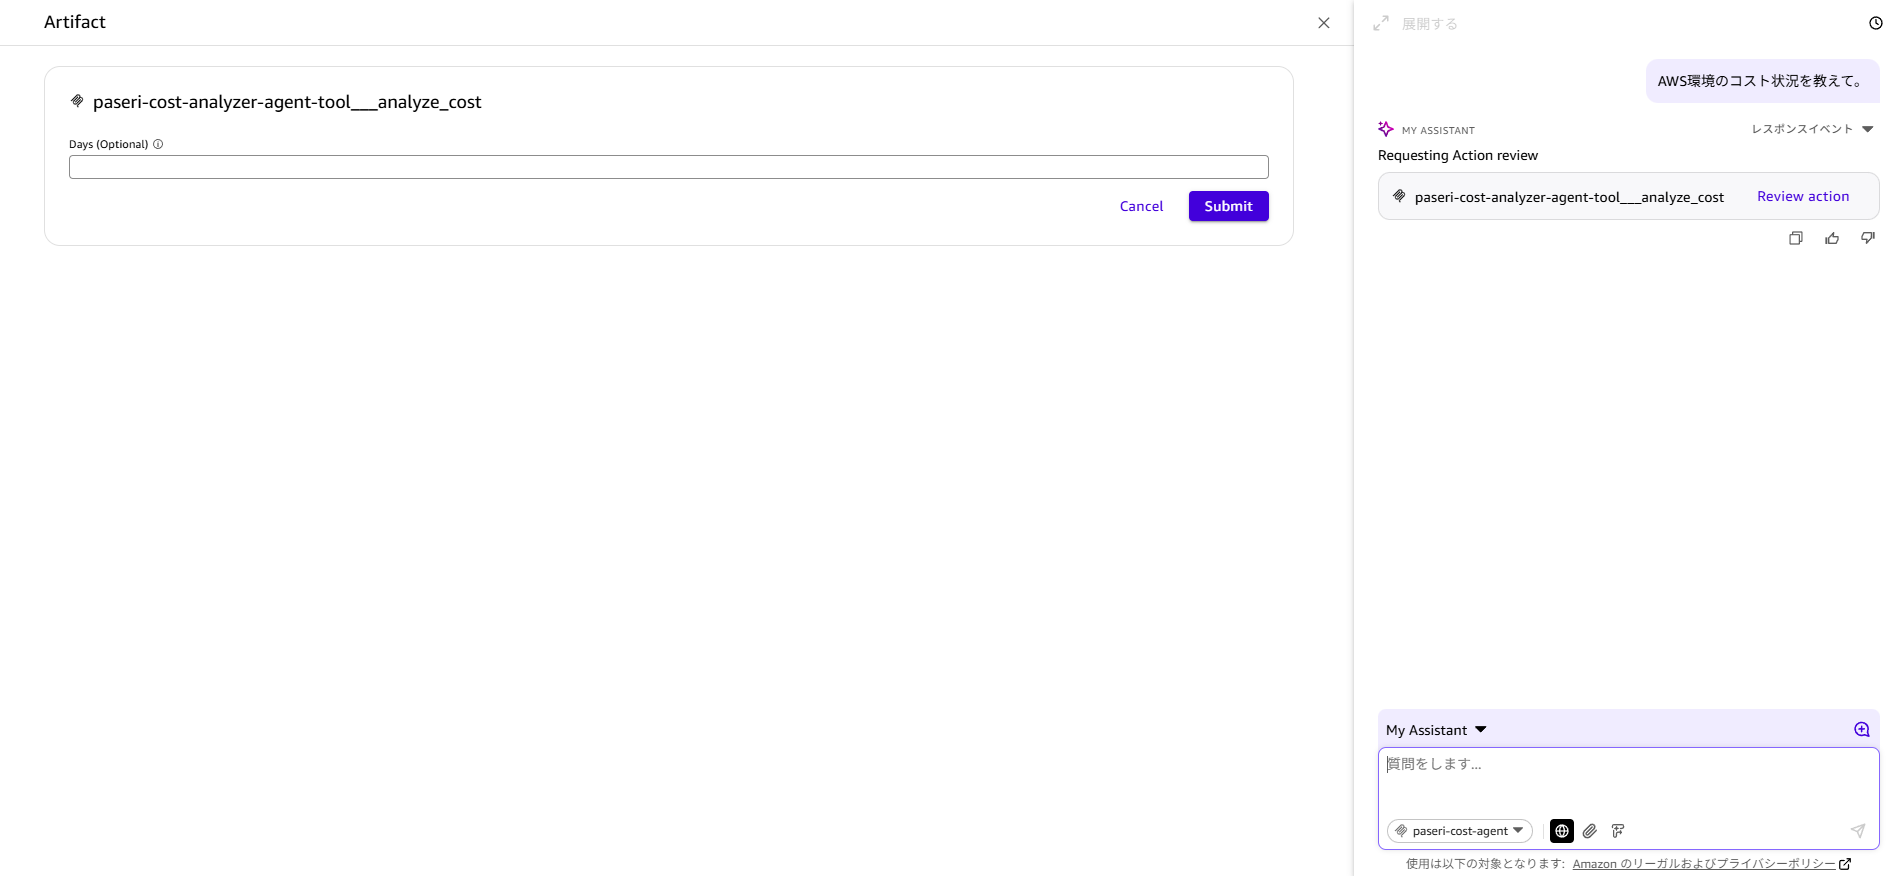
チャットから「AWS 環境のコスト状況を教えて。」と入力することで日付の値を設定する項目が自動で表示されます。
今回はそのまま指定せず実行してみます。
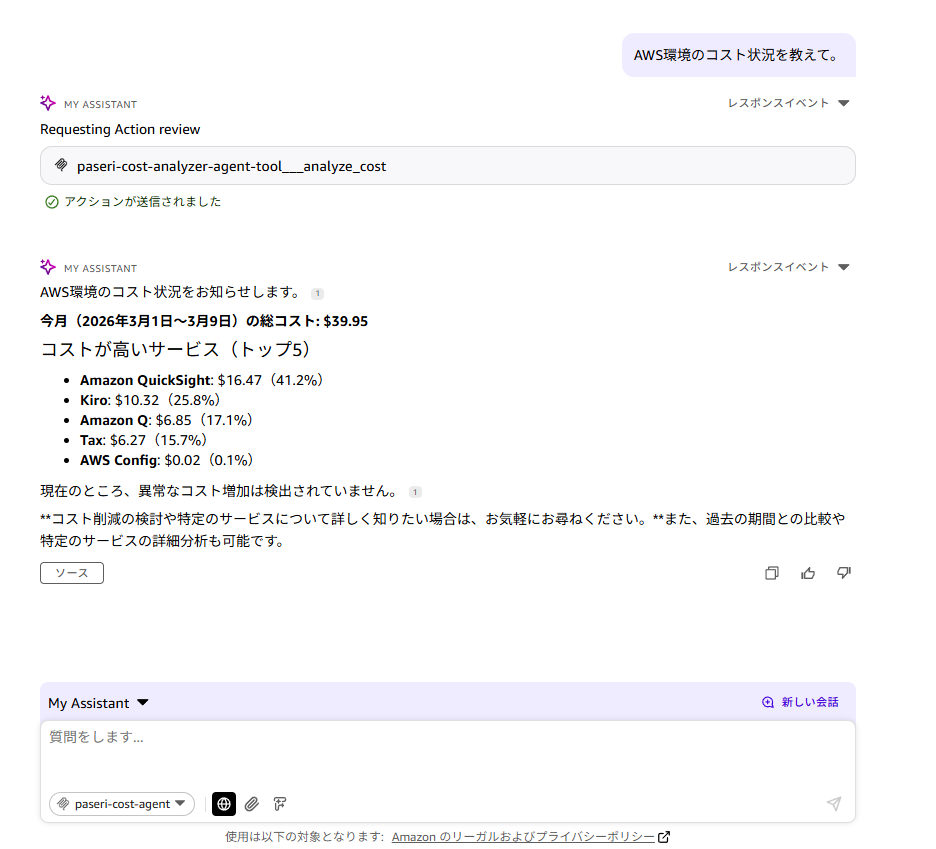
すると作成したエージェントが環境の情報を取得して返答してくれるようになりました。
過去 3 日間で指定した場合は以下のようになります。

まとめ
今回は、Amazon Bedrock AgentCore Runtime にデプロイしたエージェントへ、AgentCore Gateway 経由で Quick と連携する方法をご紹介してきました!
AgentCore を利用することで、より個人のユースケースに合わせてカスタマイズしたエージェントを利用することができるようになります。
また、Cognito を利用することでエージェントの利用に認証設定を設けることでセキュアな利用が可能になっています。
少しでも参考になれば幸いです。
最後までお読み頂きありがとうございました。
Appendix
今回の構築に利用した CloudFormation テンプレートです。
cost-agent-gateway.yaml ファイル
AWSTemplateFormatVersion: "2010-09-09"
Description: "Amazon Bedrock AgentCore Gateway"

Parameters:
  ProjectName:
    Type: String
    Default: cost-analyzer-agent
    Description: Project name
  RuntimeId:
    Type: String
    Description: AgentCore Runtime ID
  OwnerTag:
    Type: String
    Default: default-user
    Description: Owner tag for resources

Resources:
  # Cognito ユーザープール
  UserPool:
    Type: AWS::Cognito::UserPool
    Properties:
      UserPoolName: !Sub "${ProjectName}-user-pool"
      AutoVerifiedAttributes:
        - email
      UsernameAttributes:
        - email
      Schema:
        - Name: email
          AttributeDataType: String
          Required: true
          Mutable: false
      Policies:
        PasswordPolicy:
          MinimumLength: 8
          RequireUppercase: true
          RequireLowercase: true
          RequireNumbers: true
          RequireSymbols: true
      UserPoolTags:
        owner: !Ref OwnerTag
        ManagedBy: CloudFormation

  # Cognito ユーザープールドメイン
  UserPoolDomain:
    Type: AWS::Cognito::UserPoolDomain
    Properties:
      Domain: !Sub "${ProjectName}-${AWS::AccountId}"
      UserPoolId: !Ref UserPool

  # Cognito ユーザープールクライアント
  UserPoolClient:
    Type: AWS::Cognito::UserPoolClient
    Properties:
      ClientName: !Sub "${ProjectName}-client"
      UserPoolId: !Ref UserPool
      GenerateSecret: true
      AllowedOAuthFlows:
        - code
      AllowedOAuthScopes:
        - email
        - openid
        - profile
      AllowedOAuthFlowsUserPoolClient: true
      CallbackURLs:
        - https://us-east-1.quicksight.aws.amazon.com/sn/oauthcallback
        - https://us-west-2.quicksight.aws.amazon.com/sn/oauthcallback
        - https://ap-northeast-1.quicksight.aws.amazon.com/sn/oauthcallback
        - http://localhost:8080/callback
      LogoutURLs:
        - https://us-east-1.quicksight.aws.amazon.com/sn/logout
        - https://us-west-2.quicksight.aws.amazon.com/sn/logout
        - https://ap-northeast-1.quicksight.aws.amazon.com/sn/logout
        - http://localhost:8080/logout
      SupportedIdentityProviders:
        - COGNITO

  # Lambda 実行ロール
  LambdaExecutionRole:
    Type: AWS::IAM::Role
    Properties:
      RoleName: !Sub "${ProjectName}-lambda-role"
      AssumeRolePolicyDocument:
        Version: "2012-10-17"
        Statement:
          - Effect: Allow
            Principal:
              Service: lambda.amazonaws.com
            Action: sts:AssumeRole
      ManagedPolicyArns:
        - arn:aws:iam::aws:policy/service-role/AWSLambdaBasicExecutionRole
      Policies:
        - PolicyName: RuntimeInvokePolicy
          PolicyDocument:
            Version: "2012-10-17"
            Statement:
              - Effect: Allow
                Action:
                  - bedrock-agentcore:InvokeAgentRuntime
                  - bedrock-agentcore:GetRuntime
                Resource:
                  - !Sub "arn:aws:bedrock-agentcore:${AWS::Region}:${AWS::AccountId}:runtime/${RuntimeId}"
                  - !Sub "arn:aws:bedrock-agentcore:${AWS::Region}:${AWS::AccountId}:runtime/${RuntimeId}/*"
      Tags:
        - Key: owner
          Value: !Ref OwnerTag
        - Key: ManagedBy
          Value: CloudFormation

  # Lambda 関数(Gateway と Runtime 間に設置)
  GatewayProxyFunction:
    Type: AWS::Lambda::Function
    Properties:
      FunctionName: !Sub "${ProjectName}-gateway-proxy"
      Runtime: python3.12
      Handler: index.lambda_handler
      Role: !GetAtt LambdaExecutionRole.Arn
      Timeout: 300
      MemorySize: 512
      Environment:
        Variables:
          RUNTIME_IDENTIFIER: !Ref RuntimeId
          BEDROCK_REGION: !Ref AWS::Region
      Code:
        ZipFile: |
          import json
          import boto3
          import os

          bedrock_client = boto3.client('bedrock-agentcore', region_name=os.environ['BEDROCK_REGION'])

          def lambda_handler(event, context):
              """
              AgentCore Gateway からのリクエストを Runtime に転送
              """
              try:
                  print(f"Received event: {json.dumps(event)}")

                  runtime_id = os.environ['RUNTIME_IDENTIFIER']
                  arguments = event

                  print(f"Invoking runtime: {runtime_id} with arguments: {json.dumps(arguments)}")

                  # Runtime ARN を構築
                  account_id = context.invoked_function_arn.split(':')[4]
                  region = os.environ['BEDROCK_REGION']
                  runtime_arn = f"arn:aws:bedrock-agentcore:{region}:{account_id}:runtime/{runtime_id}"

                  print(f"Invoking runtime ARN: {runtime_arn}")

                  response = bedrock_client.invoke_agent_runtime(
                      agentRuntimeArn=runtime_arn,
                      payload=json.dumps(arguments).encode('utf-8')
                  )

                  print(f"Runtime response received")

                  response_body = response.get('response')
                  if response_body:
                      response_bytes = response_body.read()
                      response_text = response_bytes.decode('utf-8')

                      print(f"Response text: {response_text}")

                      try:
                          result = json.loads(response_text)
                      except json.JSONDecodeError:
                          result = {'message': response_text}

                      return result
                  else:
                      print(f"No response body")
                      return {'error': 'Runtime から応答がありませんでした'}

              except Exception as e:
                  print(f"Lambda error: {str(e)}")
                  import traceback
                  traceback.print_exc()

                  return {
                      'error': str(e)
                  }
      Tags:
        - Key: owner
          Value: !Ref OwnerTag
        - Key: ManagedBy
          Value: CloudFormation

  # Lambda リソースベースポリシー(Gateway からの呼び出しを許可)
  LambdaInvokePermission:
    Type: AWS::Lambda::Permission
    Properties:
      FunctionName: !Ref GatewayProxyFunction
      Action: lambda:InvokeFunction
      Principal: bedrock-agentcore.amazonaws.com
      SourceAccount: !Ref AWS::AccountId

  # Gateway 実行ロール
  GatewayExecutionRole:
    Type: AWS::IAM::Role
    Properties:
      RoleName: !Sub "${ProjectName}-gateway-role"
      AssumeRolePolicyDocument:
        Version: "2012-10-17"
        Statement:
          - Effect: Allow
            Principal:
              Service: bedrock-agentcore.amazonaws.com
            Action: sts:AssumeRole
      Policies:
        - PolicyName: GatewayInvokeLambdaPolicy
          PolicyDocument:
            Version: "2012-10-17"
            Statement:
              - Effect: Allow
                Action: lambda:InvokeFunction
                Resource: !GetAtt GatewayProxyFunction.Arn
      Tags:
        - Key: owner
          Value: !Ref OwnerTag
        - Key: ManagedBy
          Value: CloudFormation

  # AgentCore Gateway
  AgentCoreGateway:
    Type: AWS::BedrockAgentCore::Gateway
    DependsOn:
      - GatewayExecutionRole
      - UserPoolClient
    Properties:
      Name: !Sub "${ProjectName}-gateway"
      ProtocolType: MCP
      RoleArn: !GetAtt GatewayExecutionRole.Arn
      AuthorizerType: CUSTOM_JWT
      AuthorizerConfiguration:
        CustomJWTAuthorizer:
          DiscoveryUrl: !Sub "https://cognito-idp.${AWS::Region}.amazonaws.com/${UserPool}/.well-known/openid-configuration"
          AllowedClients:
            - !Ref UserPoolClient
      Tags:
        owner: !Ref OwnerTag
        ManagedBy: CloudFormation

  # Gateway Target
  GatewayTarget:
    Type: AWS::BedrockAgentCore::GatewayTarget
    DependsOn:
      - AgentCoreGateway
      - GatewayProxyFunction
    Properties:
      GatewayIdentifier: !GetAtt AgentCoreGateway.GatewayIdentifier
      Name: !Sub "${ProjectName}-tool"
      Description: "AWS コスト分析ツール"
      TargetConfiguration:
        Mcp:
          Lambda:
            LambdaArn: !GetAtt GatewayProxyFunction.Arn
            ToolSchema:
              InlinePayload:
                - Name: analyze_cost
                  Description: "AWS のコストを分析します。パラメータを指定しない場合は月初から現在までを分析します"
                  InputSchema:
                    Type: object
                    Properties:
                      days:
                        Type: number
                        Description: "分析期間(日数)。指定しない場合は月初から現在まで"
      CredentialProviderConfigurations:
        - CredentialProviderType: GATEWAY_IAM_ROLE

Outputs:
  UserPoolId:
    Description: Cognito User Pool ID
    Value: !Ref UserPool
    Export:
      Name: !Sub "${AWS::StackName}-UserPoolId"

  UserPoolClientId:
    Description: Cognito User Pool Client ID
    Value: !Ref UserPoolClient
    Export:
      Name: !Sub "${AWS::StackName}-UserPoolClientId"

  UserPoolDomain:
    Description: Cognito User Pool Domain
    Value: !Ref UserPoolDomain
    Export:
      Name: !Sub "${AWS::StackName}-UserPoolDomain"

  TokenEndpoint:
    Description: Cognito Token Endpoint
    Value: !Sub "https://${UserPoolDomain}.auth.${AWS::Region}.amazoncognito.com/oauth2/token"
    Export:
      Name: !Sub "${AWS::StackName}-TokenEndpoint"

  AuthorizeEndpoint:
    Description: Cognito Authorize Endpoint
    Value: !Sub "https://${UserPoolDomain}.auth.${AWS::Region}.amazoncognito.com/oauth2/authorize"
    Export:
      Name: !Sub "${AWS::StackName}-AuthorizeEndpoint"

  LambdaFunctionArn:
    Description: Lambda 関数 ARN
    Value: !GetAtt GatewayProxyFunction.Arn
    Export:
      Name: !Sub "${AWS::StackName}-LambdaFunctionArn"

  GatewayExecutionRoleArn:
    Description: Gateway 実行ロール ARN
    Value: !GetAtt GatewayExecutionRole.Arn
    Export:
      Name: !Sub "${AWS::StackName}-GatewayExecutionRoleArn"

  DiscoveryUrl:
    Description: Cognito OIDC Discovery URL
    Value: !Sub "https://cognito-idp.${AWS::Region}.amazonaws.com/${UserPool}/.well-known/openid-configuration"
    Export:
      Name: !Sub "${AWS::StackName}-DiscoveryUrl"

  GatewayId:
    Description: AgentCore Gateway ID
    Value: !GetAtt AgentCoreGateway.GatewayIdentifier
    Export:
      Name: !Sub "${AWS::StackName}-GatewayId"

  GatewayArn:
    Description: AgentCore Gateway ARN
    Value: !GetAtt AgentCoreGateway.GatewayArn
    Export:
      Name: !Sub "${AWS::StackName}-GatewayArn"

  GatewayUrl:
    Description: AgentCore Gateway URL
    Value: !GetAtt AgentCoreGateway.GatewayUrl
    Export:
      Name: !Sub "${AWS::StackName}-GatewayUrl"

  GatewayTargetId:
    Description: Gateway Target ID
    Value: !GetAtt GatewayTarget.TargetId
    Export:
      Name: !Sub "${AWS::StackName}-GatewayTargetId"

2024年新卒入社。うどん好きな初心者クラウドエンジニア。


Recommends
こちらもおすすめ
-

Amazon Bedrock 経由で Claude Code を利用するまで
2026.3.18
-

Amazon Quick から Asana を自然言語で操作してみた
2026.3.5


Special Topics
注目記事はこちら

データ分析入門
これから始めるBigQuery基礎知識
2024.02.28

AWSの料金が 10 %割引になる!
『AWSの請求代行リセールサービス』
2024.07.16