手を動かして GBDT を理解してみる
こんにちは。データサイエンスチームの t2sy です。
この記事では、多くの機械学習タスクで使われている GBDT (Gradient Boosting Decision Tree) を手を動かして実装・実験することでアルゴリズムを理解することを目指します。
環境は Python 3.7.2、 NumPy 1.15.4 です。
GBDT
ブースティング (Boosting) は弱学習器 (weak learner) の学習を逐次的に行い強学習器に導くアルゴリズムを指します。GBDT は損失関数の勾配を用いたブースティングで弱学習器に決定木を用います。
代表的な GBDT の実装には以下があります。
【事例集】AIや機械学習によるビッグデータ活用をしたい方にオススメ!

「AIによるキャスト評価システムの構築」「データ分析基盤の運用費用9割削減」など、AWSを利用したAI、機械学習の成功事例をご紹介します。
データ
最初に実験で使うデータを準備します。振幅10の正弦波に標準正規分布 N(0,1) を乗せた1000行1列のデータを生成し、訓練:テスト=8:2で分割します。
import numpy as np
from sklearn.model_selection import train_test_split

def generate_data(N=1000, test_size=0.2, seed=123):
    np.random.seed(seed)
    X = np.linspace(0, 2 * np.pi, N)
    X = X.reshape(-1, 1)
    y = 10 * np.sin(X[:, 0]) + np.random.standard_normal(N)

    return train_test_split(X, y, test_size=test_size, random_state=seed)
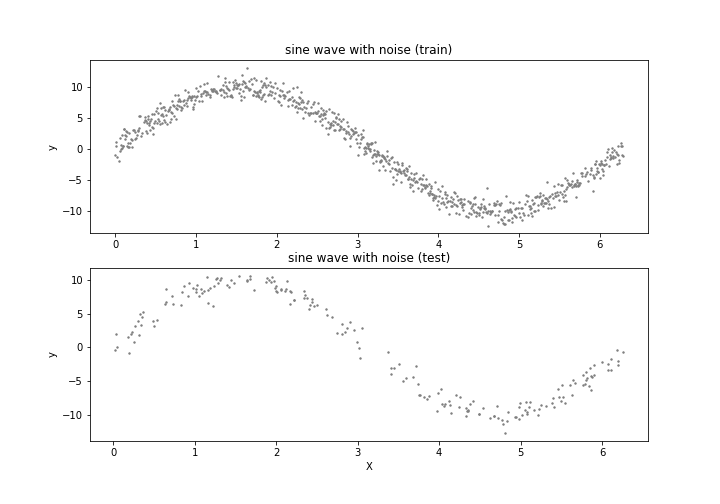
生成したデータに対して回帰木と GBDT で曲線フィッティングを行い比較します。
決定木
GBDT を構成する弱学習器である決定木あるいは回帰木は、情報利得が最大となる特徴でデータを再帰的に分割するアルゴリズムです。通常は二分決定木となります。分割条件は分類問題の場合はエントロピー、ジニ不純度、分類誤差など、回帰問題の場合は、MSE (mean squared error)、LAD (least absolute deviation) などがあります。
まず、 Tree クラスを書きます。
class Tree(object):
    def __init__(self, pre_pruning=False, max_depth=6):
        self.feature = None
        self.label = None
        self.n_samples = None
        self.gain = None
        self.left = None
        self.right = None
        self.threshold = None
        self.pre_pruning = pre_pruning
        self.max_depth = max_depth
        self.depth = 0

    def build(self, features, target, criterion='gini'):
        self.n_samples = features.shape[0]

        if len(np.unique(target)) == 1:
            self.label = target[0]
            return

        best_gain = 0.0
        best_feature = None
        best_threshold = None

        if criterion in {'gini', 'entropy', 'error'}:
            self.label = max(target, key=lambda c: len(target[target==c]))
        else:
            self.label = np.mean(target)

        impurity_node = self._calc_impurity(criterion, target)

        for col in range(features.shape[1]):
            feature_level = np.unique(features[:,col])
            thresholds = (feature_level[:-1] + feature_level[1:]) / 2.0

            for threshold in thresholds:
                target_l = target[features[:,col] <= threshold]
                impurity_l = self._calc_impurity(criterion, target_l)
                n_l = target_l.shape[0] / self.n_samples

                target_r = target[features[:,col] > threshold]
                impurity_r = self._calc_impurity(criterion, target_r)
                n_r = target_r.shape[0] / self.n_samples

                ig = impurity_node - (n_l * impurity_l + n_r * impurity_r)

                if ig > best_gain or best_threshold is None or best_feature is None:
                    best_gain = ig
                    best_feature = col
                    best_threshold = threshold

        self.feature = best_feature
        self.gain = best_gain
        self.threshold = best_threshold
        if self.pre_pruning is False or self.depth < self.max_depth:
            self._divide_tree(features, target, criterion)
        else:
            self.feature = None

    def _divide_tree(self, features, target, criterion):
        features_l = features[features[:, self.feature] <= self.threshold]
        target_l = target[features[:, self.feature] <= self.threshold]
        self.left = Tree(self.pre_pruning, self.max_depth)
        self.left.depth = self.depth + 1
        self.left.build(features_l, target_l, criterion)

        features_r = features[features[:, self.feature] > self.threshold]
        target_r = target[features[:, self.feature] > self.threshold]
        self.right = Tree(self.pre_pruning, self.max_depth)
        self.right.depth = self.depth + 1
        self.right.build(features_r, target_r, criterion)


    def _calc_impurity(self, criterion, target):
        c = np.unique(target)
        s = target.shape[0]

        if criterion == 'gini':
            return self._gini(target, c, s)
        elif criterion == 'entropy':
            return self._entropy(target, c, s)
        elif criterion == 'error':
            return self._classification_error(target, c, s)
        elif criterion == 'mse':
            return self._mse(target)
        else:
            return self._gini(target, c, s)

    def _gini(self, target, classes, n_samples):
        gini_index = 1.0
        gini_index -= sum([(len(target[target==c]) / n_samples) ** 2 for c in classes])
        return gini_index

    def _entropy(self, target, classes, n_samples):
        entropy = 0.0
        for c in classes:
            p = len(target[target==c]) / n_samples
            if p > 0.0:
                entropy -= p * np.log2(p)
        return entropy

    def _classification_error(self, target, classes, n_samples):
        return 1.0 - max([len(target[target==c]) / n_samples for c in classes])

    def _mse(self, target):
        y_hat = np.mean(target)
        return np.square(target - y_hat).mean()

    # 決定木の事後剪定
    def prune(self, method, max_depth, min_criterion, n_samples):
        if self.feature is None:
            return

        self.left.prune(method, max_depth, min_criterion, n_samples)
        self.right.prune(method, max_depth, min_criterion, n_samples)

        pruning = False

        if method == 'impurity' and self.left.feature is None and self.right.feature is None: # Leaf
            if (self.gain * self.n_samples / n_samples) < min_criterion:
                pruning = True
        elif method == 'depth' and self.depth >= max_depth:
            pruning = True

        if pruning is True:
            self.left = None
            self.right = None
            self.feature = None

    def predict(self, d):
        if self.feature is None: # Leaf
            return self.label
        else: # Node
            if d[self.feature] <= self.threshold:
                return self.left.predict(d)
            else:
                return self.right.predict(d)
続いて、回帰木のための DecisionTreeRegressor クラスを書きます。
class DecisionTreeRegressor(object):
    def __init__(self, criterion='mse', pre_pruning=False, pruning_method='depth', max_depth=3, min_criterion=0.05):
        self.root = None
        self.criterion = criterion
        self.pre_pruning = pre_pruning
        self.pruning_method = pruning_method
        self.max_depth = max_depth
        self.min_criterion = min_criterion

    def fit(self, features, target):
        self.root = Tree(self.pre_pruning, self.max_depth)
        self.root.build(features, target, self.criterion)
        if self.pre_pruning is False: # post-pruning
            self.root.prune(self.pruning_method, self.max_depth, self.min_criterion, self.root.n_samples)

    def predict(self, features):
        return np.array([self.root.predict(f) for f in features])
DecisionTreeRegressor クラスのインスタンスに対して fit() を呼び出し回帰木の分岐点を求めます。
X_train, X_test, y_train, y_test = generate_data()
regressor = DecisionTreeRegressor(criterion='mse', pre_pruning=True, pruning_method='depth', max_depth=3)
regressor.fit(X_train, y_train)
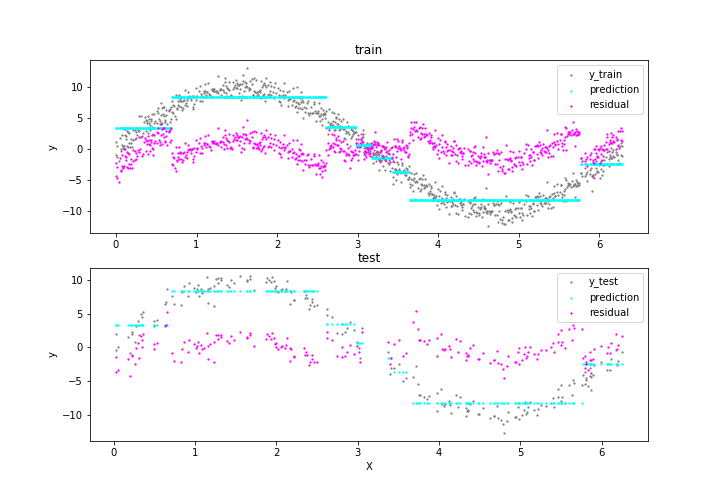
予測と残差を確認します。
def mse(y, pred):
     return np.square(y - pred).mean()

print('MSE of the Train: %.2f, MSE of the Test: %.2f' % (mse(y_train, regressor.predict(X_train)), mse(y_test, regressor.predict(X_test))))
y には標準正規分布に従うノイズが付与されているため、当てはまりが十分である場合は MSE は概ね 1 程度となることが期待されます。しかし、訓練データの MSE は 2.92、テストデータの MSE は 2.86 となりました。 従って、単一の最大深度3の回帰木では当てはまりが不十分であることがわかります。
AWSのビッグデータ活用・機械学習導入支援サービス
GBDT
今回は Gradient Boosting の回帰アルゴリズムを提案した Greedy Function Approximation: A Gradient Boosting Machine [Jerome H. Friedman, 1999] 中の LS_Boost を実装してみます。
Gradient Boosting のアルゴリズムを上記の論文から引用します。
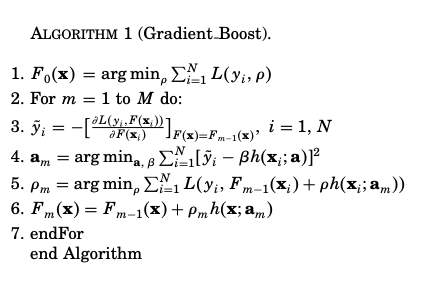
数式の表記は以下となります。
: 弱学習器の数
: 損失関数
: 加法モデル
: 入力
を引数に取るパラメータ a を持つ弱学習器
: 損失関数の負の勾配
: 直線探索 (line search) によって与えられる係数 (勾配のステップサイズ)
GBDT では、最初のモデル を決めて, m=1 から M まで損失関数が減少するように弱学習器を逐次的 (greedy stagewise) に最適化し,
を更新します。
次に、GBDT の回帰アルゴリズムのひとつである LS_Boost (Algorithm 2) のアルゴリズムは以下です。
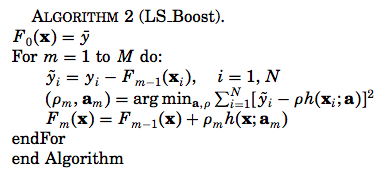
Gradient Boosting (Algorithm 1) における損失関数を二乗誤差, とすると Algorithm 1 の3行目の
はシンプルに残差
となります。また、
となるため
は
と共に最適化できます。ちなみに、GBDT の回帰アルゴリズムを GBRT (Gradient Boosted Regression Trees) と表している文献も多くあります。
早速、LS_Boost を実装し実験してみます。弱学習器である回帰木の最大深度は先程と同様に 3 としています。
X_train, X_test, y_train, y_test = generate_data()

M = 10
predictions_history = [np.repeat(y_train.mean(), len(y_train))]
test_predictions_history = [np.repeat(y_test.mean(), len(y_test))]

# LS_TreeBoost (Algorithm-2)
for m in range(M):
    y_tilde = y_train - predictions_history[-1]
    base_learner = DecisionTreeRegressor(criterion='mse', pre_pruning=True, pruning_method='depth', max_depth=3)
    base_learner.fit(X_train, y_tilde)

    prediction = predictions_history[-1] + base_learner.predict(X_train)
    test_prediction = test_predictions_history[-1] + base_learner.predict(X_test)

    train_mse = mse(y_train, prediction)
    test_mse = mse(y_test, test_prediction)

    predictions_history.append(prediction)
    test_predictions_history.append(test_prediction)

    print("[%d] column: %d, threshold: %f, mse-of-train: %.2f, mse-of-test: %.2f\n" %
                  (m+1, base_learner.root.feature, base_learner.root.threshold,
                   train_mse, test_mse) + "-" * 50)
残差に対して fitting を行う回帰木を逐次的に追加しモデル F を更新していく様子を確認します。
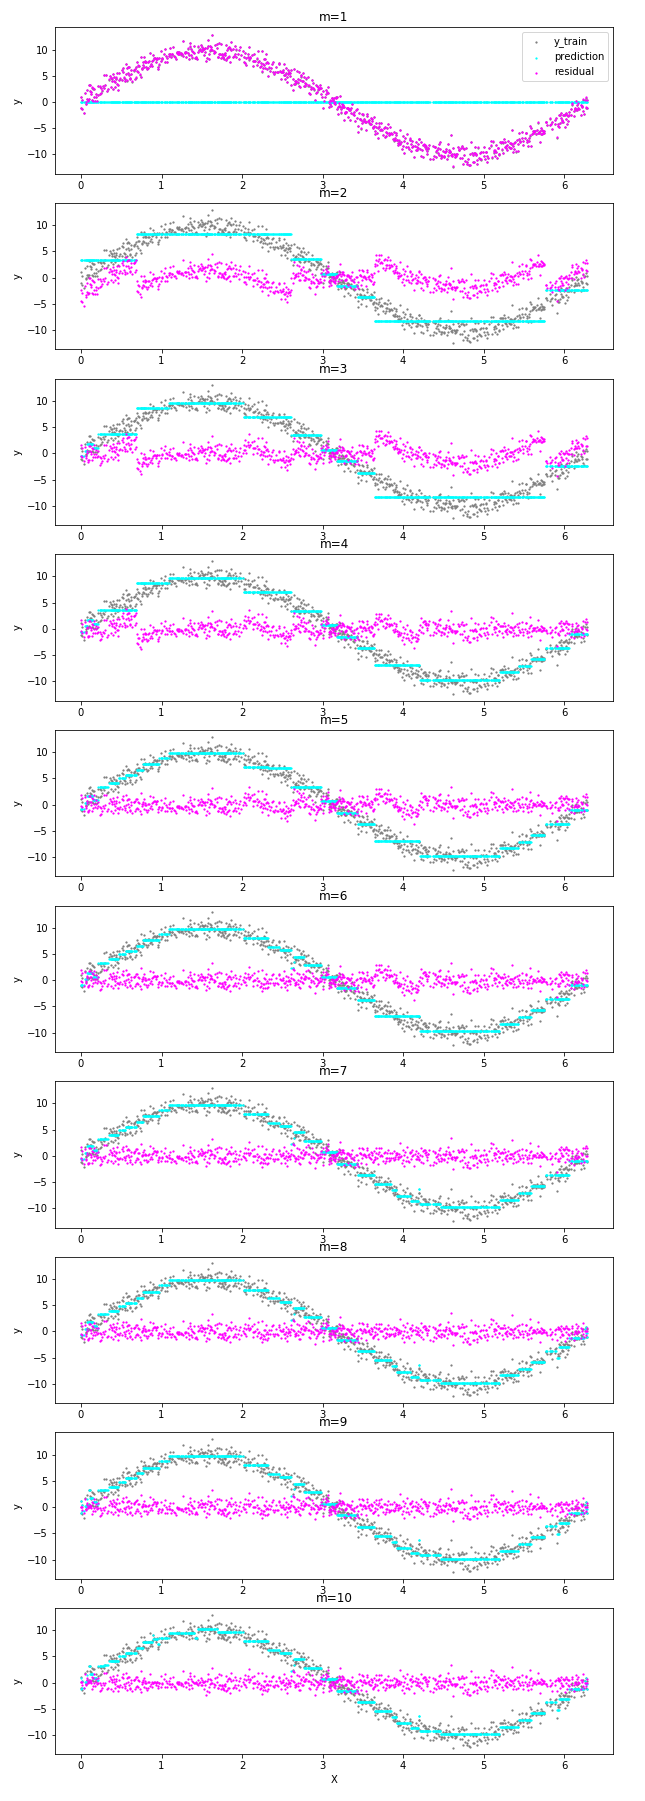
m=1 から 10 までの MSE の推移は以下です。
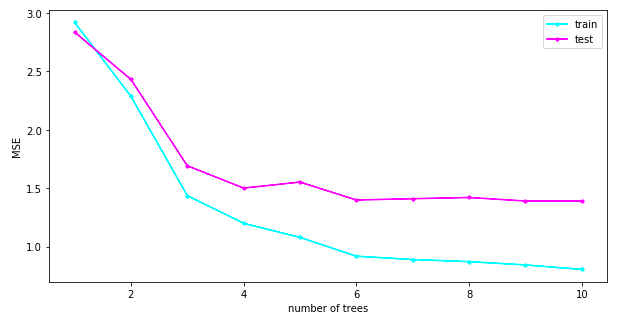
m=10 の段階で、訓練データの MSE は 0.81、テストデータの MSE は 1.39 となりました。一方で、m=8 前後からノイズに fitting している箇所が出てきています。論文中では、GDBT の正則化パラメータである弱学習器の数 M や学習率により過学習を制御する方法が紹介されています。
おわりに
この記事では、GBDT の回帰アルゴリズムのひとつである LS_Boost を実装し、LS_Boost が残差に対して fitting を行う回帰木を逐次的に追加しモデルを更新していく様子を確認しました。 今回の実装は GBDT のアルゴリズムを理解するためのものでしたが、Kaggle に代表されるデータサイエンスコンペティションで人気を集めている XGBoost や LightGBM では GBDT を大規模データに適用するための様々な高速化・効率化の手法が実装されています。[1,2]
AWSのビッグデータ活用・機械学習導入支援サービス
参考文献
[1] XGBoost: A Scalable Tree Boosting System [Chen, 2016]
[2] LightGBM: A Highly Efficient Gradient Boosting Decision Tree [Ke et al., 2017]
[3] Python機械学習プログラミング 達人データサイエンティストによる理論と実践
【事例集】AIや機械学習によるビッグデータ活用をしたい方にオススメ!

「AIによるキャスト評価システムの構築」「データ分析基盤の運用費用9割削減」など、AWSを利用したAI、機械学習の成功事例をご紹介します。
テックブログ新着情報のほか、AWSやGoogle Cloudに関するお役立ち情報を配信中!
Follow @twitter2016年11月、データサイエンティストとして中途入社。時系列分析や異常検知、情報推薦に特に興味があります。クロスバイク、映画鑑賞、猫が好き。
Recommends
こちらもおすすめ
-

FIT2018 第17回情報科学技術フォーラム参加報告(2)メタ分析編
2018.9.21
-

機械学習の受託案件を通じて気づいた5つのこと
2019.3.8
-

AWS GlueとAmazon Machine Learningでの予測モデル
2017.12.17
-

うわさのMicrosoft 365 Businessをさわってみた
2017.12.20
Special Topics
注目記事はこちら

データ分析入門
これから始めるBigQuery基礎知識
2024.02.28

AWSの料金が 10 %割引になる!
『AWSの請求代行リセールサービス』
2024.07.16


